
Transform old kitchen cabinets into a stunning DIY sideboard. This simple project brings style and functionality to any room. Need extra storage in the living room?
Want a chic addition to your dining space? Repurposing kitchen cabinets is your answer. You can create a custom piece that perfectly fits your needs.
This renovation is affordable. It helps you develop DIY skills. It also contributes to sustainable living. You give new life to materials that might otherwise be wasted. Kitchen cabinets make an excellent foundation. They’re sturdy.
They’re modular. They’re designed to bear weight. This makes them perfect for supporting decorative items. They can hold serveware. They can even support entertainment equipment.
Should You Use Kitchen Cabinets for DIY Sideboard?
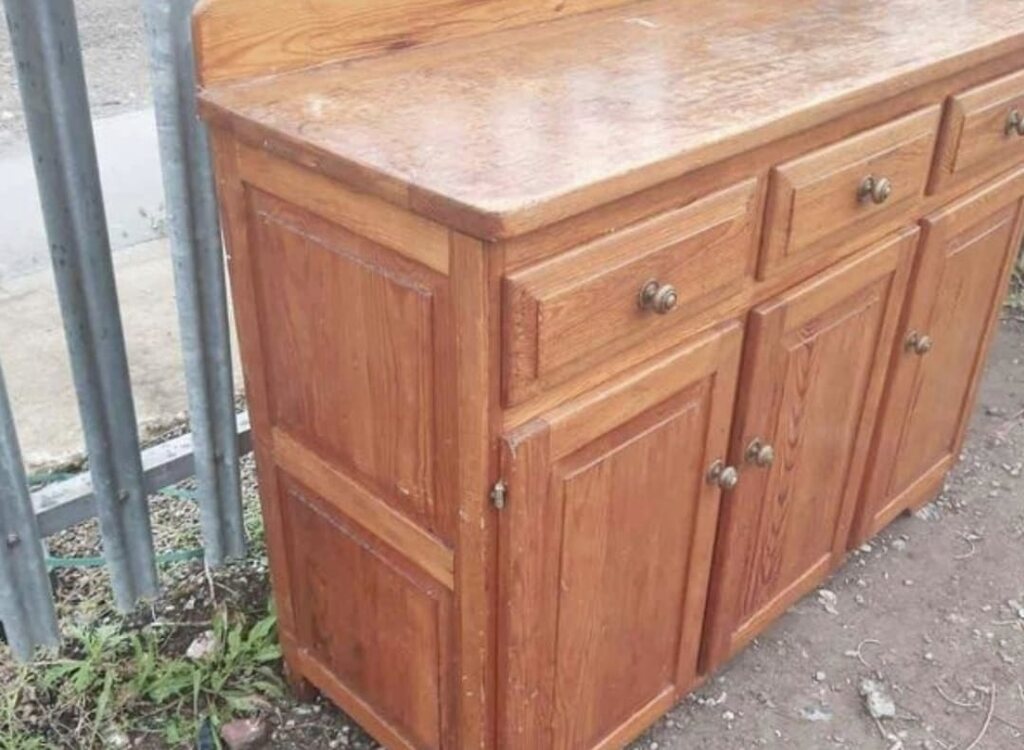
Kitchen cabinets are an excellent choice for creating a sideboard because they are rugged, versatile, and not too expensive. While considering the reuse of a kitchen cabinet, the structure stood out as a main advantage.
They are really meant to carry heavy objects and thus can be easily used as support for decorative items, serveware, or even a TV, if necessary. Again, their modular design makes them more suitable for different configurations.
The other advantage was that used kitchen cabinets were readily available from local thrift stores, which saved money and gave new life to something otherwise discarded.
It is also an eco-friendly approach, which goes well with sustainable living. I selected a cabinet with clean lines and a solid frame, thinking it would make a great sideboard for my space, sleek and chic.
Choose a kitchen cabinet in good condition. Avoid those water-damaged or with other structural issues, since those may compromise the final outcome. Look for one to fit your space and its storage needs.
Through my choice of a kitchen cabinet, I ensured a durable foundation adaptable to whatever customization could create a blend of functionality with a touch of style. After all, this approach proved practical yet creative.
Planning Your DIY Sideboard Using Kitchen Cabinet
I began by determining the exact purpose and location of the sideboard. For me, it was destined for the dining room to store dinnerware and table linens.
Measurements played a crucial role. We measured the available space carefully in terms of the width, depth, and height of the cabinet so that the final piece would fit perfectly and not overpower the room.
I sketched a rough layout and decided where to place the shelves and what type of finish was needed. Budgeting was another critical step.
Then we listed all the materials and tools needed, allocating funds for paint, hardware, and decorative accents. Setting a budget kept me focused and prevented overspending.
Always leave a little wiggle room in your budget for unexpected costs, such as additional screws or replacement tools.
This clearly presented to me how things should be done, lessening errors and ensuring a smooth run from start to finish of the project.
Materials Needed for the DIY Sideboard
Materials
Getting all the right materials was critical in this project. Here is what I used:
- Kitchen Cabinet(s): The foundation of the project was for the sturdiness and the size.
- Sandpaper or Sanding Block: Required for the preparation of the cabinet surface.
- Primer and Paint: I picked a good primer and semi-gloss paint for durability and a professional finish.
- Handles and Hardware: Installing new knobs and handles gives the design a lift.
- Wood glue and filler: useful for minor imperfections.
- Sealer: Used to protect the finish from wear and tear.
- Trim or molding: Just for decorative flair.
Tools
- Screwdriver/Drill: For dismantling the cabinet and for attaching hardware.
- Measuring Tape: To ensure exact dimensions.
- Paintbrushes/Roller: Gave an even spread of paint.
- Saw: Resized the cabinet and added a custom top.
- Level: Made the sideboard level.
- Clamps: Held pieces together when assembling.
Invest in quality tools, for they make the process smoother and yield better results. Also, borrowing tools is another cost-effective option if you do not have them.
Getting all the materials and equipment beforehand would avoid delays, ensuring I had everything required to do the project flawlessly.
Step-by-Step Guide to Building Your DIY Sideboard
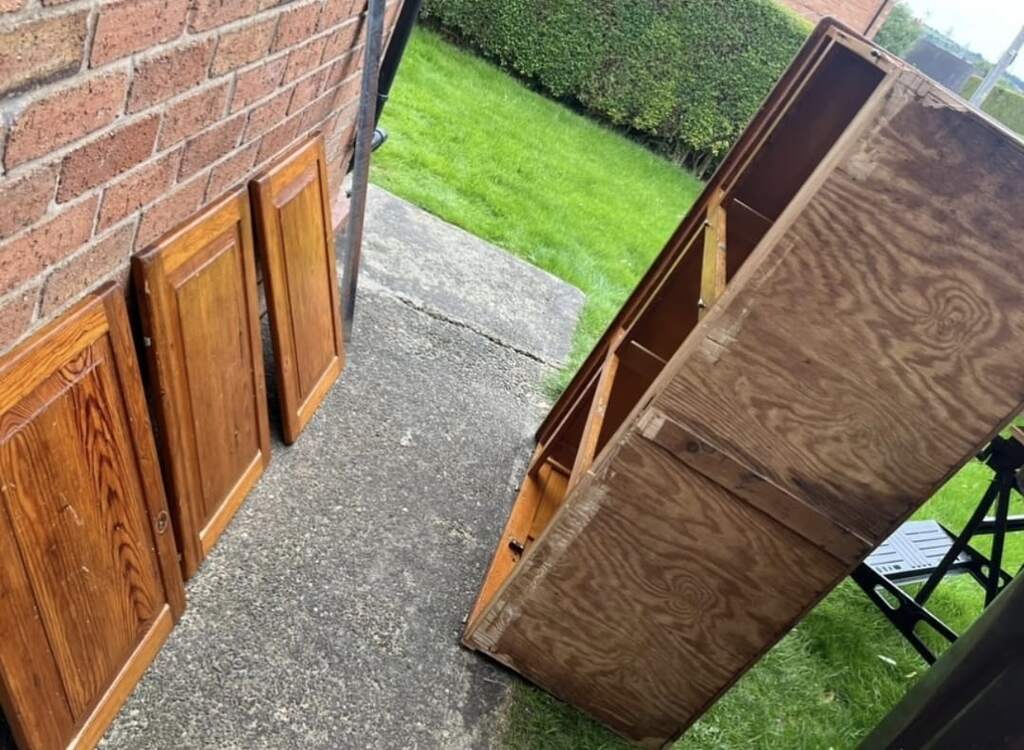
Step 1: Prep the Cabinets
I first removed all doors, drawers, and hardware from the cabinet. This made cleaning and painting much easier.
Next scrubbed the cabinet with mild detergent to remove grease and grime. The whole surface was sanded with medium-grit sandpaper, and this helped ensure the primer adhered well for a smooth painting base.
Sanding also removes the old finishes, so it can give the cabinet a refreshing finish. Wearing a mask is crucial when sanding because you do not want to breathe in dust. Always make sure the cabinet is dry before proceeding to the next step.
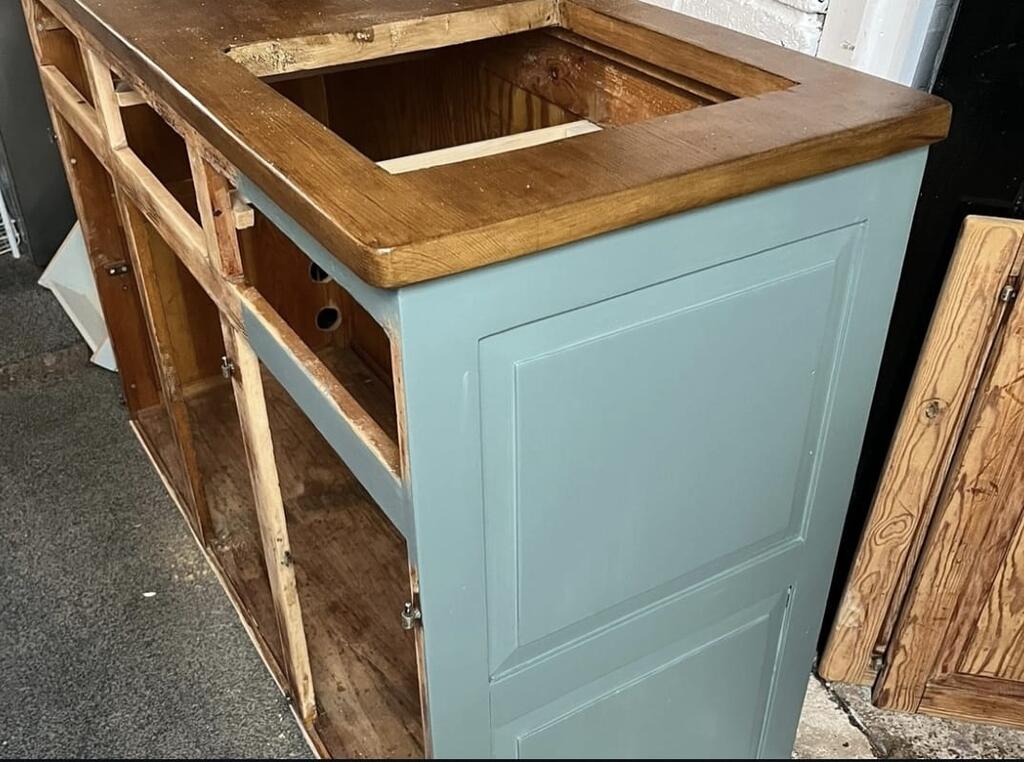
Step 2: Customize the Cabinet
Customization enabled me to make the sideboard unique. With the use of a saw, I cut the cabinet to fit the available space appropriately.
Then fill up the holes or cracks by using wood filler.Next we sanded the areas to smooth them out after it dried. Adding trim around the edges raised the design, giving a more polished and decorative look to the product.
Measure twice and cut once to avoid mistakes. Clamps are helpful when securing pieces during this stage.
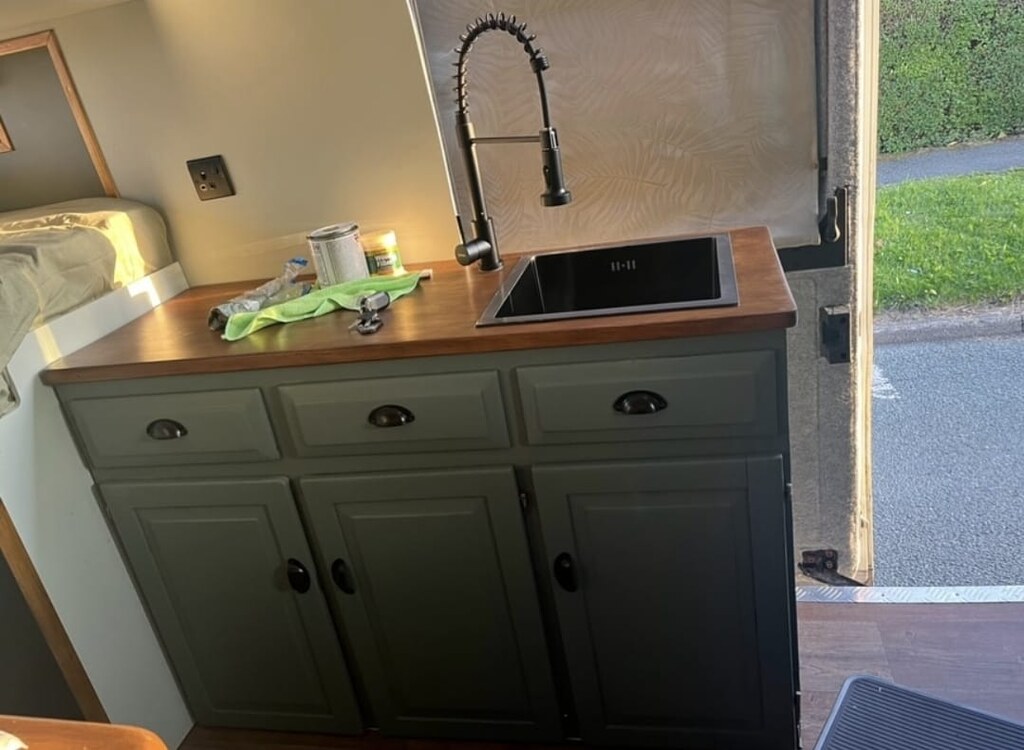
Step 3: Paint or Stain
Painting was one of the most rewarding steps. I applied a coat of primer first, which made the base even and helped the paint stick well.
After the primer had dried, we applied two coats of semi-gloss paint using a roller in rich navy blue. This color complimented my dining room decor perfectly.
If you prefer a natural wood look, staining is an alternative. A clear sealer added durability and protected the finish. Allow each coat to dry fully before applying the next to avoid streaks or unevenness.
Step 4: Add Features
The sideboard transformed with new hardware. Brushed gold handles gave it an elegant feel. I also added adjustable shelves in the cabinet to enhance the organization of things stored.
The butcher block, attached on top, not only functioned as a work surface but also gave the room a warm feel. Screw and glue the butcher block for stability.
Step 5: Assemble and Place
Putting all the cabinet pieces back together was the final part. I reattached the doors and drawers, being very sure to keep them aligned.
Using a level, we put the sideboard in its intended location. To secure it further, next, we attached brackets to the wall for added stability.
Putting some decorative accents, such as vases and books, on the sideboard brings the whole project alive.
DIY Design Ideas for Your Sideboard
It allows me to have my style, and with the sideboard, I used modern design, clean lines, and bold colors. Adding a trim on it gives the high-end look, but the top in the butcher block gives that warm feeling.
For rustic, good designs are distressed finishes and farmhouse-style hardware. It is essential that you have matching designs in other parts of the house for the sideboard to not stand out when placed there.
Customizing Your Sideboard for Different Uses
Customizing the sideboard for its intended use maximized its functionality. For my dining room, it provided ample storage for tableware and linens.
It could just as easily serve as a media console or entryway organizer, showcasing its versatility.
Important Note: Consider adjustable shelves and multi-functional features to make the sideboard adaptable to various needs.
Maintenance Tips for Your DIY Sideboard
Maintaining your DIY sideboard ensures it stays looking fresh and functional for years. Regular cleaning is important to keep dust and dirt from accumulating on the surface.
Use a microfiber cloth to gently wipe down the sideboard, which prevents scratches while removing particles. This will help maintain its smooth finish.
Be proactive about spills as well—wipe them up immediately to avoid stains or moisture damage. A damp cloth with some mild dish soap is adequate for cleaning spills, after which the surface should be dried with a soft towel.
Avoid using harsh chemical cleaners, as they could damage the paint or the wood finish. Instead, use mild cleaners or those specifically meant for wood surfaces.
Place coasters or placemats beneath dishes, glasses, and other decorations atop the sideboard to not let dirt and other damage affect your sideboard each day. This common activity prevents heat marks or scratches when they usually form on that surface.
To avoid the main structure becoming unstable, check and tighten any loose or screwed hardware over time. Taking these measures ensures that your DIY sideboard remains beautiful and serves the purpose, of making it stand out in your house.
Time to Decorate the DIY Sideboard
The final step in this rewarding project was to decorate the DIY sideboard made from kitchen cabinets.
I placed a big mirror on top of it with matching lamps on either side, making it seem wider by illusion. To add a touch of greenery, we have placed a potted plant on one side.
At the top, I have placed decorative trays and small ceramic bowls to hold small items like keys. Both functional and beautiful, at the same time, it looks rather cozy when I have a few scented candles and have placed a small stack of books.
When decorating, balance is key. Avoid overcrowding the surface and focus on layering textures and heights for a cohesive look.
Decorating transformed the DIY sideboard from kitchen cabinets into a stunning and practical addition that reflected my taste and made the space feel complete.
Conclusion
Transforming a kitchen cabinet into a beautiful sideboard is a rewarding journey of creativity and resourcefulness. With basic tools, paint, and imagination, you can breathe new life into an old piece of furniture, creating something both functional and stylish for your space.
This project demonstrates how repurposing can yield high-quality, customized furniture at a fraction of retail costs. Your DIY sideboard will not only provide practical storage but also serve as a conversation piece that showcases your style and craftsmanship.
Whether you use it to display treasured decorative items or for everyday storage, your handcrafted sideboard stands as a testament to sustainable living and the satisfaction that comes from creating something beautiful with your own hands.
FAQs
Why should I consider making a DIY sideboard from kitchen cabinets?
Kitchen cabinets offer the perfect foundation for a sideboard due to their sturdy construction, built-in storage features, and modular design. This project allows you to create custom furniture perfectly sized for your space while saving significantly compared to store-bought options ($300-$1000). It’s also an environmentally conscious choice that reduces waste.
What materials do I need for this project?
Essential materials include: a kitchen cabinet in good condition, sandpaper, primer, paint, new hardware, wood filler, sealer, and optional decorative trim. Required tools are: screwdriver/drill, measuring tape, paintbrushes/roller, saw (if resizing is needed), level, and clamps. Quality materials ensure professional-looking, long-lasting results.
How do I prepare cabinets for transformation?
Begin by removing all doors, drawers, and hardware. Clean thoroughly with mild detergent to remove grease and grime. Sand all surfaces with medium-grit sandpaper to create texture for primer adhesion. Fill any holes with wood filler and ensure everything is completely dry before painting. Always wear a mask during sanding.
How long does this project typically take?
Most people can complete this project on a weekend. Preparation and sanding take 2-3 hours, customization another 2-3 hours, and painting requires time between coats (about 24 hours total). Hardware installation takes under an hour. Allow for proper drying time between steps for best results.
What’s the approximate cost of this project?
The total cost typically ranges from $50-$200 depending on your choices. Used cabinets can be found for $20-$50 at thrift stores, paint and primer cost around $30-$40, hardware ranges from $15-$50, and decorative elements may add another $20-$60. This represents substantial savings compared to purchasing a new sideboard.