
When I first moved into my living space, I knew it was missing a focal point, something that would bring warmth, charm, and transform the atmosphere, especially during colder months. After careful consideration, I decided to tackle building my DIY corner fireplace.
What began as a practical project to add warmth quickly became a transformative experience. This simple addition reshaped my room into an intimate, inviting space where I could unwind after a long day with a cup of tea by the fire.
If you’re considering a similar project, I can confidently say it’s worth the effort. Beyond the practical benefits, it’s a rewarding experience that allows you to customize your space according to your vision. In this guide, I’ll walk you through my process, share personal insights, and offer practical advice to help you create your corner fireplace.
Materials and Tools Needed
Before building anything, I wanted to collect every piece of equipment and tool to make this piece. Here’s what I utilized for my build.
Materials:
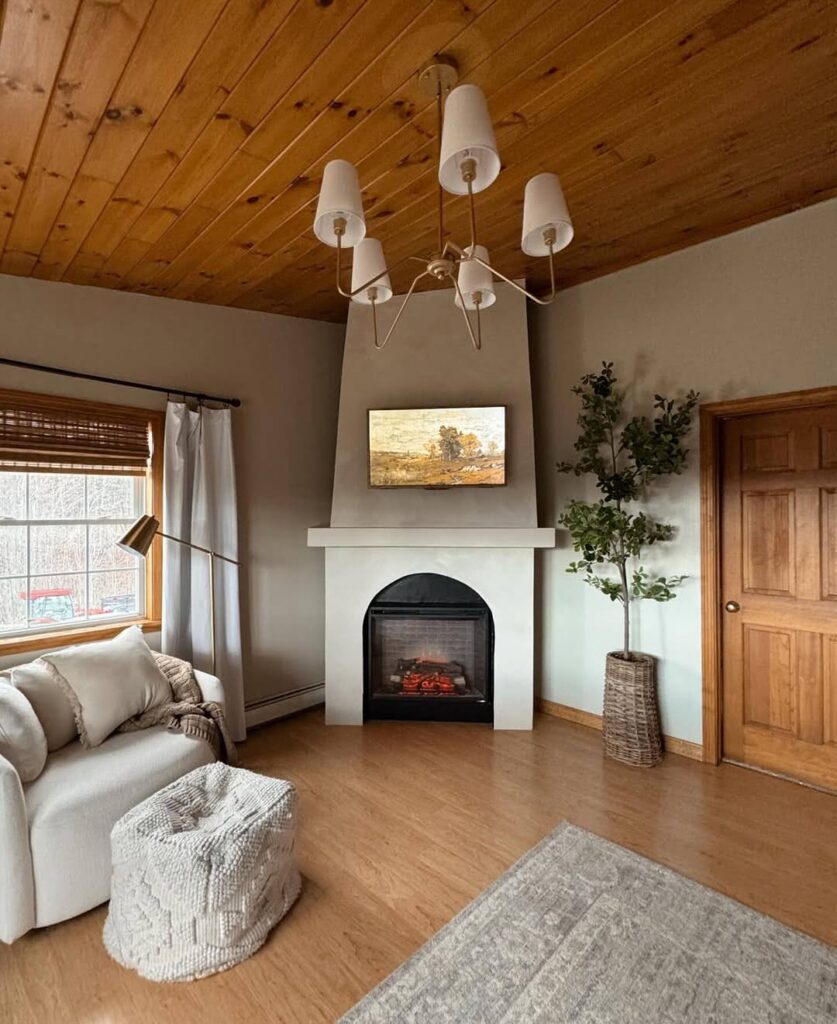
- Fireplace Insert: I did opt for the electric one mainly for easy install and safety, as you’ll discover an endless option according to the type of appearance you desire, considering available space.
- Wood or Stone: I made use of wood for the outer frame, but you can use stone veneer or bricks for a rustic look.
- Brackets and Screws: To make sure that the frame is stable and holds firm together.
- Drywall or Veneer: For the surface of the outer frame, I put up stone veneer for a glossy appearance.
- Paint or stain: To make it personal and make the frame complement your room’s decor.
Tools:
- Circular Saw: For cutting the wood to size.
- Drill and Bits: For screwing in the screws and brackets.
- Measuring Tape and Level: For precision.
- Screwdriver and Hammer: To put the frame together.
- Safety Gear: Safety goggles and gloves should always be worn when using tools!
Step 1: Planning the Space
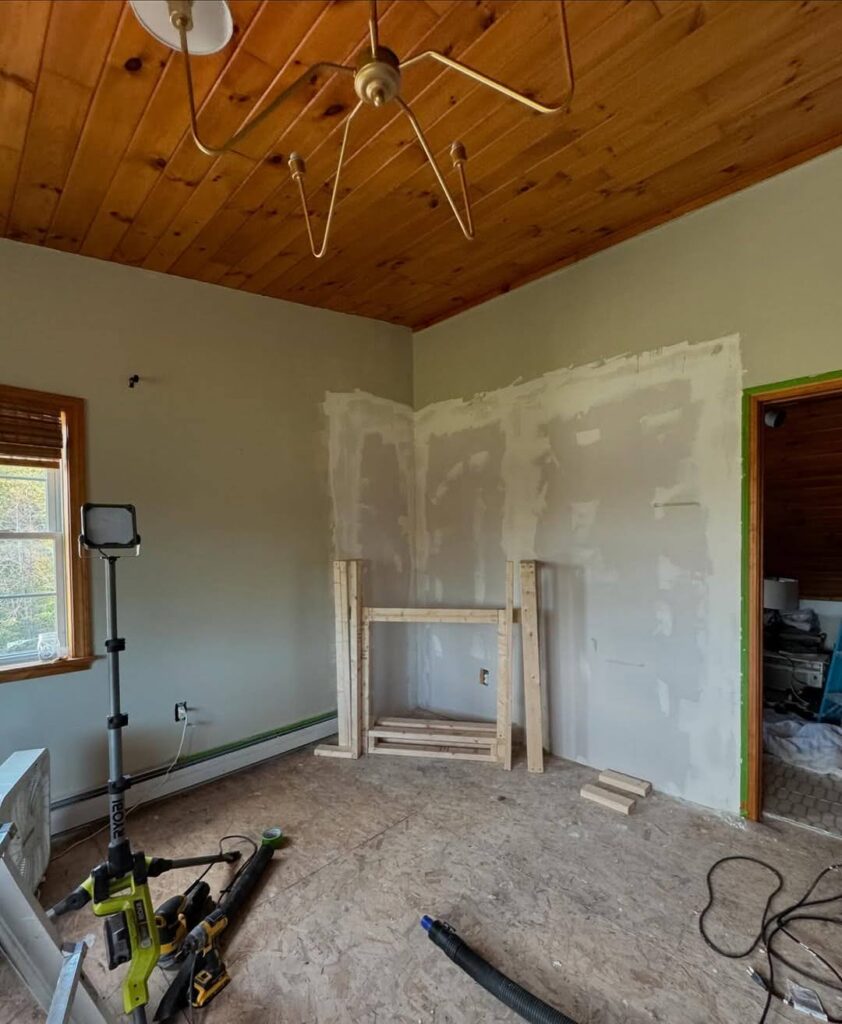
This is where the fun begins. I spent some time picking the right corner for my fireplace. Choosing the Right Corner: It is important to choose the right corner in your room.
I chose a corner that was close to my seating area so I could enjoy the warmth while relaxing. It’s also important to avoid placing the fireplace in a spot that might obstruct doorways or create awkward traffic flow.
Measuring the space: I took measurements to be sure there would be enough space for the fireplace insert and some safety clearance. One thing I learned doing this is that accuracy is key.
I made sure to leave space for airflow so that the fireplace wouldn’t become too hot or feel cramped.
Design Considerations: Think about the style of the room and how the fireplace will fit into that. I opted for a modern yet rustic look by using a combination of wood and stone veneer.
Whatever style you choose, make sure it complements the existing decor in your home.
Step 2: Building the Frame
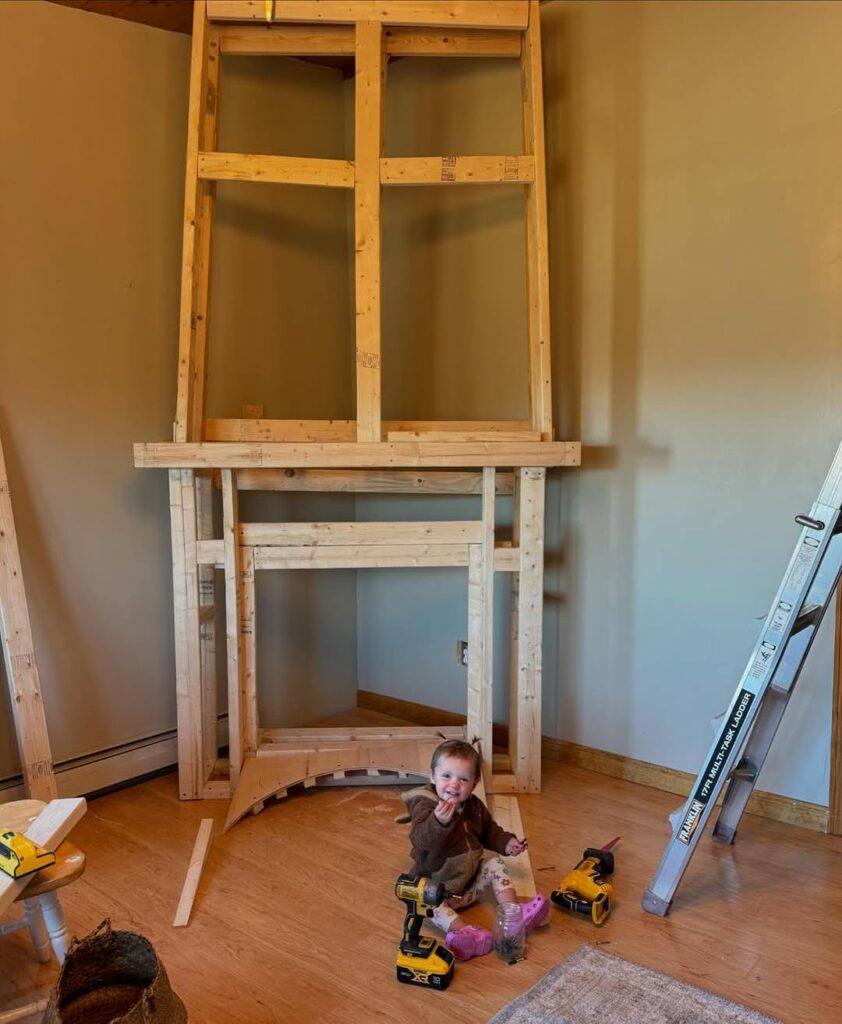
The frame is the foundation of your DIY corner fireplace. This is where the real craftsmanship happens!
Building the Frame: I used 2×4 lumber for the base and sides of the frame. Measuring and cutting the pieces carefully with a circular saw, I assembled the frame using brackets and screws. The frame needs to be square and level, so I checked with a level as I went.
Ensure Stability: The frame must support the weight of the fireplace insert. So, it is essential to assemble it properly. For additional support, I added plywood to the back of the frame. This added a solid surface for mounting the insert and made everything feel more sturdy.
Tip: Be patient while doing this. Measure everything twice to avoid mistakes, as I had to make a couple of adjustments when I realized I didn’t leave enough clearance for venting.
Step 3: Installing the Fireplace Insert
Now comes the fun partthe actual installation of the fireplace insert.
Choosing the Insert: I chose an electric fireplace insert because it is easy to install and does not require complicated venting. If you want a more authentic fire experience, you can opt for a gas or ethanol insert, but these require venting.
Mounting the Insert: This part was straightforward; I attached the insert into the frame with brackets and screws, making sure it was fitted and centered. In wiring the insert, it was important to strictly follow the manufacturer’s recommendations since electric inserts require specific types of power connections.
Tip: When installing a gas or ethanol insert, take appropriate safety precautions with venting and strictly adhere to the installation guidelines.
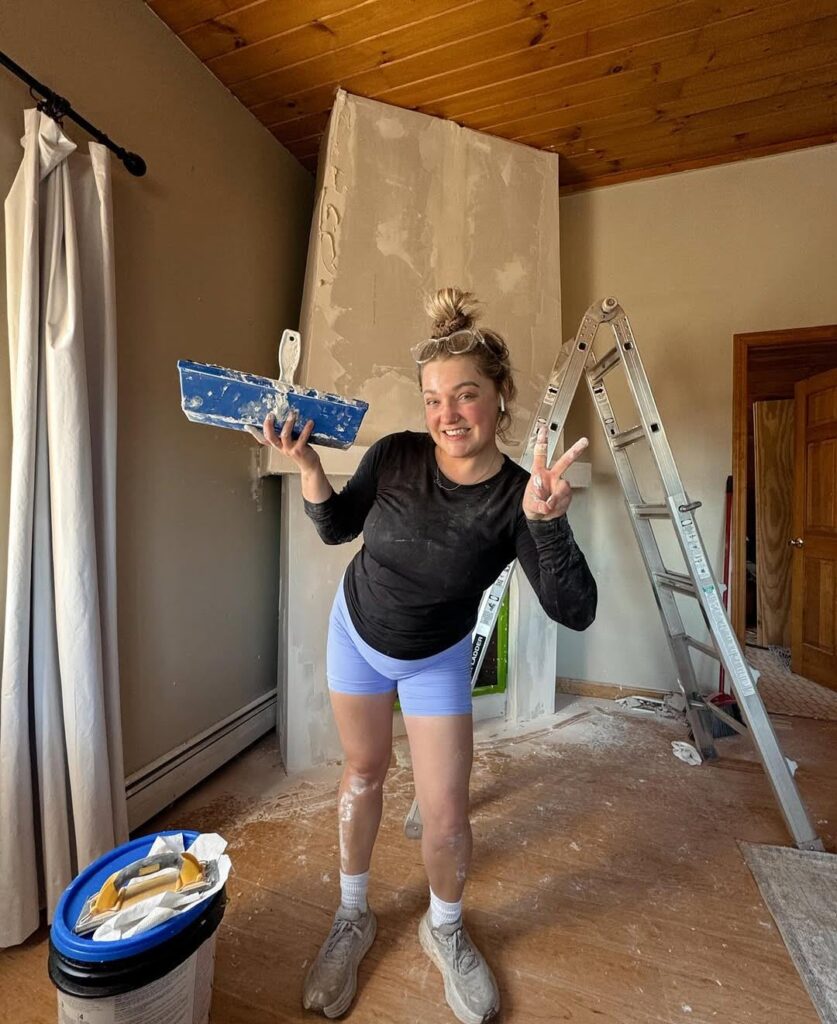
Step 4: Add Finishing Touches
Once the insert was in place securely, it was time to complete the look of the fireplace and make it more personalized.
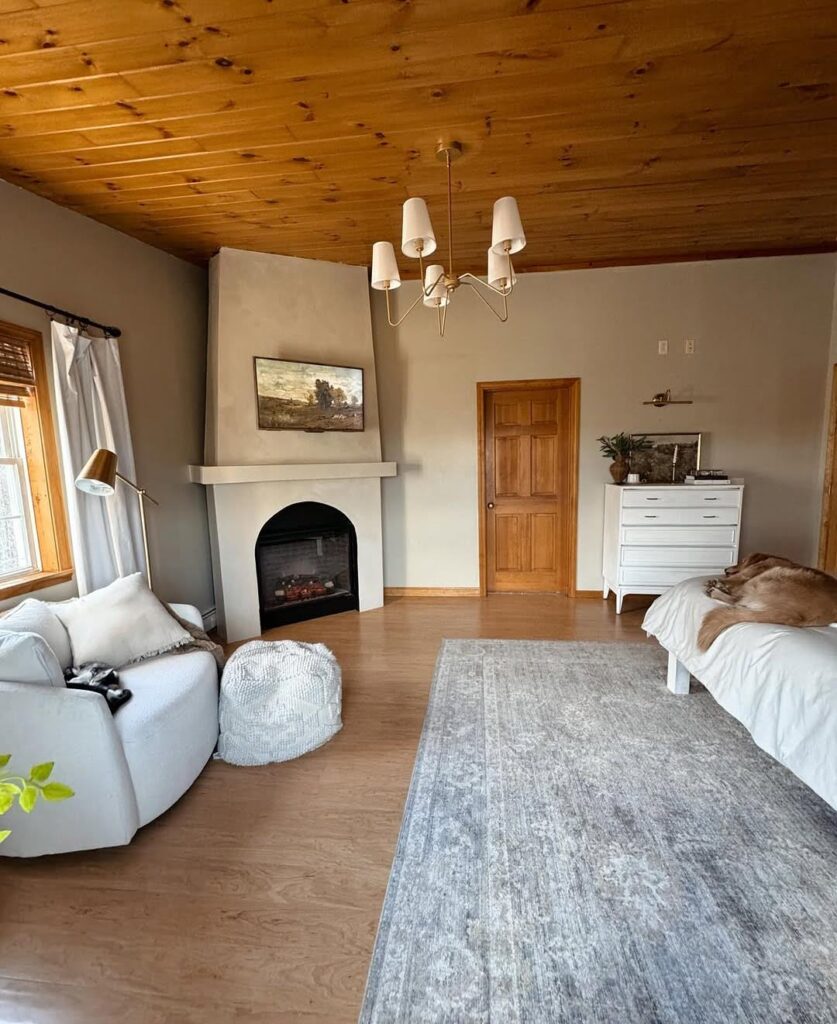
Stone veneer or drywall: I used stone veneer all around the frame to give a very modern feel. The veneer is really easy to work with and will give a finished look to your fireplace. For a more traditional look, you can use wood paneling or even drywall for a smoother finish.
Personalizing the Space: I added a small mantel above the insert to make the space feel more complete. The mantel serves as a perfect space for candles, plants, or even a clock. I also painted the wood frame to match the rest of the room’s decor, tying everything together seamlessly.
Step 5: Safety Precautions and Testing
Safety should always come first when working with heating elements.
Safety Check. Before actually igniting the fireplace, I verified that there is enough space for the insert and furniture. The wiring was secure on the electric insert.
Test. After getting all things right, I powered it on, which ignited the corner fireplace and had the heating element working accordingly. There was also no risk of electrical or fire hazards.
Maintenance of Your DIY Corner Fireplace
Now that your cozy corner fireplace is up and running, a simple maintenance routine will keep those flames dancing safely for years to come!
For My Electric Insert: I’ve made maintenance part of my Sunday morning ritual. With coffee in hand, I gently wipe down the glass using a microfiber cloth dampened with a bit of water, no harsh chemicals needed! Every month, I unplug it and check behind the unit for dust bunnies that love to gather there. Those hidden vents need breathing room to prevent overheating during movie nights.
For Gas or Ethanol Users: My neighbor’s gas insert taught me the importance of professional check-ups. She schedules an annual inspection each fallperfect timing before heavy use during winter. Between visits, she keeps the burner clean using a soft brush to prevent soot buildup, which can affect both efficiency and aesthetics. Those little flames should be blue and steady, not orange and dancing wildly!
I’ve learned the hard way that neglecting your fireplace leads to diminished performance. Last winter, my unit wasn’t heating well until I discovered dust had completely clogged the internal fan. Fifteen minutes of maintenance would have saved me from a chilly week!
Remember: Your fireplace isn’t just beautiful, it’s a heating appliance that deserves proper care to keep it
FAQs
How much does it cost to build a DIY corner fireplace?
My project ran about $450, but yours might vary! The electric insert was my biggest splurge ($250), while wood and stone veneer made up the rest. Budget tip: check thrift stores for secondhand inserts. I almost scored one for half price!
Do I need a permit to install a DIY corner fireplace?
For my electric insert, no paperwork needed, what a relief! Gas or ethanol? That’s another story. I recommend a quick call to your local building department before starting. My neighbor skipped this step and regretted it during a home inspection!
Is a DIY corner fireplace a good fit for a small room?
Absolutely! My 300-square-foot apartment was transformed by tucking a fireplace into that awkward corner behind my reading chair. The angled design made the room feel larger and created a natural conversation area I never had before.
How do I care for my DIY corner fireplace?
I spend five minutes each week wiping the glass with a microfiber cloth and checking connections. It’s become part of my Sunday ritual: dust, check wiring, then sit back with coffee and enjoy the flames. Simple maintenance equals years of cozy evenings.
Conclusion
Building my DIY corner fireplace was a rewarding project that not only added warmth to my home but also transformed its atmosphere. Its incredible how a simple addition can make a room feel so cozy and inviting.
This project has truly become a centerpiece in my living space, providing both functionality and charm. If you want to improve your home without a major renovation, then making your DIY corner fireplace is a great way to go.
Whether you choose an electric, gas, or ethanol insert, it’s a customizable project that can fit any style. I am thrilled with the results and encourage you to give it a try. You will love the sense of accomplishment and the cozy ambiance it brings to your home.