
Protecting your butcher block shouldn’t feel like solving a mystery. Yet with dozens of sealers claiming to be “the best,” finding the right one can be overwhelming.
In this guide, I’ll walk you through everything you need to know about butcher block sealers – from food-safe options to waterproof finishes that won’t yellow over time.
You’ll discover:
- Which sealers are truly food-safe
- How often different sealers need reapplication
- Budget-friendly options that actually work
- Professional recommendations based on real testing
I’ve spent years working with wood finishes and have tested every major butcher block sealer on the market. My countertops and cutting boards get heavy use in my home kitchen, so I know firsthand what holds up and what fails.
No more wasting money on products that don’t deliver. Let’s find the perfect sealer for your butcher block.
Why Sealing Your Butcher Block Is Essential
Imagine cutting vegetables on your beautiful new butcher block, only to find it warped and stained a month later. I’ve seen this happen too many times.
Unsealed wood is like a sponge. It soaks up everything it touches – water, wine, meat juices, and even bacteria. This isn’t just about looks; it’s about protecting your investment.
When I first installed butcher blocks in my kitchen, I learned this lesson the hard way. Within weeks, water rings appeared around the sink area. Coffee left permanent marks. Chicken juice created tiny grooves that harbored bacteria.
Here’s what proper sealing prevents:
- Water damage that causes warping and cracking
- Food stains that won’t scrub out
- Bacteria growth in wood pores
- Premature aging and dullness
Did you know? Unsealed butcher blocks can absorb up to 8% of their weight in water – enough to cause serious warping.
The good news? A proper seal creates a barrier that keeps your butcher block beautiful for years, not months. And it only takes an afternoon to apply.
Types of Butcher Block Sealers (Pros and Cons)
Finding the right sealer can make or break your butcher block experience. I’ve tried them all over the years, and each has its place depending on how you use your countertops.
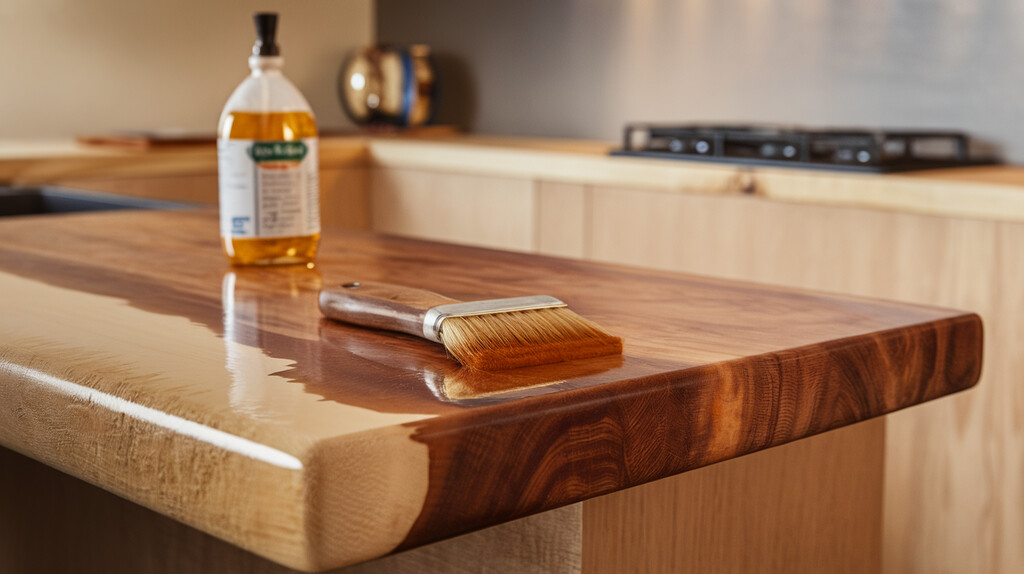
1. Mineral Oil
The classic standby that won’t let you down. Mineral oil is completely food-safe and costs just a few dollars per bottle.
I love how easy it is to apply, just wipe it on with a cloth and let it soak in. No special skills needed.
The downside? You’ll need to reapply it every 1-2 weeks when your counter is new, and monthly after that. Water still beads up initially but will eventually soak in.
2. Beeswax & Oil Blends
These natural blends give your wood a beautiful soft glow and pleasant scent. The beeswax helps the oil stay on the surface longer.
They’re perfect for cutting boards you don’t use daily.
However, they offer less protection against heavy water exposure. I found they work best in areas away from sinks.
3. Tung Oil (Pure & Polymerized)
This is what I use on my own kitchen island. Pure tung oil penetrates deep into the wood fibers and creates a water-resistant barrier.
Once cured, it withstands hot pans better than mineral oil ever could.
Be warned: Pure tung oil takes 3-7 days to fully dry between coats. Polymerized versions dry faster but some contain additives that aren’t food-safe.
4. Water-Based Polyurethane
Want a “set it and forget it” solution? Water-based poly creates a hard, clear shell that rarely needs maintenance.
It’s great for counters that see tons of water exposure.
Remember: Only some formulations are food-safe, so check the label carefully. This finish sits more on top of the wood rather than soaking in.
5. Oil-Based Polyurethane
The toughest protection available. This finish creates a plastic-like barrier that nothing gets through.
It adds a warm amber tone that deepens over time.
The tradeoffs? It smells strong during application and takes up to a week to fully cure. Not ideal if you need to use your kitchen right away.
6. Hardwax Oil (e.g., Rubio Monocoat)
This premium option gives you the best of both worlds, the penetration of an oil with the protection of a hard finish.
I’ve seen hardwax oil withstand years of abuse with minimal maintenance.
Key Factors to Consider Before Choosing a Sealer
Not all butcher blocks serve the same purpose. Before grabbing any sealer off the shelf, think about how you’ll actually use your wood surface.
1. Usage Type
The big question: Will you cut directly on this surface?
If you’re using your butcher block as a cutting board, you need a food-safe finish that won’t chip into your food. Mineral oil and beeswax blends shine here.
For countertops where you’ll always use cutting boards, your options open up. I’ve found polyurethane finishes work great when you never cut directly on the surface.
2. Food-Safe vs Non-Food-Safe
This isn’t just about preference, it’s about safety.
Any surface that touches food needs a finish that’s FDA approved for food contact. Look for products specifically labeled “food safe” or “food grade.”
Warning: Some products claim to be food-safe after curing, but the FDA hasn’t actually approved them. When in doubt, stick with mineral oil or pure tung oil for areas where food is prepared.
3. Appearance Preferences
Do you want your wood to look natural or polished?
Oil-based finishes create a rich, warm look that enhances the wood grain. They typically dry to a satin or matte finish that feels natural under your hands.
Film-forming finishes like polyurethane can be glossy, semi-gloss, or satin. The higher the shine, the more it looks like there’s something on top of the wood.
4. Maintenance Commitment
Be honest with yourself about maintenance.
Will you really reapply oil every month? If not, consider a harder finish.
I recommend mineral oil only to people who don’t mind the regular ritual of maintaining their wood. For busy households, a once-a-year refresher coat of hardwax oil might be more realistic.
5. Budget
The cheapest option isn’t always the most economical. Mineral oil costs about $8 per bottle, but you’ll use several bottles per year.
Premium finishes like Rubio Monocoat cost $70+ initially but might last 3-5 years before needing reapplication.
I always calculate the annual cost rather than just the upfront price. Sometimes spending more now saves money (and time) later.
Best Sealer Recommendations for Different Use Cases
Not all kitchens are created equal. Your perfect sealer depends on how you cook, clean, and live.
1. For Food-Prep Surfaces
- Top pick: Howard Butcher Block Conditioner
- Blend of mineral oil, beeswax, and carnauba wax
- Completely food-safe for direct cutting surfaces
- Easy to reapply when needed
- DIY alternative: 4:1 mixture of mineral oil and beeswax
- Fully natural option
- Apply monthly or when wood looks dry
- Most economical choice
- Key requirement: Must not chip, flake, or leach chemicals into food
2. For High-Moisture Kitchens
- Top pick: Waterlox Original Sealer/Finish
- Tung oil-based with excellent water resistance
- Allows wood to breathe while protecting surface
- Lasts 2+ years near sink areas with proper application
- Premium alternative: Rubio Monocoat
- One-coat application saves time
- Superior water resistance
- Higher initial cost but excellent durability
- Focus on: Products that create a water-resistant barrier without completely sealing the wood
3. For Low-Maintenance Households
- Top pick: Bona Craft Oil 2K
- Two-component hardwax oil system
- Virtually maintenance-free for years
- Ideal for busy families who won’t remember regular oiling
- Budget alternative: General Finishes Arm-R-Seal
- Simpler application process
- Needs recoating every 1-2 years
- More affordable initial cost
- Priority: Long-lasting protection that doesn’t require frequent attention
4. For Eco-Conscious Users
- Top pick: OSMO TopOil
- Plant-based hardwax oil formula
- No biocides or preservatives
- Low VOC with minimal odor during application
- Natural alternative: 100% Pure Tung Oil (Real Milk Paint brand)
- No additives or solvents
- Completely renewable resource
- Requires more patience during application
- Look for: Products with sustainable ingredients and minimal chemical processing
Step-by-Step: How to Seal a Butcher Block (With Any Sealer)
1. Tools & Materials Needed
- Basic supplies for all sealers:
- 120, 150, and 220-grit sandpaper
- Clean, lint-free rags (old t-shirts work great)
- Painter’s tape for protecting adjacent surfaces
- Rubber gloves to keep your hands clean
- Plastic scraper for removing old finish (if refinishing)
- For oil-based sealers:
- Natural-bristle brush or applicator pad
- Container for soaking rags in water after use (prevents fire hazard)
- For water-based finishes:
- Synthetic-bristle brush or foam applicator
- Small container for application
- For spray finishes:
- Respirator mask rated for chemical vapors
- Drop cloths to protect surrounding areas
2. Surface Prep
- For new butcher blocks:
- Remove any factory finish with 120-grit sandpaper
- Progress through 150 and 220-grit for a smooth surface
- Wipe with mineral spirits to remove dust and check for missed spots
- For refinishing existing blocks:
- Clean thoroughly with mild dish soap and water
- Let dry completely (24+ hours)
- Sand until all old finish is removed
- Repair any deep gouges with wood filler if needed
- Final prep for all surfaces:
- Vacuum all dust with brush attachment
- Wipe with tack cloth or damp rag
- Allow to fully dry before sealing
3. Application Tips for Each Type
- Mineral Oil:
- Pour directly onto surface and spread with clean cloth
- Apply generously, letting wood absorb as much as possible
- After 20 minutes, wipe off excess
- Repeat process 3-4 times for new wood
- Oil & Wax Blends:
- Apply thin coat in direction of grain
- Let sit 15-30 minutes until tacky
- Buff thoroughly with clean cloth
- Apply 2-3 coats for best protection
- Tung Oil (Pure):
- Thin first coat 50/50 with citrus solvent for better penetration
- Apply thin coats only – thick layers won’t dry properly
- Allow 24-72 hours between coats
- Apply minimum of 3 coats, buffing between each
- Polymerized Oils:
- Apply with cloth or brush in thin, even coats
- Wait recommended time on package between coats (usually 12-24 hours)
- Light sand with 320-grit between coats
- Typically needs 2-3 coats for proper protection
- Film-Forming Finishes (Polyurethane):
- Apply with brush or foam applicator in direction of grain
- Maintain wet edge to prevent lap marks
- Allow full drying time between coats
- Sand lightly with 320-grit between coats
- Apply 3 coats minimum
4. Curing & Maintenance
- Curing periods:
- Oil-only finishes: 24-48 hours before light use
- Oil-wax blends: 72 hours before regular use
- Hardwax oils: 7-10 days for full cure
- Polyurethane: 21-30 days for complete hardening
- Regular maintenance:
- Oil finishes: Reapply monthly or when surface looks dry
- Wax blends: Refresh every 2-3 months
- Hardwax oils: Clean with mild soap, reapply annually
- Film finishes: Clean with damp cloth, recoat every 2-5 years
- Signs it’s time to reapply:
- Water no longer beads on surface
- Wood looks dull or dry
- Stains begin to penetrate more easily
- Surface feels rough or dry to touch
Conclusion
Your butcher block deserves the right protection. Whether you choose the simplicity of mineral oil, the durability of hardwax oil, or the set-it-and-forget-it quality of polyurethane, what matters most is that you seal it properly.
The small investment of time and money now will save you from replacing an expensive piece later. Remember that your usage, maintenance commitment, and household needs should guide your choice, not just what worked for someone else.
Ready to protect your butcher block the right way? Grab your sealer of choice and set aside an afternoon this weekend. Your future self will thank you when you’re still enjoying that beautiful wood surface years from now. Have questions about your specific situation? Drop a comment below, and I’ll help you choose the perfect sealer for your needs.
Frequently Asked Questions
Is mineral oil safe for food-contact surfaces?
Yes, food-grade mineral oil is completely safe for cutting boards and butcher block counters. Look for “USP” or “food grade” on the label. Avoid industrial mineral oils or baby oil, which may contain additives not safe for food contact.
How often do I need to reapply sealer to my butcher block?
It depends on your sealer type. Mineral oil needs reapplication every 2-4 weeks, wax blends every 1-3 months, and hardwax oils annually. Film-forming finishes like polyurethane can last 2-5 years before needing refreshing.
Can I use olive oil or vegetable oil to seal my butcher block?
Avoid kitchen cooking oils for sealing wood. They can turn rancid over time, creating unpleasant odors and potentially harboring bacteria. Stick with non-drying oils specifically formulated for wood like mineral oil or specialized butcher block oils.
Is it safe to cut on a polyurethane-sealed butcher block?
No. While polyurethane creates a durable finish, it’s not meant for direct food cutting. The finish can chip into food when cut. Use polyurethane only on countertops where you’ll place cutting boards for food prep.
How do I remove stains from my sealed butcher block?
For oil-finished surfaces, try a paste of baking soda and water on the stain. For tougher stains, light sanding followed by reapplication of the original sealer works best. On film-finished surfaces, avoid abrasives and use only recommended cleaners to prevent damaging the finish.