
Tile roofs are among the most durable and attractive roofing options available today. Clay and concrete tiles can last 50-100 years with proper care, making them a smart long-term investment. However, even the best tile roofs eventually need replacement.
Several factors signal it’s time for a new roof. Age is the most obvious one. But severe weather damage, multiple leaks, or structural issues can also force an early replacement.
This is a major home improvement project. The process involves removing thousands of heavy tiles, inspecting the roof structure, and installing new materials. Most homeowners hire professionals for this work.
But understanding the process helps you make informed decisions. You’ll know what to expect, how to budget properly, and what questions to ask contractors. Let’s walk through everything you need to know about tile roof replacement.
Know When It’s Time to Replace Your Tile Roof
Your roof gives clear warning signs when replacement time approaches.
Cracked or Missing Tiles: Individual tile damage is normal. But widespread cracking means structural problems. Missing tiles create immediate leak risks.
Water Leaks and Ceiling Stains: Water stains on your ceiling mean moisture is getting through. Even small leaks cause extensive damage to insulation and wooden structures.
Sagging Roof Structure: A sagging roofline is a serious safety concern. This usually means the roof decking or support beams are failing.
Material Lifespan: Clay tiles last 50-100 years. Concrete tiles have similar lifespans but may fade sooner. Even quality tiles need replacement eventually, since underlayment has a shorter lifespan.
Get a Roof Inspection First
Never start a replacement without a professional inspection. This protects you from surprises and helps you plan accurately.
Why Professional Assessment Matters Contractors have experience to spot problems you might miss. They safely access steep areas and identify structural issues not visible from the ground.
What Inspectors Look For Inspectors examine tile condition, underlayment, flashing, and gutters. They check the roof decking from your attic and test for soft spots indicating water damage.
Getting Documentation Request written reports with photos. Get estimates from at least three contractors. Make sure each estimate includes materials, labor, permits, and cleanup costs.
Choose the Right Roofing Materials
Each material type has distinct advantages and drawbacks.
Clay Tiles: Clay offers classic beauty and excellent durability. Resists fire, insects, and rot naturally. However, clay is heavy, expensive, and can crack in freeze-thaw cycles.
Concrete Tiles: Concrete costs less than clay with similar durability. Comes in many colors and styles. The main drawbacks are weight and potential color fading.
Slate Tiles: Slate offers unmatched longevity and natural beauty. It can last over 100 years. But it’s the heaviest and most expensive option, requiring specialized installation.
Composite Tiles: Modern composites combine durability with lighter weight. They resist cracking better and often cost less. Quality varies significantly among products.
Underlayment Matters: Quality underlayment is just as important as tiles. Choose waterproof synthetic materials over felt paper. Proper ventilation prevents moisture problems.
Prepare for the Project

Start planning several weeks before work begins.
Permits and Codes: Most areas require permits for full replacement. Your contractor should handle applications. Check homeowner’s association restrictions on materials or colors.
Budgeting: Costs vary based on material choice, roof complexity, and regional rates. Set aside an additional 10-20% for unexpected issues like structural repairs.
Timeline: Typical replacement takes 3-7 days for average homes. Complex rooflines or weather delays extend this. Plan for noise, dust, and limited home access during work hours.
Step-by-Step Roof Replacement Process
Understanding each phase helps you monitor progress and ensure quality workmanship. Professional contractors should follow these general steps.
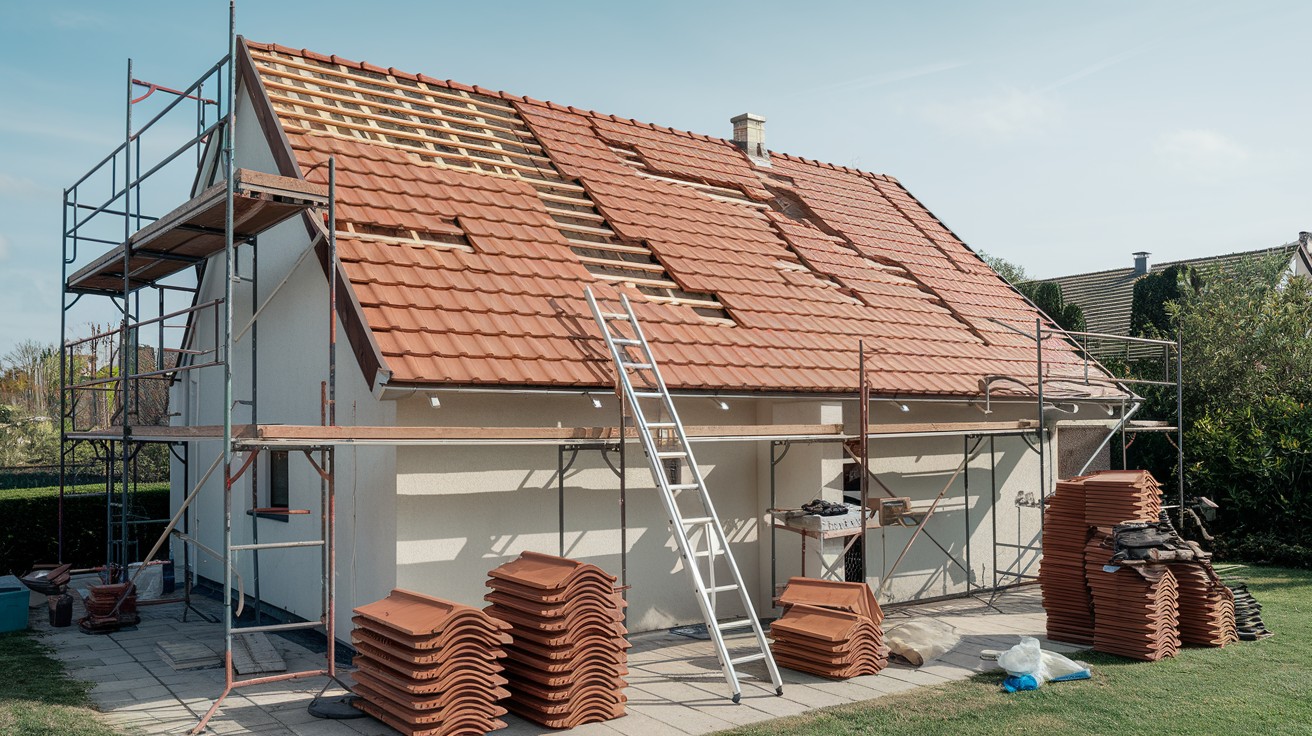
1. Remove Old Tiles
Tile removal requires a careful technique to avoid damaging the roof structure. Workers systematically strip tiles from ridge to eave, preserving reusable materials when possible.
Heavy tiles create safety hazards and require proper equipment for safe handling. Professional crews use specialized tools and safety systems.
Proper Disposal Methods: Broken tiles and debris need proper disposal. Many areas have recycling programs for concrete and clay tiles. Your contractor should handle all debris removal and disposal fees.
2. Inspect and Repair Roof Decking
With tiles removed, contractors can fully assess the roof structure. They look for water damage, rot, or structural weaknesses that need repair.
Common Decking Issues: Water damage often concentrates around chimneys, vents, and roof edges. Damaged plywood or OSB sheathing must be replaced before installing new materials.
Some older homes have spaced board decking instead of solid sheathing. This may need upgrading to meet current building codes.
3. Install New Underlayment
Quality underlayment provides your roof’s primary water barrier. Modern synthetic materials outperform traditional felt paper in durability and weather resistance.
Installation Best Practices: Underlayment must be installed with proper overlap and fastening patterns. Seams need sealing to prevent water infiltration. The material should extend up walls and around roof penetrations.
Ice and water shields go in vulnerable areas like eaves, valleys, and around chimneys.
4. Install New Roof Tiles
Tile installation starts at the bottom edge and works upward. Proper layout ensures straight lines and correct spacing between tiles.
Pattern and Alignment: Most tile installations use chalk lines to maintain straight rows. Tiles must align properly for both appearance and weather protection.
Fastening Methods: Tiles attach with nails, screws, or clips depending on the style and local wind requirements. Over-fastening can crack tiles, while under-fastening creates blow-off risks.
Ridge and Hip Installation: Ridge and hip tiles require special attention since they cap the roof’s highest points. These pieces need secure fastening and proper sealing to prevent leaks.
Post-Installation Tips
- Schedule a final inspection with your contractor before making the final payment.
- Walk around your property to check for any missed debris or damage
- Test your gutters and downspouts to ensure proper drainage
- Take photos of the completed work for your records
- Register product warranties with manufacturers if applicable
- Keep all receipts and documentation for insurance and warranty purposes
- Review maintenance requirements with your contractor
Tile Roof Maintenance Tips
- Inspect your roof twice yearly, especially after severe weather
- Clean debris from gutters and roof valleys regularly
- Trim tree branches that hang over your roof
- Remove moss or algae growth promptly to prevent tile damage
- Replace cracked or broken tiles immediately to prevent leaks
- Check and maintain proper attic ventilation
- Schedule professional inspections every 3-5 years
- Never walk on tile roofs unless necessary – tiles can crack under foot traffic.
Conclusion
Tile roof replacement is a significant investment that protects your home for decades. The process involves multiple steps from initial inspection through final cleanup. Each phase requires attention to detail and quality materials.
While this guide explains the general process, most homeowners benefit from professional installation. Tile roofs are heavy, complex systems that require specialized knowledge and equipment.
Take time to research contractors, compare estimates, and choose quality materials. A well-installed tile roof adds value to your home while providing reliable protection.
Don’t rush the decision-making process. Ask questions, verify credentials, and trust your instincts when selecting a contractor. The extra effort upfront prevents problems later.
Remember that maintenance extends your roof’s life significantly. Regular inspections and prompt repairs keep small problems from becoming major expenses. With proper care, your new tile roof will serve your family for generations.
Frequently Asked Questions
How much does tile roof replacement typically cost?
Tile roof replacement costs vary from $8-25 per square foot, depending on material choice, roof complexity, and regional labor rates. Clay and slate tiles cost more than concrete options. Get multiple estimates for accurate pricing in your area.
Can I install a tile roof over my existing shingles?
No, tile installation requires complete removal of old roofing materials. Tiles are too heavy for overlay installation and need proper underlayment for weather protection. Existing materials must be stripped to inspect and prepare the roof deck.
How long does a tile roof replacement project take?
Most tile roof replacements take 3-7 days for average-sized homes. Complex rooflines, structural repairs, or weather delays can extend the timeline. Your contractor should provide a realistic schedule based on your specific project requirements.
Do I need to upgrade my roof structure for tile installation?
Possibly. Tile roofs are heavier than most other materials and may require structural reinforcement. A professional assessment determines if your current framing can support the additional weight. Older homes often need upgrades to meet current building codes.
What’s the best time of year for tile roof replacement?
Late spring through early fall typically offers the best weather conditions for roofing work. Avoid winter months when possible due to weather delays and material handling challenges. Schedule your project well in advance since contractors are busiest during ideal weather periods.