
Your stand mixer is heavy. It takes up precious counter space. Yet you need it within reach for baking. I’ve been there. Struggling to find the perfect storage spot for my KitchenAid.
Here’s what you’ll find in this guide:
- 17 proven storage solutions that actually work
- Budget-friendly options starting at $50
- DIY projects with step-by-step instructions
- Small kitchen hacks for tight spaces
I’ll solve your mixer storage problem today. I’ve tested countless storage methods. Some failed miserably. Others changed my entire baking routine. You’re looking for storage ideas that work. Not fancy gadgets that collect dust.
I’ll show you solutions that make your mixer easy to access. Because when your mixer is stored right, you bake more often. And that’s what matters.
Why Stand Mixer Storage Matters
Your mixer weighs 20+ pounds. Moving it around your kitchen gets old fast. When it’s stored wrong, you avoid baking. When it’s stored right, you reach for it without thinking.
Good storage also protects your investment. These machines cost hundreds of dollars. Dust, grease, and bumps can damage them over time.
Plus, your kitchen looks cleaner when everything has its place.
Best Countertop Storage Ideas
Let’s start with keeping your mixer visible and ready to use.
1. Corner Appliance Garage with Roll-Up Door
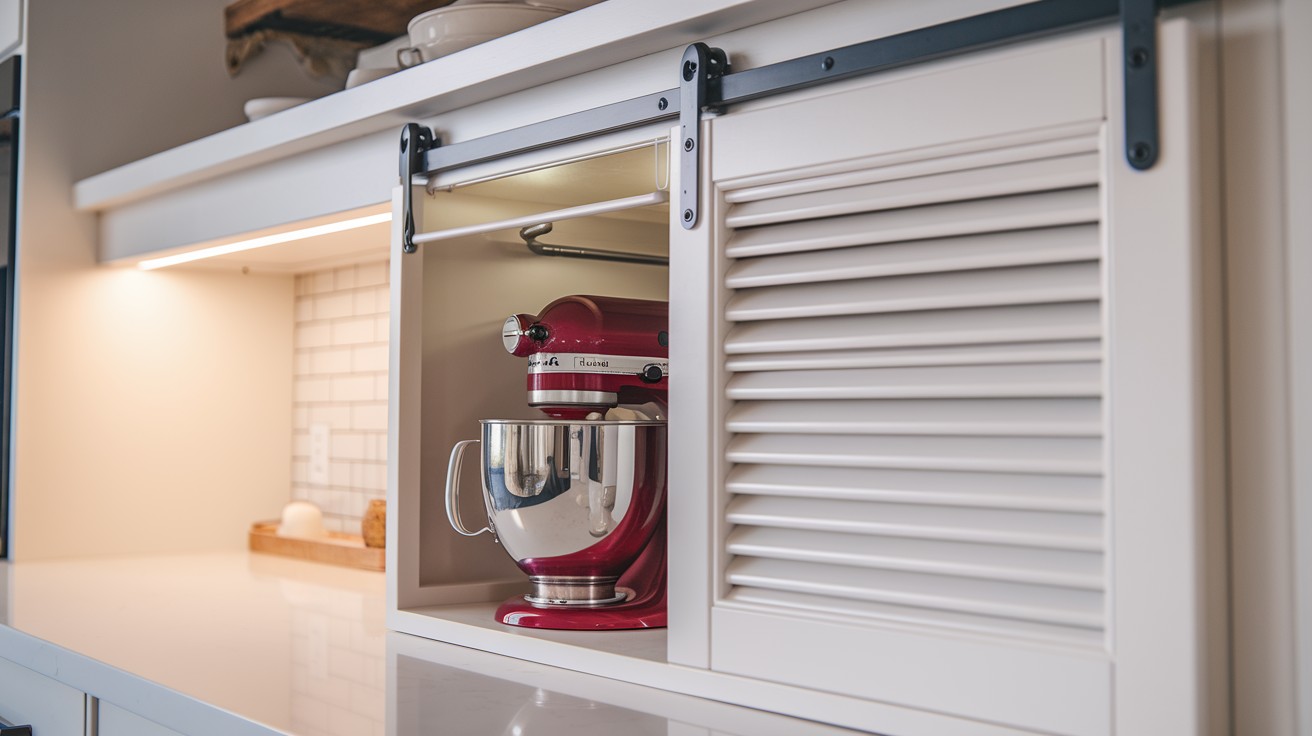
You install a small cabinet in your corner space. The roll-up door slides open when you need your mixer. Closed, it looks like part of your regular cabinets.
Why it works:
- Keeps dust and grease away
- Easy access without lifting
- Looks built-in and professional
- Protects your investment
I installed one in my kitchen three years ago. Best decision I ever made for baking. No more dragging my mixer across the counter.
2. Mixer on a Butcher Block or Rolling Cart
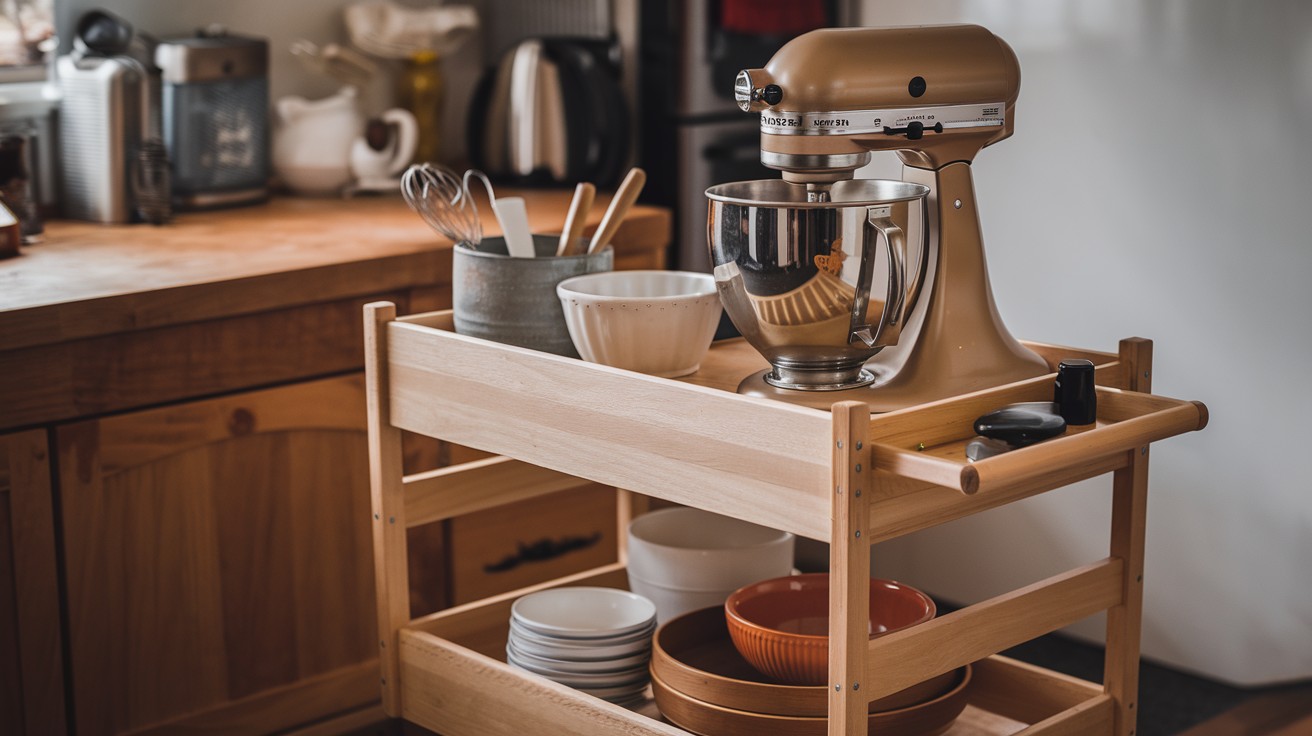
A sturdy rolling cart with locking wheels solves multiple problems. Your mixer stays put during use but rolls away when you need counter space. Simple but incredibly effective.
Perfect features to look for:
- Locking wheels for stability
- Storage underneath for bowls
- Solid wood or steel construction
- Counter-height design
My sister uses this method in her tiny apartment. She can bake anywhere in her kitchen now. The cart even doubles as extra prep space.
3. Deep Counter Nook for Built-In Look

This requires planning during renovation but creates the most seamless look. You create a recessed area in your counter where your mixer sits flush with the surface. It stays accessible but never gets in the way.
Key measurements:
- Width: 16-18 inches minimum
- Depth: 12-14 inches for clearance
- Height: 16-18 inches for most mixers
- Add 2 inches to all sides for comfort
I wish I had thought of this during my kitchen remodel. Now I’m stuck with a mixer that crowds my workspace. Learn from my mistakes.
4. Heavy-Duty Floating Shelf Display
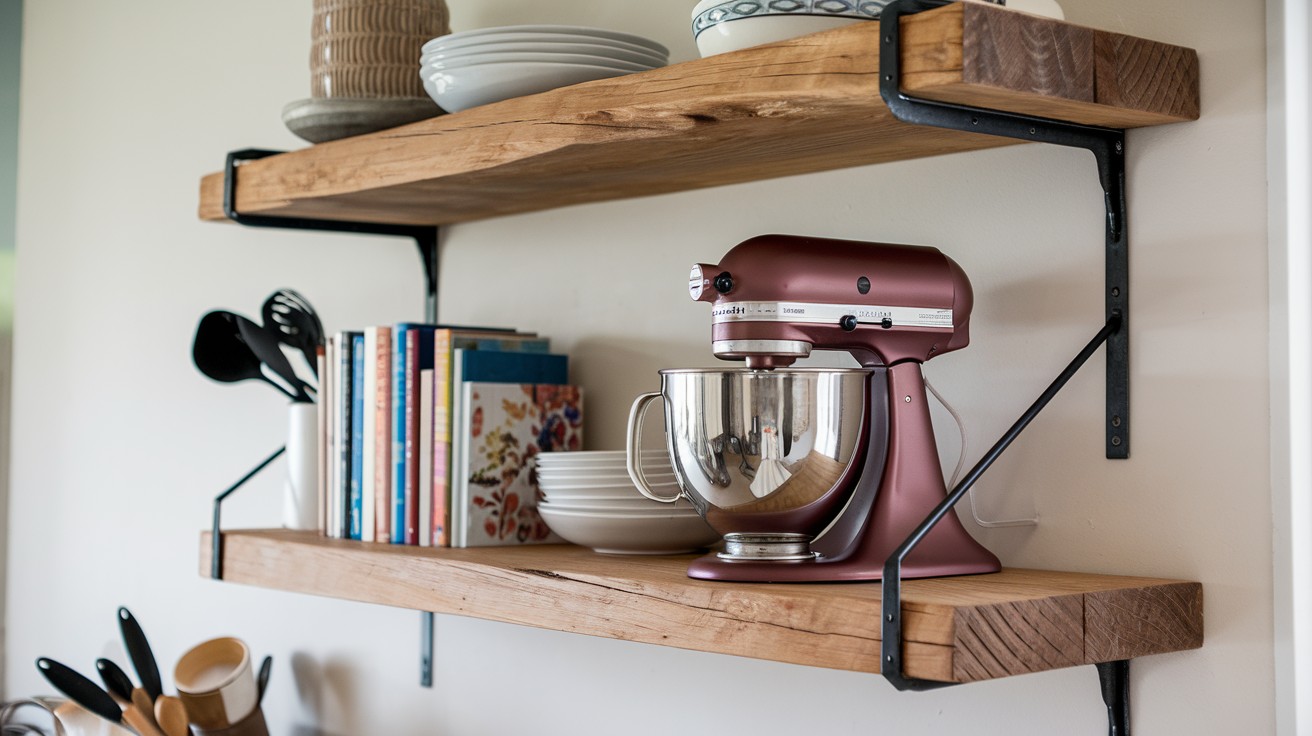
Mount a thick wooden shelf 18 inches deep to your wall. Your mixer becomes functional kitchen decor when not in use. This works great for mixers you use weekly but want to keep visible.
Critical requirements:
- Toggle bolts rated for 50+ pounds
- Solid wood shelf (2+ inches thick)
- Wall studs for mounting points
- 18 inches minimum depth
Warning: I learned this the hard way. My first shelf wasn’t anchored right and came crashing down. Always use proper hardware or hire someone who knows what they’re doing.
5. Lift-Up Mixer Shelf Attachment
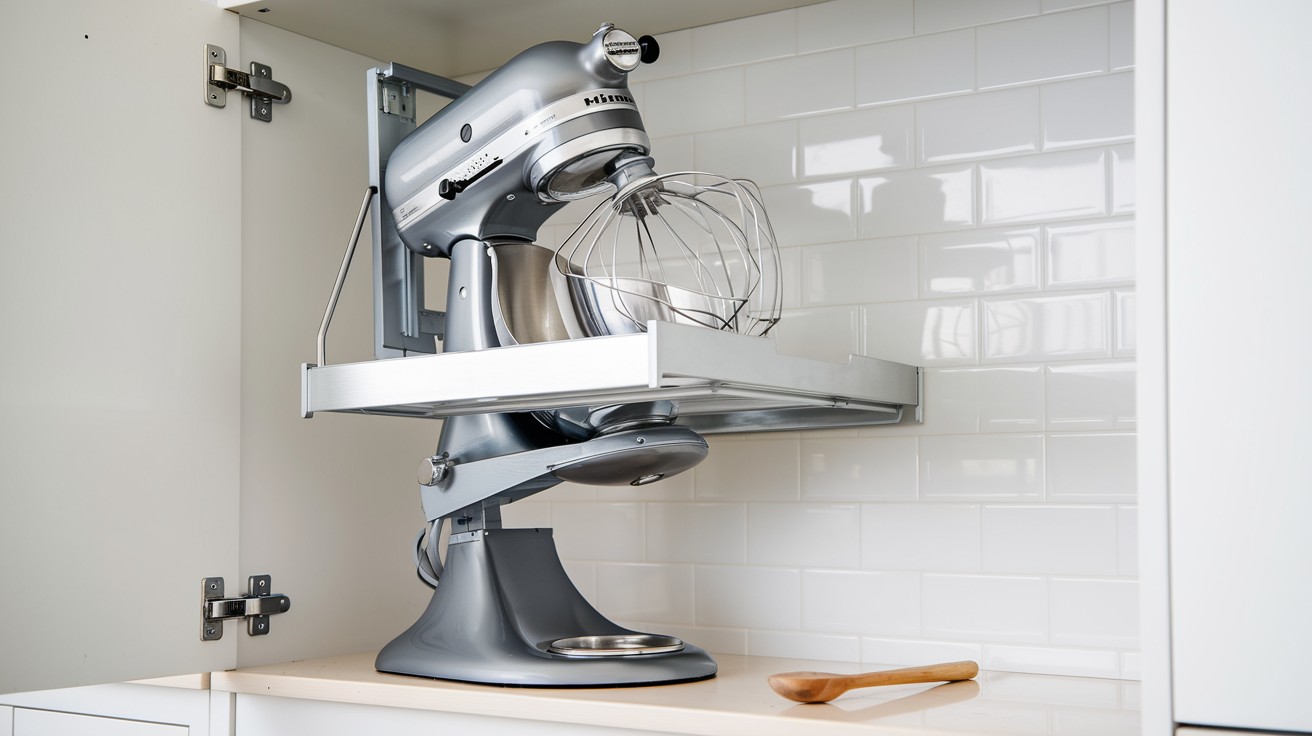
This clever gadget mounts under your upper cabinets. Pull a lever and your mixer lifts up from below the counter. Push it back down when finished baking.
Installation needs:
- 18 inches clearance under cabinets
- Strong cabinet mounting points
- Professional installation recommended
- Works best with lighter mixers
My neighbor has this setup and loves showing it off. It’s like magic watching the mixer appear and disappear. Though I’ll admit, it makes me a bit nervous with all those moving parts.
Cabinet Storage Ideas (Hidden but Handy)
Want your mixer out of sight? These ideas keep it accessible.
6. Pull-Out Stand Mixer Drawer
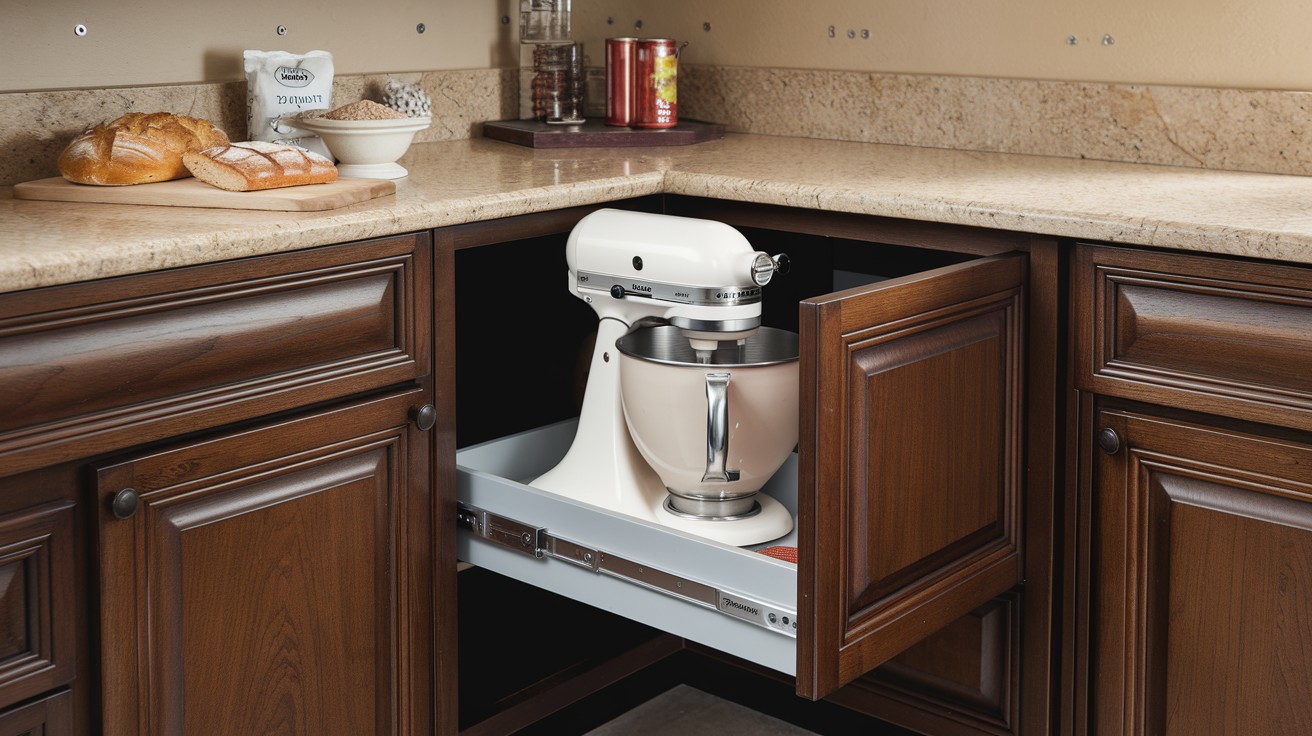
This is the gold standard for hidden mixer storage. A deep drawer slides out completely, bringing your mixer to the perfect working height. No lifting or straining your back required.
Hardware specifications:
- 24 inches wide minimum opening
- 16 inches deep for clearance
- Heavy-duty slides (100+ pound capacity)
- Soft-close mechanism recommended
I saved up for two years to install this in my kitchen. Worth every penny. My back doesn’t hurt anymore after long baking sessions.
7. Slide-Out Tray for Lower Cabinets
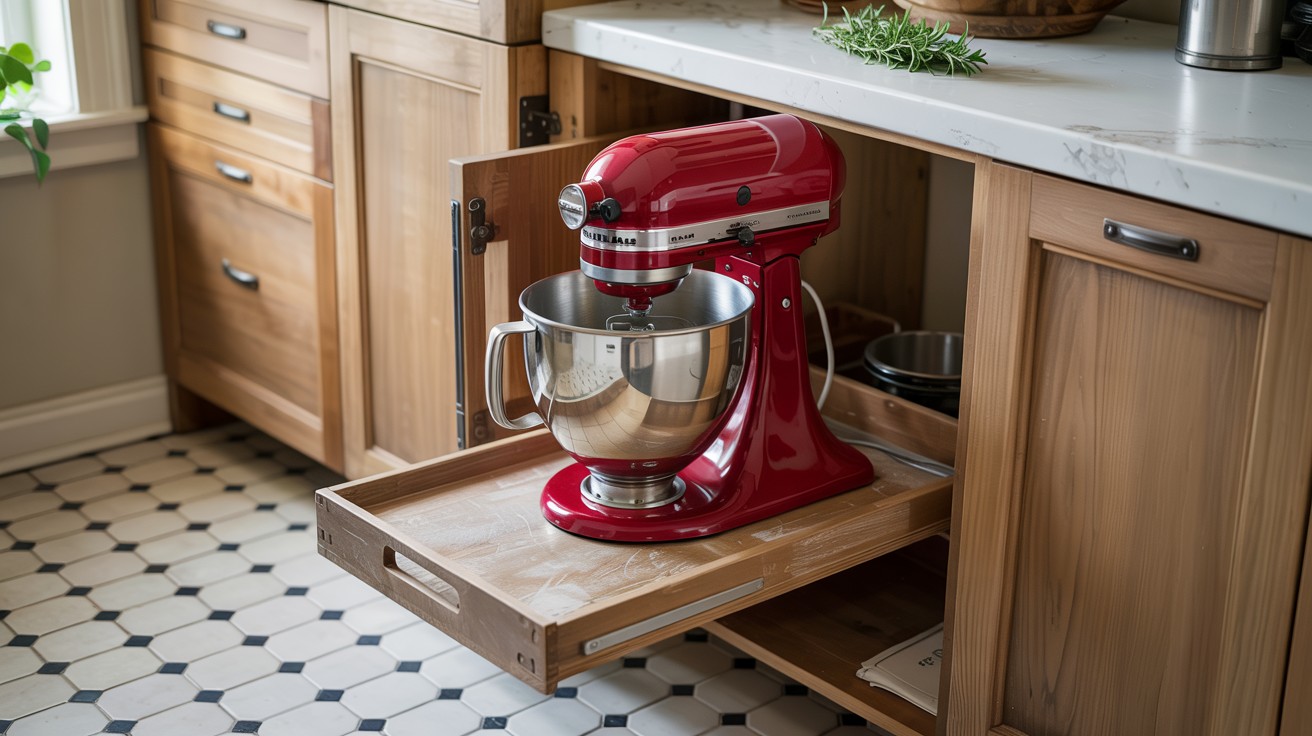
A more budget-friendly option than a full drawer system. You install a sliding tray inside your existing base cabinet. Your mixer slides forward when needed, then pushes back out of sight.
What you need:
- Existing cabinet 24+ inches wide
- Heavy-duty sliding tray hardware
- Basic DIY skills for installation
- About 2 hours for setup
This was my first mixer storage solution when I was just starting out. It worked great for five years until I could afford something fancier. Don’t let a tight budget stop you from better storage.
8. Appliance Garage with Built-In Outlet
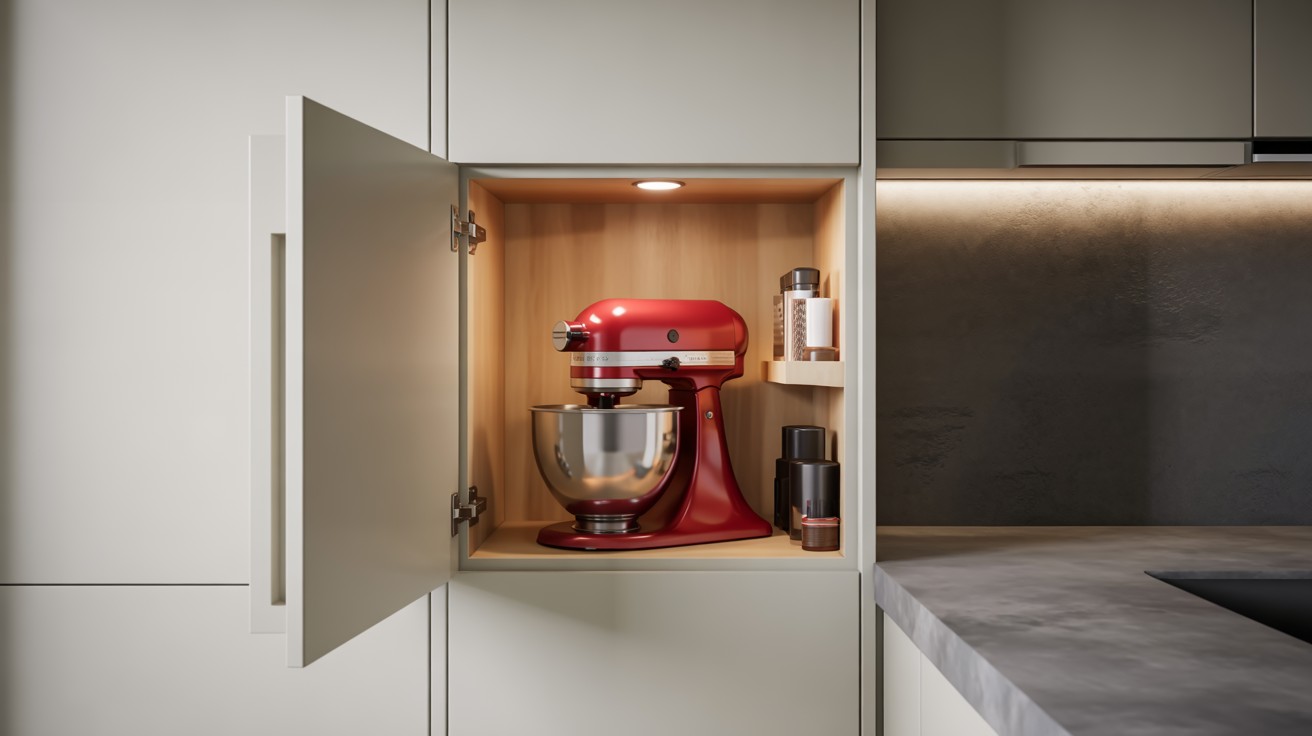
You install an electrical outlet inside your appliance garage. Your mixer plugs in without messy extension cords snaking across your counter. The door hides everything when closed.
Electrical requirements:
- GFCI outlet for safety
- Professional electrician for installation
- Proper ventilation for heat
- Easy access to circuit breaker
Important: This isn’t a DIY project. I hired an electrician after seeing too many kitchen fire stories online. Safety first when dealing with electricity.
9. Mixer Shelf in Pantry Closet
If you have a walk-in pantry, this is perfect real estate for your mixer. Install a sturdy shelf at counter height and your mixer lives there with your other small appliances.
Pantry benefits:
- Frees up main kitchen counter space
- Keeps mixer dust-free
- Room for all baking supplies together
- Easy access when needed
My friend converted her coat closet into a baking pantry. She calls it her “baking command center.” Everything she needs is in one spot.
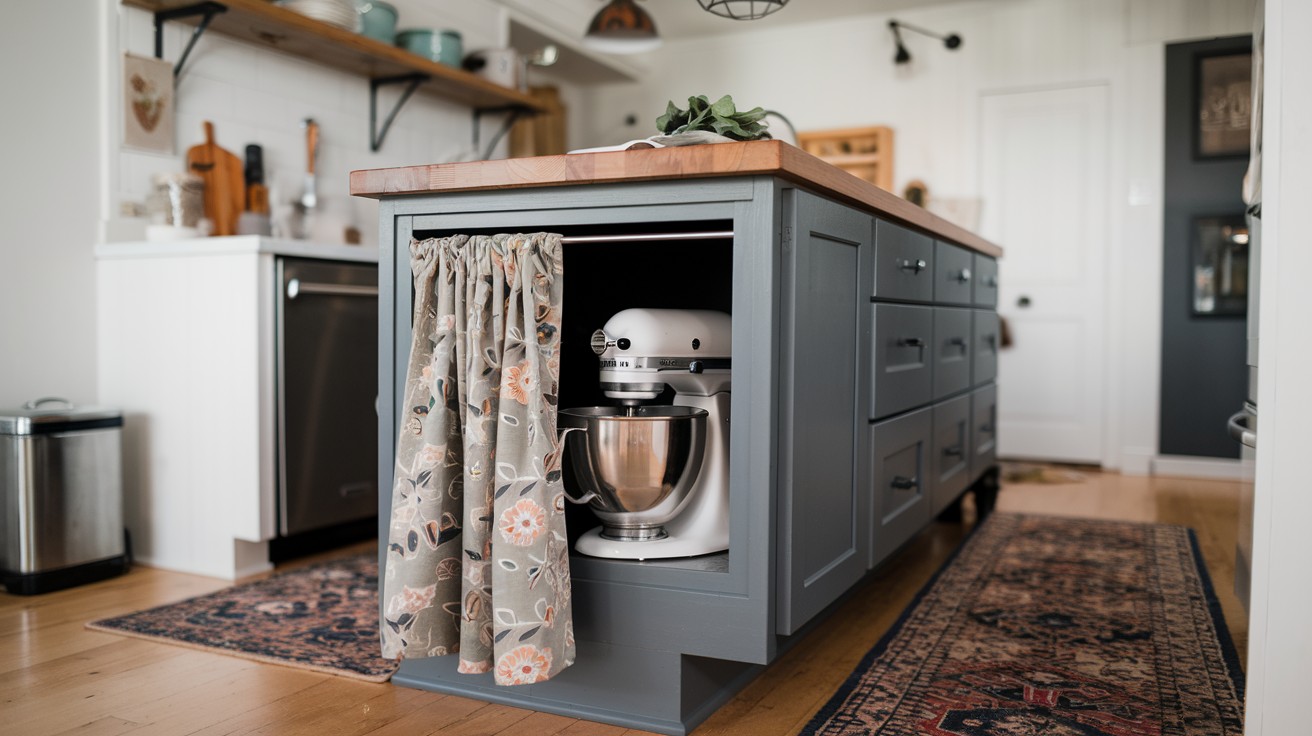
10. Under-Counter Cubby with Curtain/Door

Create a cubby space under your counter overhang. Add a curtain or small door to hide your mixer while keeping it easily accessible. This works especially well with kitchen islands.
Best locations:
- Kitchen islands with overhangs
- Peninsula counters
- Breakfast bar areas
- Any spot with 18+ inches clearance
I made this work under my breakfast bar using a tension rod and fabric. It cost me $15 and took 30 minutes to set up. Sometimes the simplest solutions work best.
11. Lazy Susan in Corner Cabinet
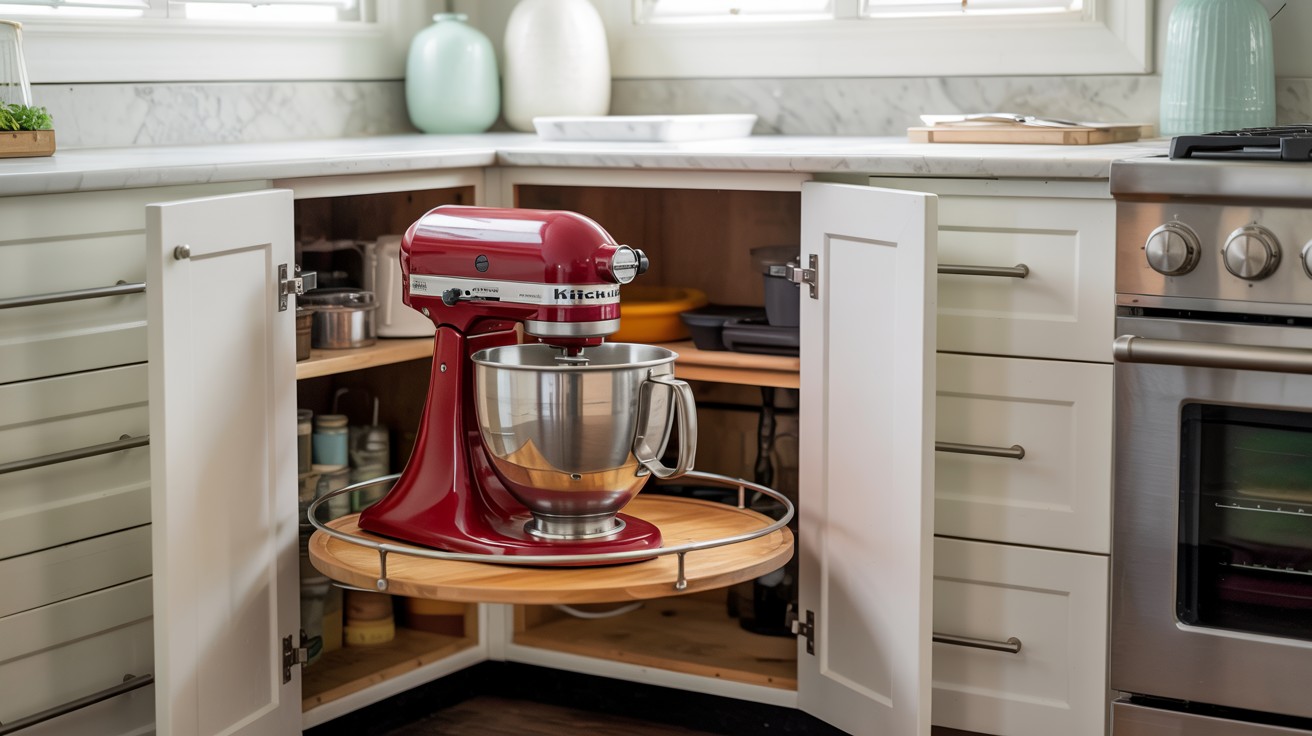
Corner cabinets often become black holes for kitchen items. A lazy Susan fixes this wasted space by making everything accessible with a simple spin.
Size requirements:
- 24-inch diameter minimum
- Heavy-duty bearings for weight
- Full-extension rotation
- Non-slip surface material
I installed one last month after years of crawling into my corner cabinet. My mixer spins right to the front now. No more digging around in dark corners.
DIY Stand Mixer Storage Projects
Ready to build something custom?
12. DIY Rolling Mixer Shelf
Build a simple two-shelf rolling unit that holds your mixer on bottom and bowls on top. This project requires basic carpentry skills but costs much less than buying a pre-made cart.
Materials list:
- 2×4 lumber for the frame
- Plywood sheets for shelving
- Heavy-duty casters with locks
- Wood screws and brackets
I built mine on a rainy Saturday last fall. It took about 4 hours and cost $85 total. My husband laughed until he saw how useful it was.
13. Repurposed Cabinet Mixer Station
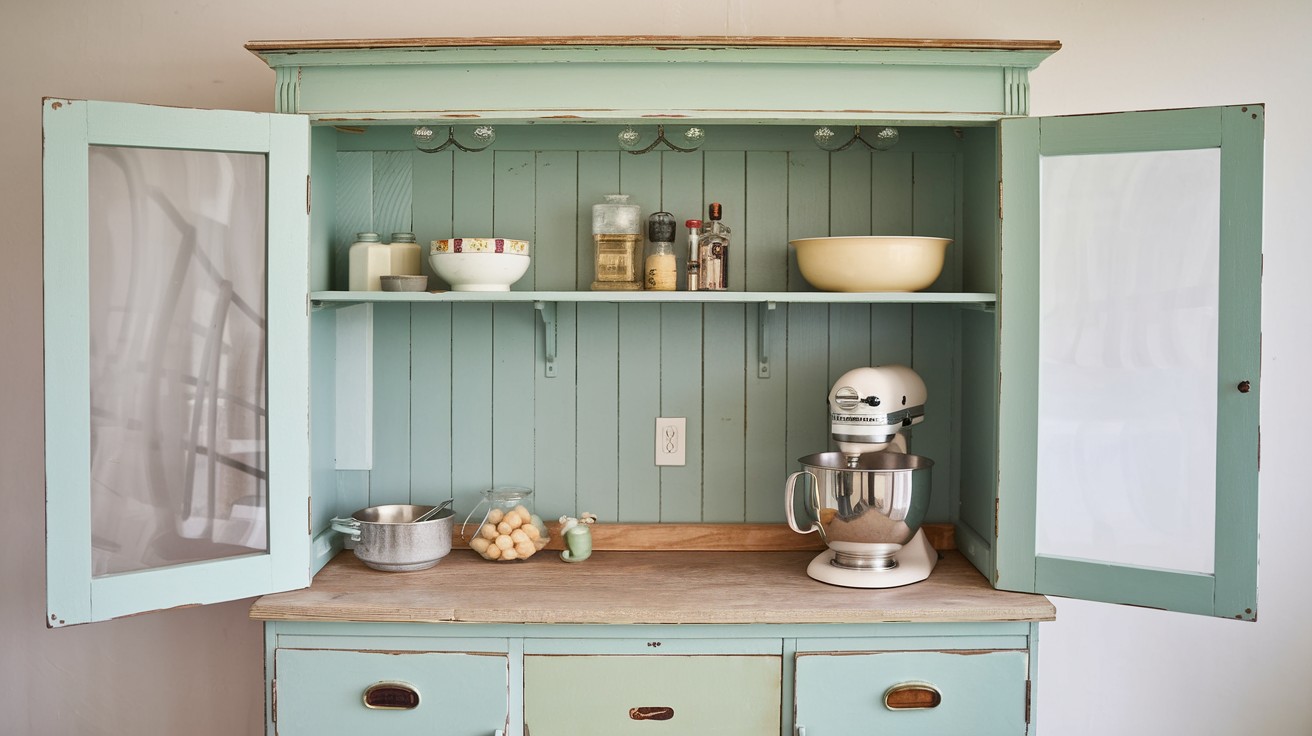
Hunt for an old cabinet at thrift stores or garage sales. Remove the doors, add a pull-out shelf inside, and install an outlet. You get custom storage for a fraction of new cabinet costs.
Conversion steps:
- Sand and paint to match your kitchen
- Install interior pull-out shelf
- Add electrical outlet (hire electrician)
- Mount on counter or wall
I found a perfect cabinet at a garage sale for $25. After some paint and new hardware, it looks like it will cost ten times more. Thrift store treasures make the best projects.
14. Custom Appliance Hutch (With Free Plans)
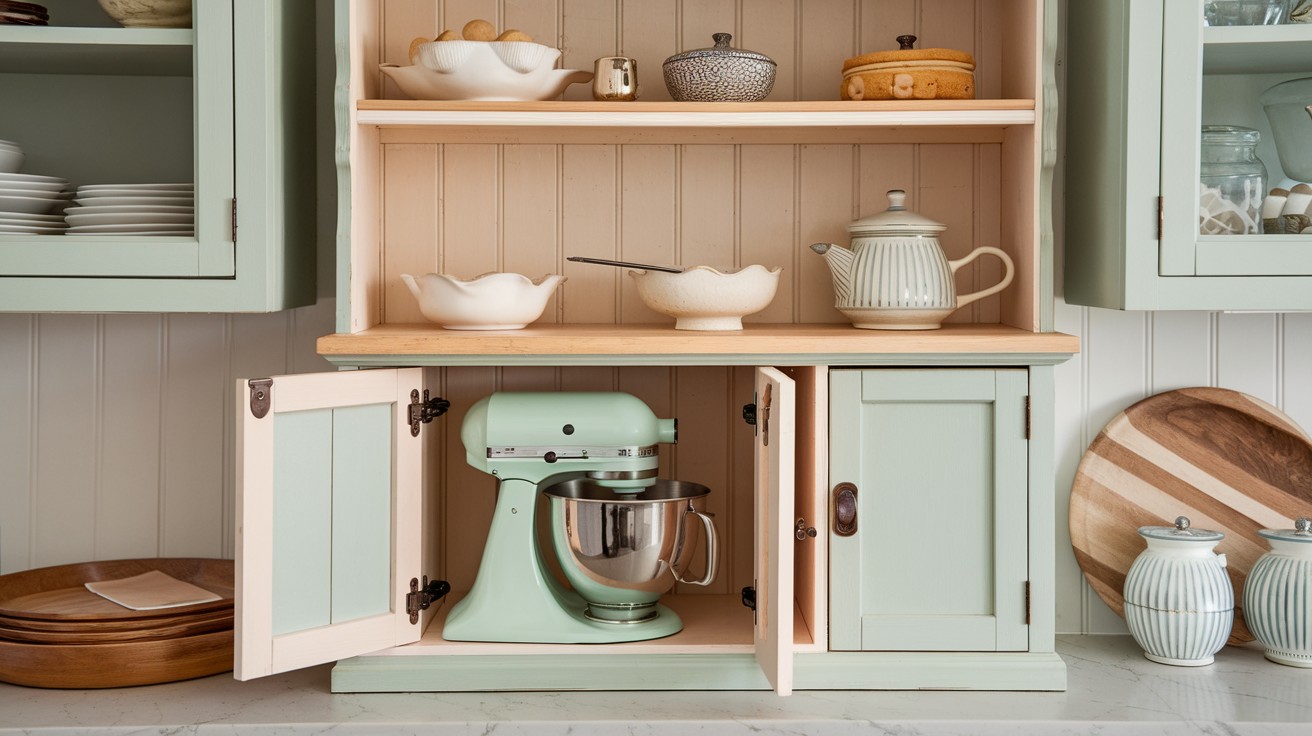
Build a cabinet that sits on your counter with space for your mixer plus storage for all your baking supplies. Paint it to match your kitchen colors and hardware.
Project includes:
- Mixer storage compartment
- Upper shelves for ingredients
- Drawer for small tools
- Closed doors to hide everything
Free building plans available from woodworking websites like Ana White. I followed her plans exactly and loved the results. My mixer finally has a proper home.
Small Kitchen Stand Mixer Storage Hacks
Tight on space? These tricks help.
15. Fridge-Top Shelf with Decorative Box
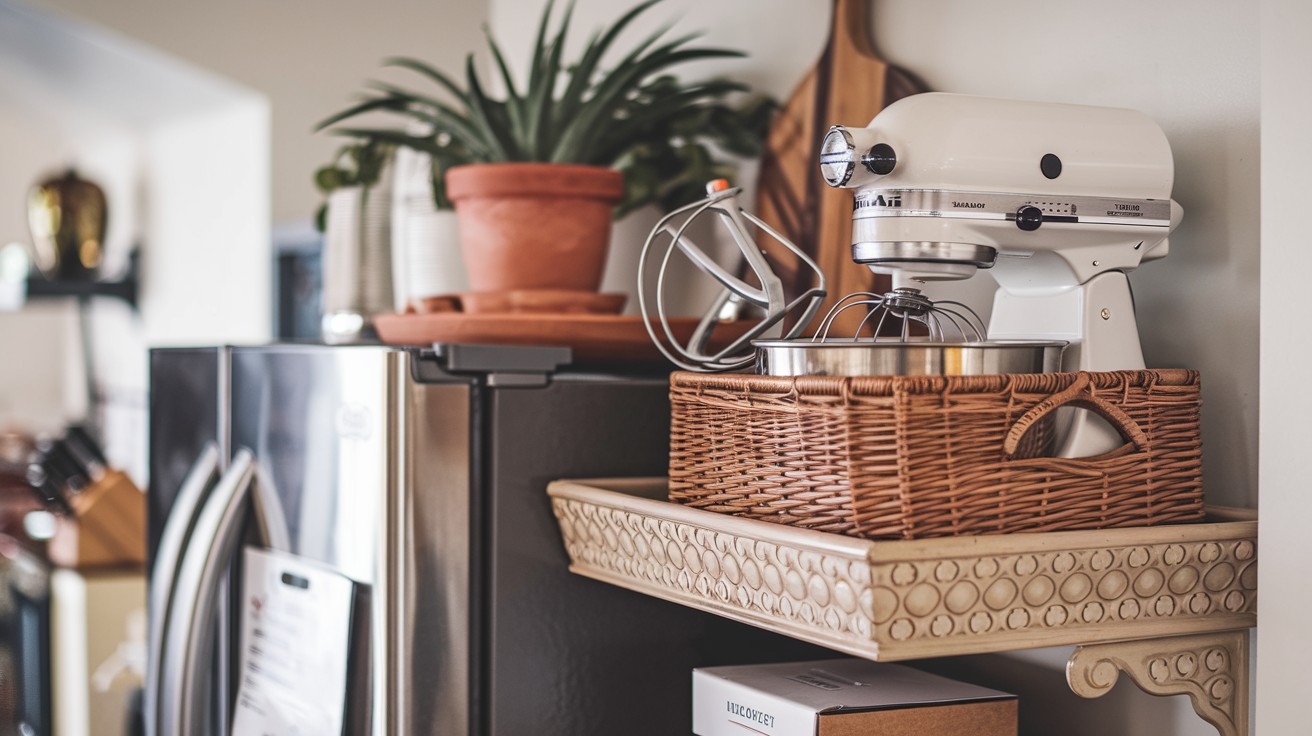
The top of your refrigerator is prime real estate that most people ignore. Install a shelf up there and store your mixer in a decorative box or basket to keep it clean.
Safety considerations:
- Use a sturdy step stool
- Have someone spot you
- Choose lightweight decorative containers
- Keep frequently used items lower
I was skeptical about this at first. But it freed up so much counter space that I’m never going back. Just be careful climbing up there.
16. Rolling Cart Hidden in Pantry Gap
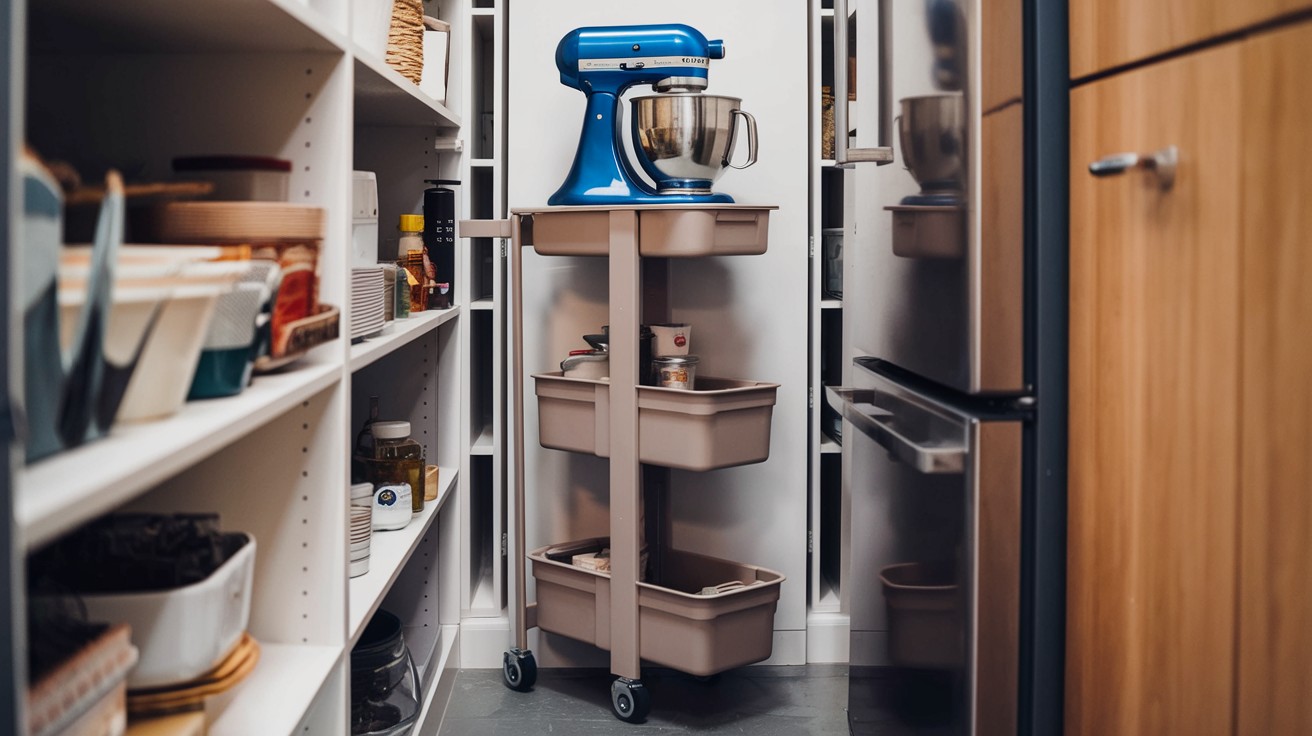
Measure that narrow gap beside your refrigerator or pantry door. You might be surprised to find a slim rolling cart fits perfectly in that wasted space.
Typical gap sizes:
- 6-8 inches: Very slim carts available
- 9-12 inches: Standard narrow carts
- 12+ inches: Regular cart options
- Custom sizes possible with DIY
I measured my gap at exactly 10 inches and found the perfect cart online. Now my mixer rolls out whenever I need it. That dead space finally serves a purpose.
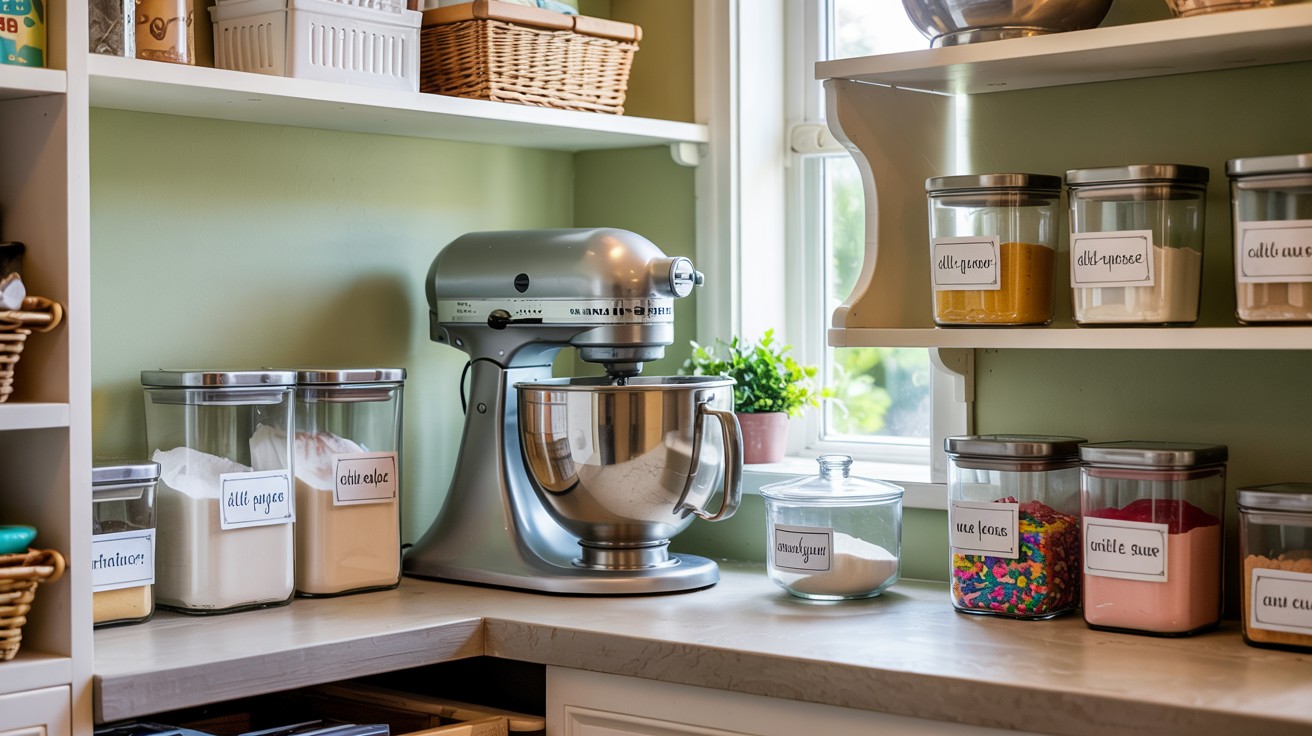
17. Mixer in a Basket on Open Shelves
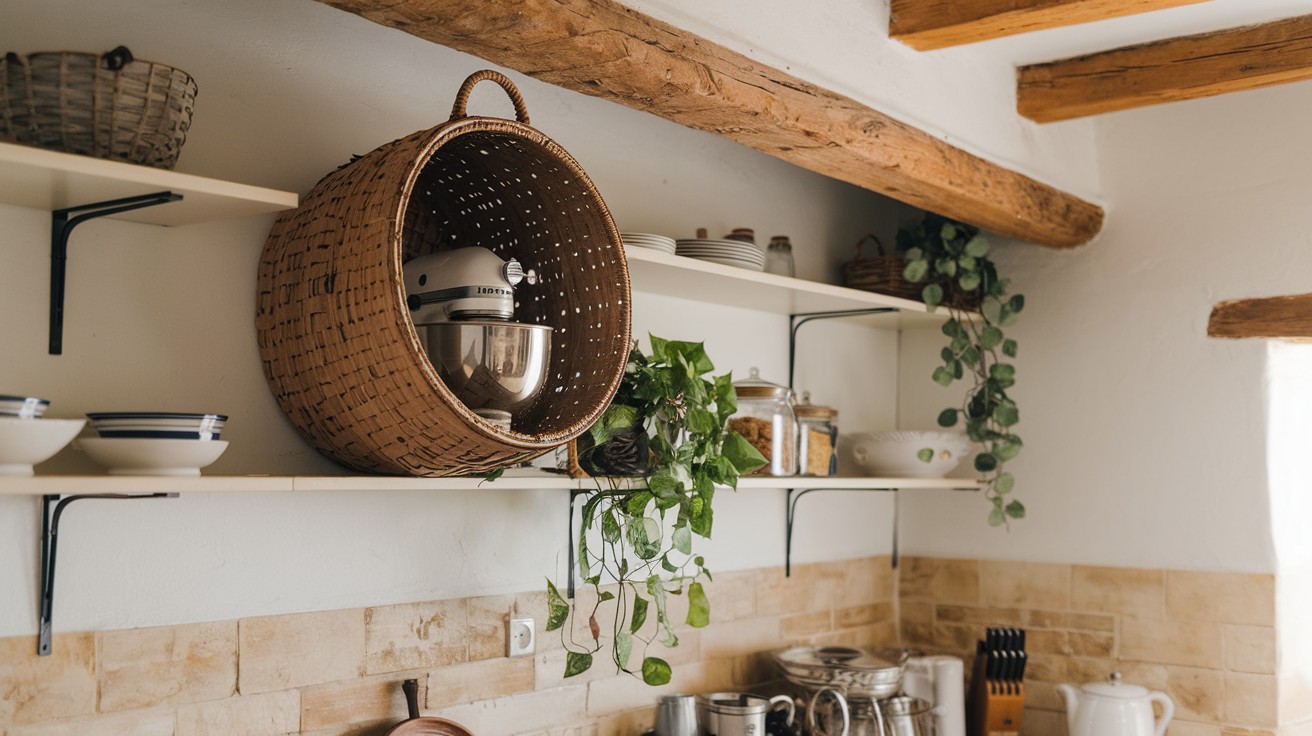
The open shelving looks great but everything collects dust quickly. Store your mixer in a large woven basket to keep it clean while maintaining that open, airy kitchen feel.
Basket selection tips:
- Natural materials like wicker or seagrass
- Handles for easy lifting
- Slightly larger than your mixer
- Matches your kitchen style
My sister-in-law does this in her farmhouse kitchen. The baskets look intentional and keep everything dust-free. Plus she can grab the whole basket and move it anywhere.
Best Mixer Storage Accessories to Try
These products make storage easier:
- Mixer covers: Protect from dust and grease
- Attachment organizers: Keep everything together
- Non-slip mats: Prevent sliding during use
- Cord wraps: Tidy up power cords
Kitchen Layout Tips for Appliance Storage Zones
Think about your baking workflow.
Store your mixer near:
- Measuring cups and spoons
- Mixing bowls
- Baking ingredients
- Counter space for prep
The goal: Everything you need within arm’s reach.
What to Avoid When Storing Your Mixer
Don’t store your mixer:
- Above shoulder height (back injury risk)
- In damp areas (rust and damage)
- Without proper ventilation (overheating)
- On wobbly surfaces (vibration damage)
Never store attachments loose in drawers. They’ll scratch and get damaged.
Conclusion
Your mixer storage problem is solved. You now have 17 proven solutions to choose from. Pick the one that fits your kitchen and budget.
Remember this: The best storage spot is the one you’ll actually use. Don’t overcomplicate it.
Start simple. A rolling cart works just as well as a custom cabinet. The goal is easy access to your mixer. When your mixer is stored right, baking becomes effortless. You’ll reach for it more often. Your family gets more homemade treats.
That heavy mixer won’t intimidate you anymore. It becomes a tool you love using. Take action today. Measure your space. Pick your favorite solution from this list. Your future baking self will thank you.
Stop letting poor storage keep you from baking. You deserve a kitchen that works for you.
Frequently Asked Questions
How much weight can a floating shelf hold for a mixer?
Use wall anchors rated for 50+ pounds minimum. Your mixer plus attachments can weigh 25-30 pounds total.
What’s the minimum cabinet depth needed for mixer storage?
You need 16 inches deep at minimum for most mixers. Go with 18 inches if you have a larger KitchenAid Professional model.
Should I unplug my mixer when storing it?
Always unplug your mixer after each use for safety. Leaving it plugged in wastes energy and poses fire risks.
Can I store mixer attachments in the dishwasher between uses?
Never store wet attachments – they’ll rust quickly. Always dry them completely before putting them away.
How do I prevent my mixer from sliding during use?
Place a damp towel or non-slip mat under your mixer. The extra grip stops vibration and movement during heavy mixing.