
That old dresser doesn’t have to stay ugly. I’ll show you exactly how to fix it.
You’re here because you want fresh ideas for your dresser makeover. Good news – I’ve got 45 proven techniques that actually work.
What you’ll find in this guide:
- Step-by-step refinishing instructions for beginners
- Modern, vintage, rustic, and artistic style ideas
- Expert tips from someone who’s refinished hundreds of pieces
- Solutions for every budget and skill level
I’ve helped thousands of people change their furniture. My methods work because I focus on real techniques, not fancy theories.
Your dresser can become the room’s best feature. No matter if you want sleek modern style or cozy farmhouse charm, there’s a perfect solution here.
Let’s turn that eyesore into something beautiful.
How to Refinish a Dresser (Beginner DIY Guide)
Before we cover the creative ideas, let’s go over the basics.
What you’ll need:
- Sandpaper (120 and 220 grit)
- Paint or stain
- Brushes or rollers
- Drop cloths
- Screwdriver
- New hardware (optional)
Step 1: Remove all hardware and drawers.
Step 2: Clean the entire dresser with degreaser.
Step 3: Sand the surface starting with 120-grit, then 220-grit.
Step 4: Wipe away all dust with a tack cloth.
Step 5: Apply primer if painting or stain if going natural.
Step 6: Paint or stain in thin, even coats.
Step 7: Let dry completely between coats.
Step 8: Install new hardware and replace drawers.
The whole process takes 2-3 days with drying time. Worth every minute.
Modern Painted Dresser Ideas
Modern design is all about clean lines and bold choices. These ideas will give your dresser a contemporary edge.
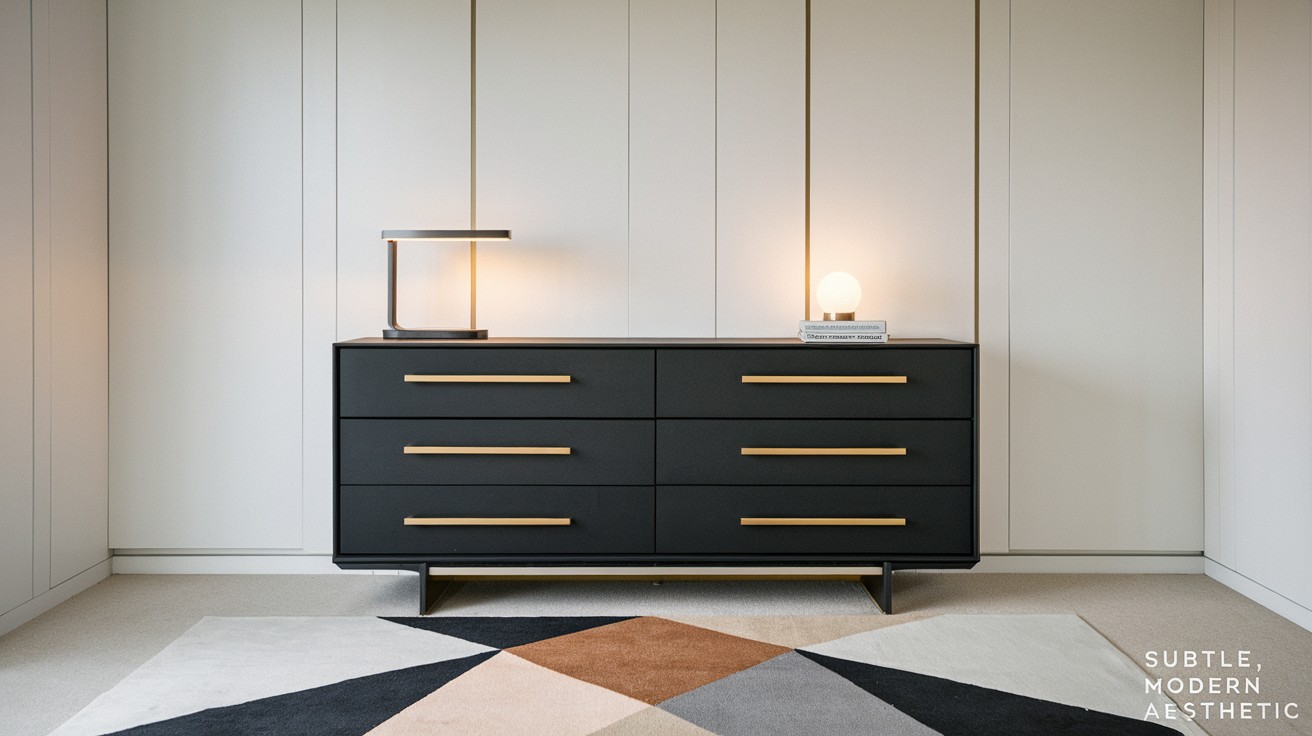
1. Matte Black with Gold Bar Pulls
Black never goes out of style. Paint your dresser in matte black for a polished look. Add brushed gold bar pulls for that luxury hotel vibe. This combo works in any room. Bedroom. Living room. Even a home office.
What you need:
- Matte black paint (Benjamin Moore Advance works great)
- Brushed gold bar pulls, 5-inch length
- Fine-grit sandpaper for smooth finish
2. White and Wood Two-Tone Finish
Mix painted and natural elements for visual interest. Paint the frame white. Keep the drawer fronts natural wood. Or flip it – natural frame with white drawers.
Pro tip: Use the same wood stain on all natural elements for consistency.
Key supplies:
- Pure white paint for clean contrast
- Wood stain in matching tone
- Polyurethane for protection
3. Charcoal Gray with Minimalist Round Knobs
Charcoal gray is the new black. It’s softer but just as versatile. Choose small, round knobs in brushed nickel. Keep the lines clean and simple. This works especially well in modern bedrooms where you want calm, not chaos.
Shopping list:
- Charcoal gray paint with satin finish
- 1.25-inch round knobs in brushed nickel
- Quality primer for smooth coverage
4. Moody Emerald with High-Gloss Lacquer
Ready to make a statement?
Deep emerald green with a glossy finish creates drama. It’s bold without being overwhelming. Perfect for a master bedroom accent piece or living room focal point.
Materials needed:
- Deep emerald green paint
- High-gloss polyurethane topcoat
- Fine brushes for smooth application
5. Navy Blue with Sleek Silver Handles
Navy blue is timeless and polished. Pair it with long, sleek silver handles for a nautical-modern hybrid. This color hides fingerprints better than lighter shades. Great choice for kids’ rooms that need to grow with them.
Essential items:
- Navy blue paint in eggshell finish
- Brushed silver bar handles, 6-8 inches
- Primer for even color coverage
Vintage & Antique Restorations
Sometimes the best approach honors the dresser’s original character. These ideas celebrate vintage charm.
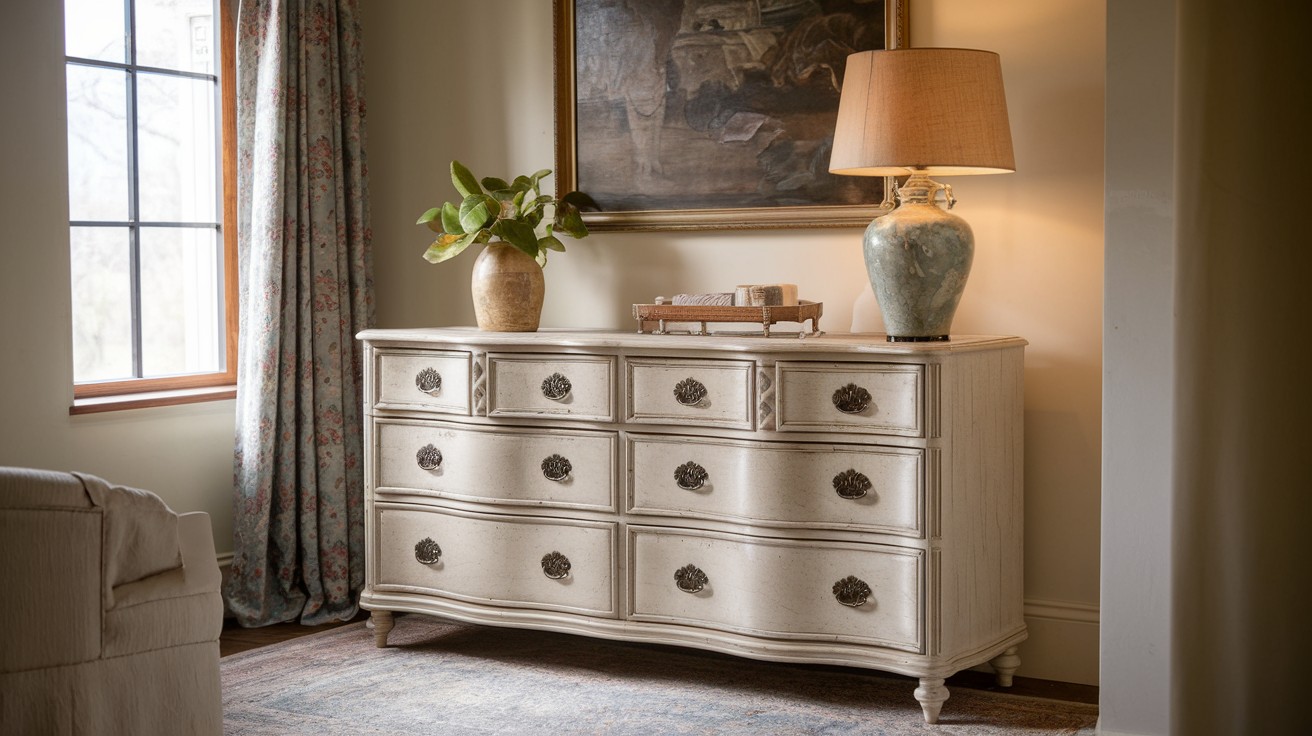
6. Distressed White French Provincial with Wax Finish
French Provincial furniture has those gorgeous curves and details. Paint it white, then gently sand edges for a worn look. Finish with clear wax for protection and subtle sheen. This technique takes patience but creates authentic vintage appeal.
Supplies you’ll need:
- Chalk paint in pure white
- Medium-grit sandpaper for distressing
- Clear furniture wax and soft cloth
7. Dark Walnut Stained Victorian Dresser
Victorian dressers often have incredible woodwork that deserves to shine. Strip the old finish completely. Apply a rich walnut stain to bring out the grain. Multiple thin coats work better than one thick coat.
The result? Museum-quality furniture in your home.
What to buy:
- Paint stripper and steel wool
- Dark walnut wood stain
- Clear satin polyurethane finish
8. Light Sage Green with Ceramic Knobs
Sage green feels fresh and timeless. This soft color works with ceramic knobs in white or cream. Look for knobs with subtle patterns or textures. Perfect for a guest bedroom or cottage-style space.
Required materials:
- Light sage green paint
- White or cream ceramic knobs
- Soft-bristle brush for smooth finish
9. Black + Wood Grain Top in Farmhouse Antique Frame
Combine the best of both worlds. Paint the body black for drama. Strip and stain the top to show beautiful wood grain. This creates visual weight at the bottom and lighter feel on top.
You’ll need:
- Matte black paint for body
- Wood stripper for top surface
- Natural wood stain and sealer
10. Pale Blue Milk Paint with Crackle Effect
Milk paint creates that authentic aged look you can’t fake. Apply a base coat. Let it dry. Apply crackle medium. Then your top coat of pale blue milk paint. The crackling happens naturally as it dries. Magic in motion.
Crackle supplies:
- Milk paint in pale blue
- Crackle medium from same brand
- Natural bristle brushes
Rustic & Farmhouse Dresser Makeovers
Farmhouse style brings warmth and comfort to any space. These ideas capture that cozy, lived-in feeling.
11. Chalk-Painted White with Exposed Pine Top
Chalk paint gives that perfect matte, velvety finish. Paint the body white. Sand the top down to raw wood and seal with matte polyurethane. The contrast between painted and natural wood is farmhouse gold.
Materials list:
- White chalk paint
- Coarse sandpaper for stripping
- Matte polyurethane sealer
12. Soft Taupe and Linen-Colored Dry Brush Finish
Dry brushing creates subtle texture and depth. Start with a taupe base coat. Dry brush linen color over it, letting the base show through. This technique adds character without looking overdone.
Dry brush essentials:
- Taupe paint for base coat
- Linen-colored paint for top layer
- Stiff-bristled brush for technique
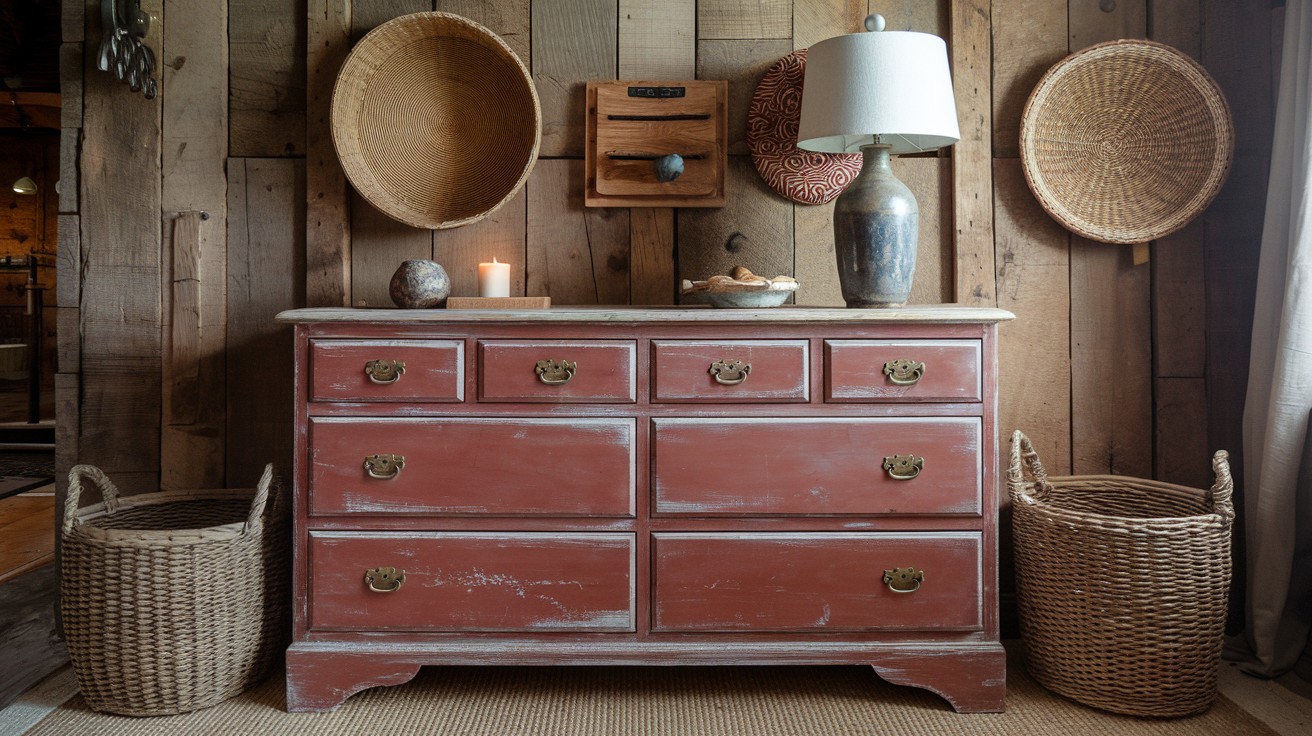
13. Distressed Barn Red with Vintage Pulls
Barn red brings instant farmhouse appeal. Paint in barn red. Sand edges and high-wear areas for authentic distressing. Add vintage-style cup pulls in aged brass. Bold but not overwhelming – perfect for a country bedroom.
Shopping needs:
- Barn red paint with flat finish
- Aged brass cup pulls
- Sandpaper for distressing edges
14. Layered Gray-and-Whitewash Technique
Layer different shades for a complex, weathered look. Start with a dark gray base. Dry brush lighter gray. Finish with whitewash glaze. Each layer shows through slightly, creating natural aging effects.
Layering supplies:
- Dark gray base paint
- Light gray for middle layer
- White glaze for final wash
15. Raw Wood Dresser Sealed with Matte Poly
Sometimes simple is best. Strip to raw wood. Sand smooth. Apply matte polyurethane for protection without shine. This lets the natural beauty of wood grain take center stage.
Basic requirements:
- Paint stripper and scrapers
- Progressive grits of sandpaper
- Matte polyurethane in clear
Boho & Eclectic Dresser Styles

Bohemian style celebrates creativity and personal expression. Mix patterns, colors, and textures freely.
16. Colorful Drawer Fronts with Mismatched Knobs
Why limit yourself to one color?
Paint each drawer a different bright color. Mix and match knobs in various styles and finishes. Rules are meant to be broken in boho design.
Rainbow supplies:
- Multiple paint colors in small quarts
- Variety pack of different knobs
- Small brushes for detail work
17. Mustard Yellow + Woven Cane Inlay Drawers
Mustard yellow is having a major moment. Paint the frame mustard yellow. Replace drawer fronts with woven cane for texture contrast. This adds natural elements while keeping the bold color impact.
Cane project needs:
- Mustard yellow paint
- Pre-woven cane webbing
- Wood trim to frame cane
18. Hand-Stamped Tribal Print Accents
Create custom patterns with stamps. Paint base color first. Use foam stamps to add tribal or geometric patterns in contrasting colors. Practice on cardboard first to get your technique down.
Stamping kit:
- Base paint in neutral tone
- Foam stamps in tribal patterns
- Contrasting paint for stamping
19. Painted Coral with Natural Rattan Handles
Coral brings warmth and energy to any space. Paint in coral. Replace knobs with natural rattan handles for organic texture. This combination feels beachy without being themed.
Coral combo items:
- Coral paint in satin finish
- Natural rattan drawer pulls
- Primer for vibrant color
20. Turquoise Base with Wood-Burned Mandala Design
Combine painting with wood burning for custom results. Paint base turquoise. Use wood burning tools to create mandala designs on drawer fronts. This takes time but creates truly one-of-a-kind furniture.
Wood burning setup:
- Turquoise paint for base
- Wood burning pen with tips
- Mandala stencils for guidance
Minimalist & Scandinavian-Inspired Finishes
Less is more in Scandinavian design. Clean lines, natural materials, and functional beauty define this style.
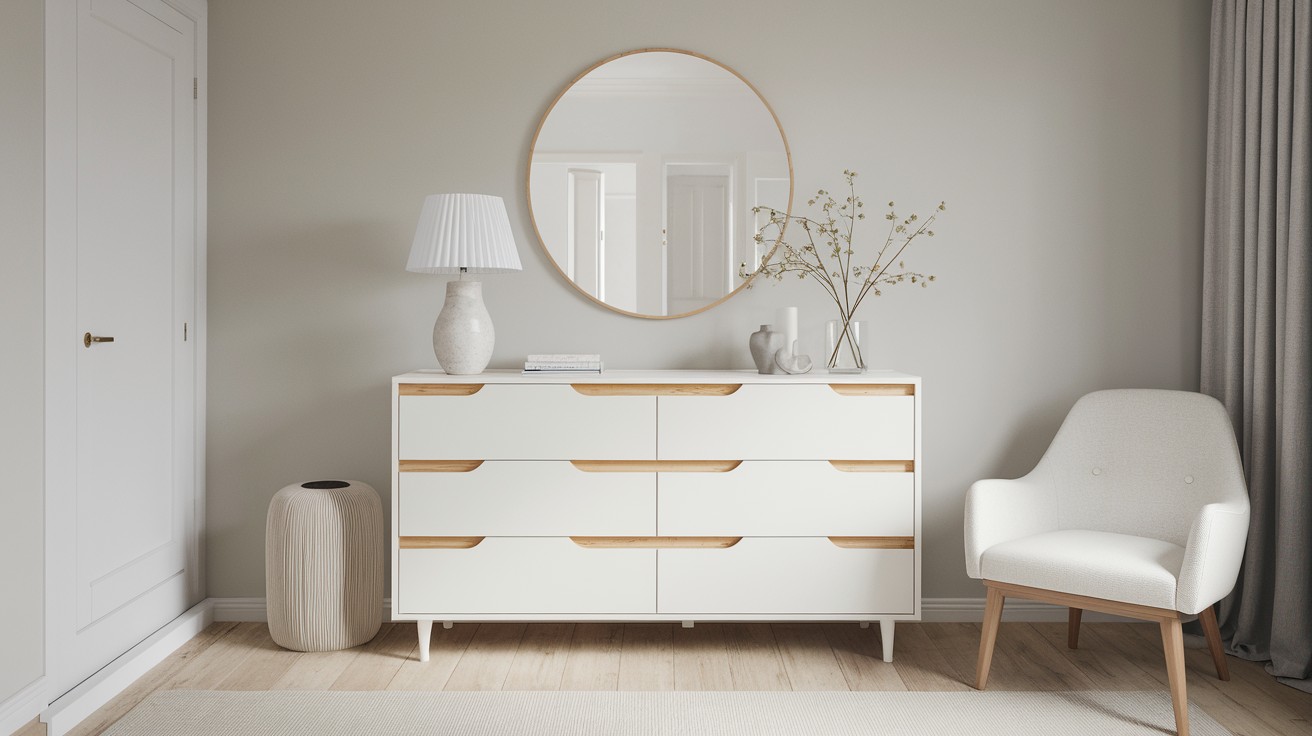
21. Pure White Dresser with Oak Handles
Classic Scandinavian combination. Paint everything pure white. Add simple oak handles in natural finish. The contrast is subtle but creates visual interest without clutter.
Minimal materials:
- Pure white paint in satin
- Natural oak bar handles
- Fine-grit sandpaper for prep
22. Bleached Pine with Tapered Legs
Bleaching lightens wood while preserving grain. Apply wood bleach according to instructions. Sand smooth. Seal with clear matte finish. Consider adding tapered legs for that mid-century Scandinavian look.
Bleaching supplies:
- Two-part wood bleach system
- Neutralizing solution
- Clear matte polyurethane
23. Warm Beige with Tone-on-Tone Drawer Pulls
Monochromatic doesn’t mean boring. Paint in warm beige. Choose drawer pulls in slightly darker or lighter beige. This creates subtle definition while maintaining clean looks.
Beige palette needs:
- Warm beige paint in eggshell
- Matching pulls in similar tone
- High-quality primer for coverage
24. Black Frame with Birch Drawer Fronts
High contrast in minimal design. Paint frame black. Replace drawer fronts with light birch wood. The contrast is striking but not overwhelming – perfect Scandinavian balance.
Contrast materials:
- Matte black paint
- Birch plywood for drawer fronts
- Wood stain in natural tone
25. No-Hardware Push-to-Open Minimalist Dresser
Ultimate minimalism removes hardware completely. Install push-to-open drawer slides. Paint in any neutral color. Clean lines with no visual interruptions – pure Scandinavian design.
Hardware-free essentials:
- Push-to-open drawer slides
- Neutral paint color
- Professional installation tools
Bold & Artistic Dresser Makeovers
Ready to make art? These ideas turn your dresser into a conversation starter.
26. Color-Blocked Geometric Design
Create modern art with paint and painter’s tape. Plan your design on paper first. Use tape to create clean geometric shapes. Paint each section different colors.
Precision is key – take time with your tape placement.
Geometric supplies:
- Multiple paint colors
- High-quality painter’s tape
- Small foam rollers for sections
27. Hand-Painted Floral Drawer Fronts
Bring garden beauty indoors. Paint base color first. Sketch flower designs lightly. Paint florals by hand using small artist brushes.
Don’t worry about perfection – slight irregularities add charm.
Floral painting kit:
- Base paint in soft neutral
- Artist acrylic paints for flowers
- Fine detail brushes, sizes 2-6
28. Graffiti-Inspired Dresser with Spray Paint
Street art meets home decor. Use stencils for clean letters. Layer different colors. Add highlights and shadows for depth. Work in a well-ventilatedarea and protect surrounding surfaces.
Graffiti essentials:
- Spray paint in multiple colors
- Letter and design stencils
- Drop cloths and masking tape
29. Ombre Effect from Soft Peach to Burnt Orange
Gradient effects create movement and interest.
Start with the lightest color at top. Blend into darker shades toward the bottom. Work quickly while the paint is wet. Practice blending technique on cardboard first.
Ombre materials:
- Peach paint for light end
- Burnt orange for dark end
- Blending brush or sponge
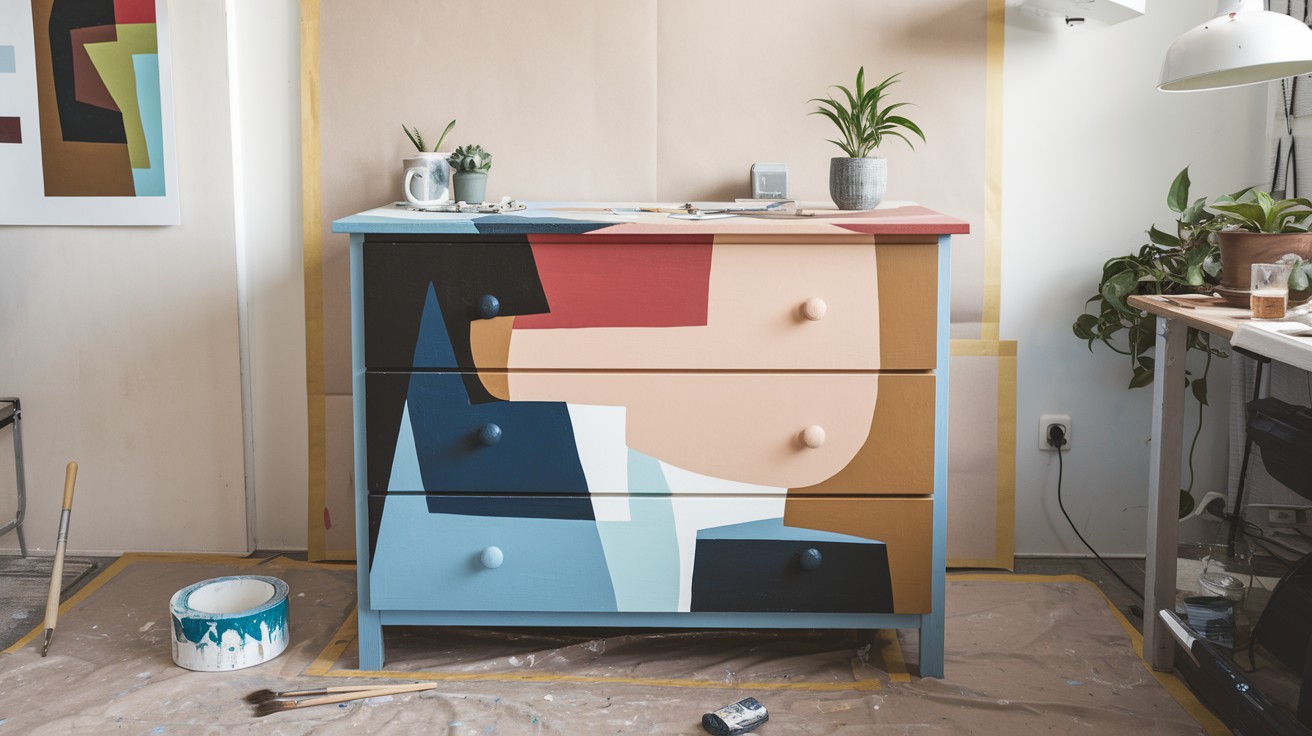
30. Abstract Brushstroke Blend in 3 Bold Colors
Let your inner artist loose. Choose three colors that work well together. Apply with large brushes using bold, confident strokes.
Don’t overthink it – abstract art should feel spontaneous.
Abstract painting needs:
- Three coordinating bold colors
- Large flat brushes, 2-4 inches
- Canvas or cardboard for practice
Upcycled & Repurposed Dressers

Sometimes the best finishing job changes the dresser’s purpose entirely. Think beyond the bedroom.
31. Dresser Turned Bathroom Vanity
Change an old dresser into a custom vanity. Cut hole in top for sink. Paint with bathroom-safe paint. Add plumbing and faucet. Check local codes before major plumbing changes.
Vanity conversion kit:
- Bathroom-safe paint and primer
- Jigsaw for cutting sink hole
- Plumbing supplies and faucet
32. Converted to Kitchen Island with Towel Bar
Add wheels and storage for mobile kitchen help. Paint in kitchen-appropriate colors. Add a towel bar to the side. Install wheels for mobility. Measure your kitchen to ensure adequate clearance.
Island makeover:
- Kitchen-safe paint finish
- Locking caster wheels
- Towel bar hardware
33. Dresser Bench with Cushion Seat
Create seating with built-in storage. Remove top drawers. Add cushioned seat on top. Keep bottom drawers for storage. Perfect for entryway or bedroom seating.
Bench conversion needs:
- Foam cushion cut to size
- Fabric for upholstery
- Hinges for lift-up seat
34. Painted Dresser Used as TV Console
Low dressers make excellent media centers.Paint to match room decor. Drill holes for cord management. Adjust shelving as needed. Measure your TV to ensure proper fit and proportion.
Media center supplies:
- Paint matching room colors
- Hole saw for cord management
- Cable management solutions
35. Nursery Changing Table with Wallpapered Drawers
Baby-safe refinish with style. Use low-VOC paint safe for nurseries. Add wallpaper to drawer fronts. Install a changing pad on top.
Safety first, ensure all finishes are baby-safe.
Nursery project materials:
- Low-VOC, baby-safe paint
- Removable wallpaper
- Changing pad with safety straps
Kids & Teen Room Dresser Ideas
Kid-friendly doesn’t mean sacrificing style. These ideas grow with children and reflect their personalities.
36. Chalkboard-Painted Drawers for Labeling
Functional and fun organization solution. Paint drawer fronts with chalkboard paint. Kids can label contents themselves. Changes easily as storage needs evolve.
Chalkboard supplies:
- Chalkboard paint in black or color
- Colored chalk or chalk markers
- Primer for smooth chalkboard surface
37. Pastel Rainbow Drawer Fronts
Gentle rainbow without overwhelming brightness. Use soft pastel versions of rainbow colors. Keep handles simple and white. Sweet but not babyish, works for older kids too.
Pastel rainbow kit:
- Six pastel paint colors
- White drawer pulls
- Small brushes for clean lines
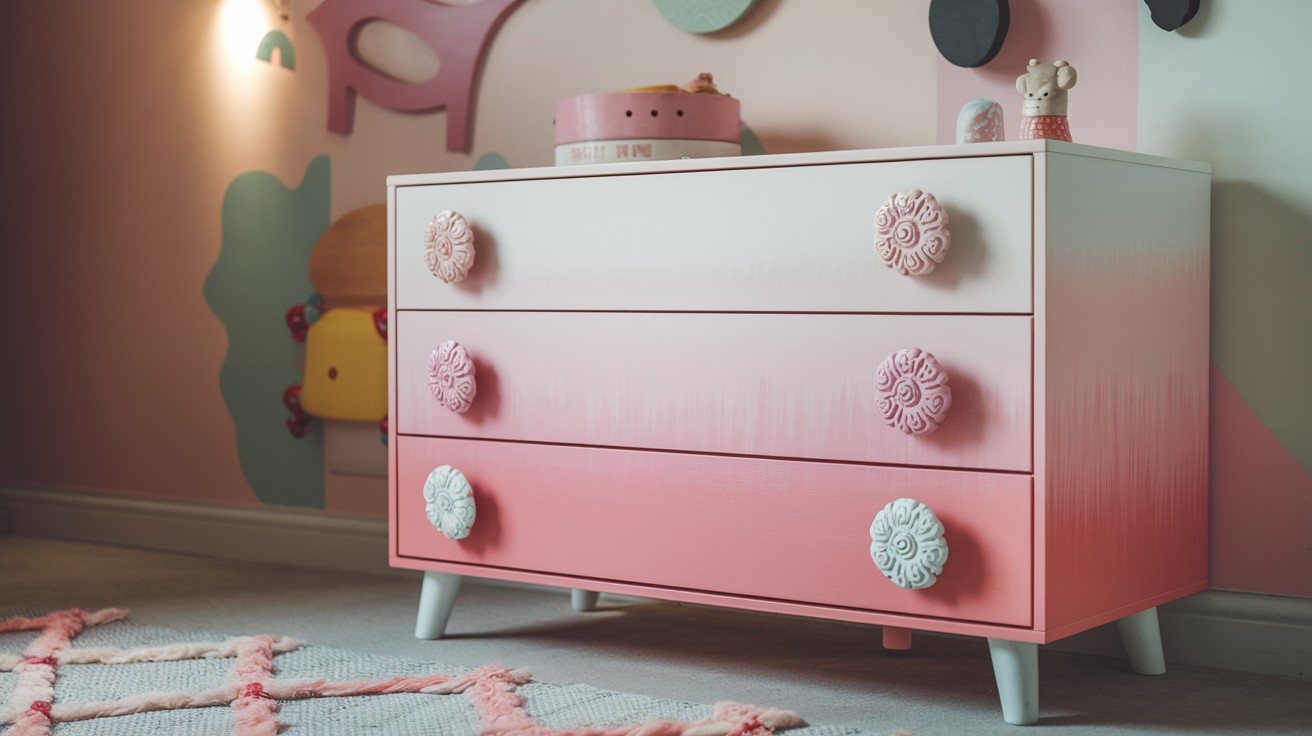
38. Ombre Pink with Floral Knobs
Princess-worthy without going overboard. Create a pink ombre from light to dark down the drawers. Add graceful floral knobs. Refined enough to transition through different ages.
Pink ombre needs:
- Light to dark pink paints
- Floral ceramic knobs
- Blending brush for smooth transitions
39. Comic Book Decoupage Front Panels
Perfect for superhero fans. Apply comic book pages with decoupage medium. Seal with multiple clear coats. Use actual comics or printed reproductions for an authentic look.
Comic decoupage kit:
- Old comic books or prints
- Decoupage medium (Mod Podge)
- Clear protective topcoat
40. Two-Tone Blue Dresser with Basketball Knob Pulls
Sports theme with style. Paint top half light blue, bottom half navy. Add basketball-shaped knobs. Theme without being overwhelming, maintains broader appeal.
Sports theme supplies:
- Light blue and navy paint
- Basketball-shaped knobs
- Painter’s tape for clean lines
Nature-Inspired & Earthy Dresser Ideas
Bring outdoor beauty inside with these earth-friendly finishes and natural materials.
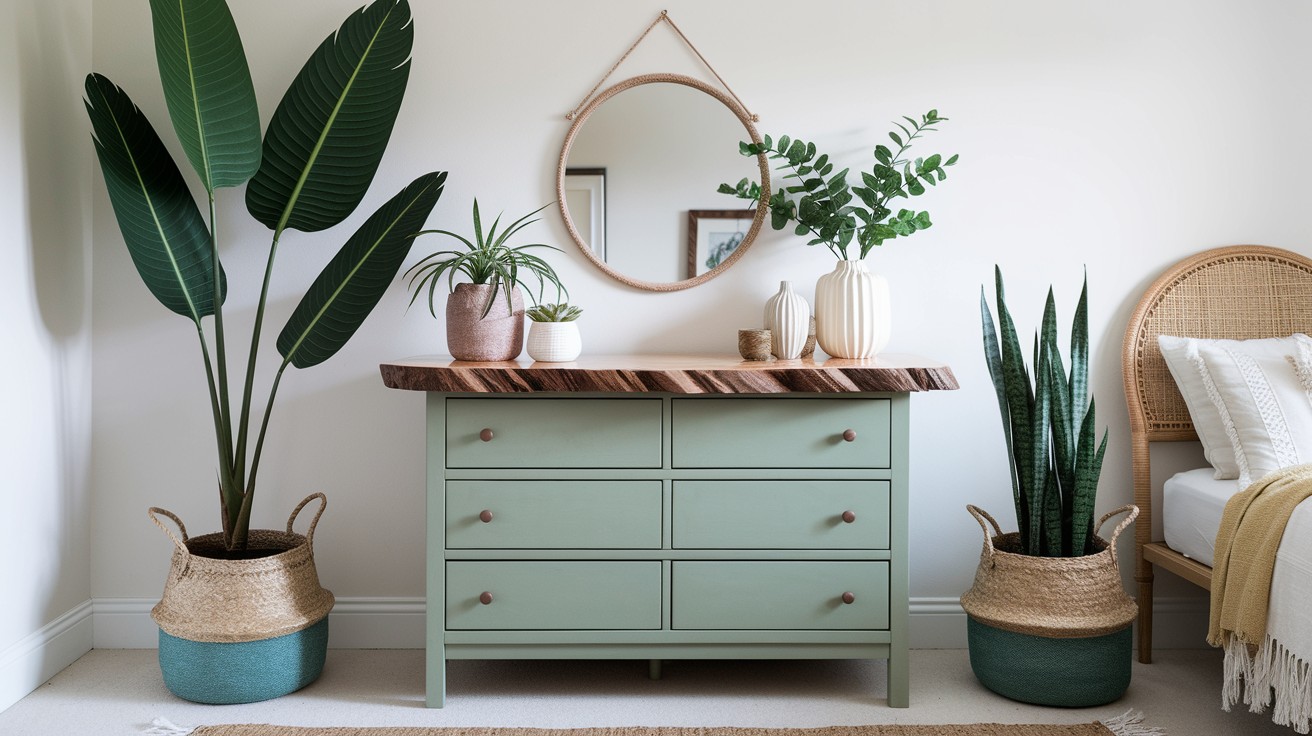
41. Moss Green Dresser with Wood Slab Top
Forest colors create a calm, grounding effect. Paint base moss green. Replace top with live-edge wood slab. Seal properly for durability. Natural materials bring an authentic outdoor feeling indoors.
Forest-inspired materials:
- Moss green paint in matte finish
- Live-edge wood slab
- Natural wood sealer
42. Painted Fern or Leaf Stencils on Drawer Faces
Botanical patterns add organic interest. Paint base color. Use leaf stencils to add darker green patterns. Vary placement for natural randomness. Layer different sizes for realistic forest floor effect.
Botanical stencil kit:
- Base paint in light natural tone
- Fern and leaf stencils
- Dark green paint for patterns
43. Clay-Colored Chalk Paint with Jute Knobs
Earthy tones feel warm and welcoming. Use clay-colored chalk paint for matte finish. Replace knobs with natural jute rope versions. Texture contrast between smooth paint and rough jute adds interest.
Earthy combination needs:
- Clay-colored chalk paint
- Jute rope drawer knobs
- Clear wax for protection
44. Stonewashed Gray + Driftwood Top
Beach-inspired without shells and anchors. Paint base weathered gray. Top with actual driftwood pieces arranged and sealed. Collect driftwood yourself or find suppliers online.
Coastal materials:
- Weathered gray paint
- Collected driftwood pieces
- Marine-grade polyurethane
45. Bamboo-Accented Drawer Panels on White Base
Sustainable materials with clean design. Paint frame white. Replace drawer fronts with bamboo panels. Frame with thin wood strips. Eco-friendly choice that looks refined and modern.
Bamboo project supplies:
- White paint for frame
- Bamboo panel sheets
- Thin wood strips for framing
Expert Tips for Dresser Refinishing Success
After refinishing dozens of dressers, I’ve learned what works and what doesn’t. Here’s what makes the difference between amateur and professional results.
Prep work is everything. Spend more time on sanding and cleaning than you think you need. Paint only sticks well to properly prepared surfaces.
Use quality brushes and rollers. Cheap tools leave marks and shed bristles. Good tools make smooth finishes easier to achieve.
Thin coats beat thick ones every time. Multiple thin coats look better and last longer than fewer thick ones.
Work in proper lighting. Poor lighting hides flaws until it’s too late. Use bright work lights to catch problems early.
Test techniques first. Try new finishes or colors on hidden areas before committing to visible surfaces.
Protect your work area. Drop cloths and proper ventilation prevent damage to surrounding areas and your health.
Document your process. Take before photos and note paint colors for future touch-ups or matching projects.
Invest in good sandpaper. Quality sandpaper cuts faster and lasts longer. Replace when it stops cutting effectively.
Conclusion
Your dresser makeover starts now.
These 45 refinished dresser ideas give you everything needed to create something amazing. From simple paint jobs to complex artistic designs, you have options for every skill level.
The best part? Most techniques take just a weekend to complete.
I’ve shown you modern styles, vintage looks, and bold artistic approaches. Pick the one that matches your vision and room style. Start small if you’re nervous. Try a simple paint color first. Build confidence with basic techniques before attempting complex finishes.
Remember, every expert was once a beginner. Your dresser is waiting for its makeover.
Which style caught your eye? Pick one and start this weekend. Your room will thank you.
Frequently Asked Questions
What’s the easiest dresser refinishing technique for beginners?
Chalk paint is your best friend for first-time projects. It covers well without primer and hides minor imperfections beautifully.
Can I refinish a dresser without removing the old finish?
Yes, if the existing finish is solid and not peeling. Light sanding and good primer let you paint right over most finishes.
How do I choose the right color for my dresser?
Consider your room’s existing colors and lighting first. Neutral colors like white, gray, or black work in any space and never go out of style.
What’s the biggest mistake people make when refinishing dressers?
Rushing the prep work ruins more projects than anything else. Take time to clean, sand, and prime properly for professional-looking results.
How long will my refinished dresser last?
A properly done refinish job lasts 10-15 years with normal use. High-quality paint and proper sealing make the biggest difference in durability.