
Have you ever bought a beautiful brass piece only to realize it’s too shiny for your space?
I get it. Sometimes you need that aged, vintage look to match your home’s style. Maybe you’re working on a DIY project or just want to tone down bright hardware.
The good news is you can age brass yourself at home. You don’t need fancy tools or special training. A few simple household items will do the trick. This guide will walk you through easy methods that actually work.
Let’s turn that shiny brass into something with character and history.
What You Need to Know Before Tarnishing Brass

Preparing your brass correctly ensures better results and helps you avoid common mistakes that can ruin your piece.
Check if Your Brass Is Solid or Plated
Use the magnet test to identify your brass type. Hold a magnet against the piece. If it sticks, you have plated brass with a base metal underneath. No attraction means solid brass.
This matters because plated brass has a thin surface layer that wears off easily. Solid brass handles aggressive aging better, while plated pieces need gentle treatment.
Remove Lacquer or Coating First
New brass often has a protective lacquer that blocks aging solutions. Touch your piece. If it feels smooth and slick, lacquer is present. Soak it in hot, soapy water for 30 minutes, then scrub with steel wool.
For stubborn coatings, use acetone on a cloth in a ventilated space. The brass should feel slightly textured when clean.
Clean the Brass for Best Results
Dirt and oils cause uneven tarnishing. Wash your brass with warm water and dish soap using a soft cloth. For deeper cleaning, make a paste with equal parts salt, flour, and vinegar.
Apply it, wait a few minutes, then rinse thoroughly. Dry completely with a clean towel to prevent water spots from affecting the aging process.
Quick & Effective Methods to Tarnish Brass
Now that your brass is prepped, let’s look at the actual aging methods. Each technique creates a different finish and works at different speeds.
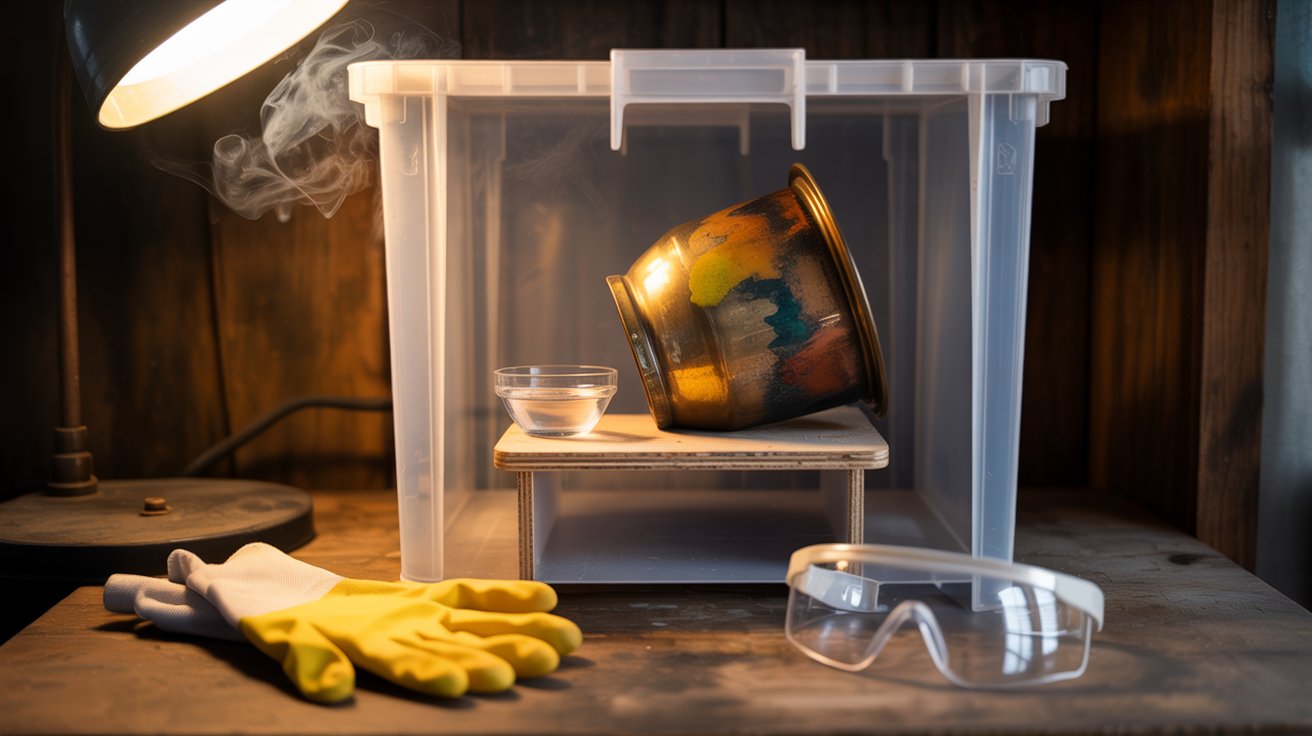
Method 1: Using Vinegar & Salt Fumes (Beginner-Friendly)

This method is safe, simple, and uses items you already have at home. The fumes from vinegar and salt slowly age the brass without any scrubbing.
Steps
Pour white vinegar into a shallow bowl and add a tablespoon of salt. Stir until dissolved. Place your brass on a raised platform inside a larger plastic container.
Set the vinegar mixture beside it without touching. Close the lid to trap fumes. Check every few hours. The process takes 12 to 24 hours.
Remove and rinse when you like the color.
Results
This creates a soft, natural patina with brown and greenish tones. The finish looks authentic and you get good control over the darkness.
Best for: Hardware, knobs, and small home décor pieces.
Method 2: Liver of Sulfur for Deep Antique Patina

Liver sulfur creates rich, dark colors that look professionally done. This is what jewelers use for quick aging.
Steps
Fill a glass container with warm water. Add liver of sulfur following package directions. The water turns yellow. Dip your brass using plastic tongs.
Color changes happen in minutes. Remove and rinse under cool water when you reach the desired darkness.
You can buff certain areas with steel wool for highlights.
Safety Tips
This smells like rotten eggs. Work outside or in a ventilated area. Wear rubber gloves. Don’t use metal containers. Keep away from children and pets.
Best for: Jewelry, small detailed pieces, and items needing dramatic dark finishes.
Method 3: Ammonia Fuming for Strong, Fast Patina
Ammonia fumes create quick, intense patina. This method works fast but needs careful handling.
Steps
Pour household ammonia into a glass bowl. Place your brass on a raised platform inside a plastic bin. Don’t let brass touch the liquid.
Set the ammonia bowl next to it and seal the container. Check every 30 minutes. Brass darkens within hours.
Remove when satisfied, air out for 30 minutes, then rinse.
Precautions
Ammonia fumes are strong. Always work outside or in an open garage. Wear gloves and safety glasses. Don’t breathe fumes directly. Keep sealed containers away from living spaces.
Best for: Raw brass, hardware, door handles, and musical instrument parts.
Method 4: Heat Patina (Torch or Boiling Water)

Heat changes brass surface color based on temperature. This gives you artistic control over the final look.
Steps
For the torch method, hold a propane torch a few inches from brass. Move it slowly across the surface.
For the boiling water method, use tongs to dip brass into rolling boiling water for 30 seconds. Remove and let cool.
Repeat several times.
Color Outcomes
Light heat produces gold and amber. Medium heat creates brown and copper. Higher heat brings bronze and purple.
Longer heat means darker brass. You can create patterns by heating specific areas more.
Best for: Raw hardware, DIY craft projects, and artistic pieces.
Method 5: Salt, Lemon & Accelerated Oxidation

This natural method uses citric acid and salt to speed up oxidation. It’s gentle and creates an organic aged look.
Steps
Squeeze lemon juice into a bowl and add a tablespoon of salt. Mix well. Apply this mixture to your brass with a cloth. Cover the entire surface.
Let sit for 30 minutes to several hours. For faster results, sprinkle extra salt on the wet brass.
Rinse thoroughly and dry.
Natural and Mild Antique Finish
This creates a subtle, weathered look with warm brown tones and slight green hints. The process is forgiving and hard to mess up.
Best for: Decorative pieces, picture frames, and light vintage looks.
Method 6: Commercial Brass Aging Solutions

Store-bought products work consistently and give predictable results every time. This is the most reliable method.
Products
Look for Jax Brown or Brass Ager at hardware stores. These solutions come ready to use. Check the label to confirm it works on brass.
Steps
Wear rubber gloves. Apply the solution with a brush or cloth in thin, even coats. Color changes happen within seconds to minutes.
Apply multiple coats for darker finish. Some products need rinsing, others just dry. Check instructions.
Let brass dry completely before handling.
Fastest and Most Consistent
Commercial solutions remove guesswork. The finish is even and professional. Best choice for multiple pieces that need to match. Results appear in under 10 minutes.
Best for: Professional projects, multiple matching pieces, and time-sensitive situations.
Tips for Getting an Authentic Antique Look
- Layering Patinas for Rich Color: Don’t limit yourself to one method. Try combining techniques for depth. Start with vinegar treatment, then add heat or ammonia for darker areas. Real antique brass develops layers over time.
- Spot-Tarnishing for a Distressed Finish: Authentic aged brass doesn’t darken evenly. Apply aging solutions to edges, corners, and recessed details. Leave some spots lighter to mimic natural wear. Use a cotton swab for precise control.
- Avoiding Over-Patination: It’s easier to add more tarnish than remove it. Check your brass frequently and stop before it gets too dark. If you go too far, you’ll need to polish and start over.
- Rinsing & Neutralizing Chemicals Properly: Always rinse your brass thoroughly after using any solution. Leftover chemicals continue reacting and create uneven spots. Use cool water for at least a minute. For strong chemicals, rinse with baking soda solution.
- Sealing Your Finish: Once you achieve the perfect patina, protect it with clear sealer. Use spray lacquer or paste wax designed for metal. This prevents further tarnishing and keeps your finish intact.
Conclusion
Aging brass at home is simpler than most people think. You don’t need expensive tools or professional skills to get that perfect vintage finish.
The methods I’ve shared work with basic household items and give you complete control over the final look.
Try vinegar fumes for a gentle patina, ammonia for quick results, or heat for artistic color variations. Each technique offers something different.
Pick the one that matches your project and comfort level. With a little patience and experimentation, you’ll create beautifully aged brass that looks like it’s been around for decades.
Now it’s your turn to give it a try.
Frequently Asked Questions
Can you tarnish brass that has a lacquer coating?
No, the lacquer acts as a barrier and blocks aging solutions from reaching the brass surface. You need to remove the coating first by soaking the piece in hot soapy water and scrubbing with steel wool before any tarnishing method will work.
How long does it take to tarnish brass naturally?
Natural tarnishing can take months or even years depending on environmental conditions. Using methods like vinegar fumes speeds this up to 12-24 hours, while ammonia or commercial solutions can create patina in just a few hours or minutes.
Will tarnished brass continue to darken over time?
Yes, unless you seal it with a protective coating like lacquer or wax. Exposed brass continues reacting with air and moisture, which means the patina will keep developing. Apply a clear sealer if you want to preserve your exact finish.
Can you remove tarnish if you don’t like the results?
Yes, you can polish brass back to its original shine using commercial brass cleaner, a paste of lemon and salt, or a mixture of vinegar and baking soda. Once cleaned, you can start over with a different aging method or lighter application.
Does tarnishing brass weaken or damage the metal?
No, tarnishing only affects the surface layer and doesn’t compromise the structural integrity of brass. The patina is just oxidation on top of the metal. However, be gentle with brass-plated items since aggressive methods can wear through the thin brass coating.