
A raised garden bed with legs is simply a container for growing plants that stands above ground level on supports. These practical structures have gained favor among gardeners who have limited space or want to reduce bending and kneeling. Raised beds with legs bring the garden up to you, making them perfect for patios, decks, and accessible gardening.
In this article, I’ll guide you through building your elevated garden bed step by step. You won’t need advanced woodworking skills or expensive tools to complete this project successfully. As someone who has built several of these beds for my small balcony and community gardens, I can confirm that this design works well even in tight spaces.
The instructions focus on what you truly need: a simple, functional growing space that keeps soil at a comfortable height. Let’s create a garden bed that meets your needs without making the process complicated. To For detailed step-by-step guidance and material lists, check out these free raised garden bed plans from Craftcamp that walk you through the entire building process”
Materials and Tools You’ll Need
Materials:
- Cedar or pressure-treated lumber
- Galvanized or deck screws (2-3 inches)
- Landscape fabric
- 4×4 posts for legs
- Corner braces (L-brackets)
- Mesh screen
Optional Materials:
- Casters for mobility
- Wood sealant
- Plastic liner
Tools:
- Power drill with screwdriver bits
- Saw (circular or hand)
- Tape measure
- Level
- Pencil
- Safety glasses
- Work gloves
I’ve made several beds with just these items. What size are you planning for your garden bed?
Plan Before You Build
Size Options:
- Small: 2×4 feet (good for tight spaces)
- Medium: 3×6 feet (more growing area)
- Custom: Based on your available space
Height Guidelines:
- Standing gardeners: 30-36 inches
- Wheelchair users: 24-30 inches
- Soil depth needed: 8-12 inches minimum
Location Requirements:
- Full sun (6+ hours daily)
- Flat, stable surface
- Easy water access
- Wind protection, if possible
I recommend marking your chosen spot with string or chalk before building. This helps you visualize how the bed will fit in your space.
Step-by-Step: How to Build a Raised Garden Bed With Legs
Step 1 – Cut the Wood
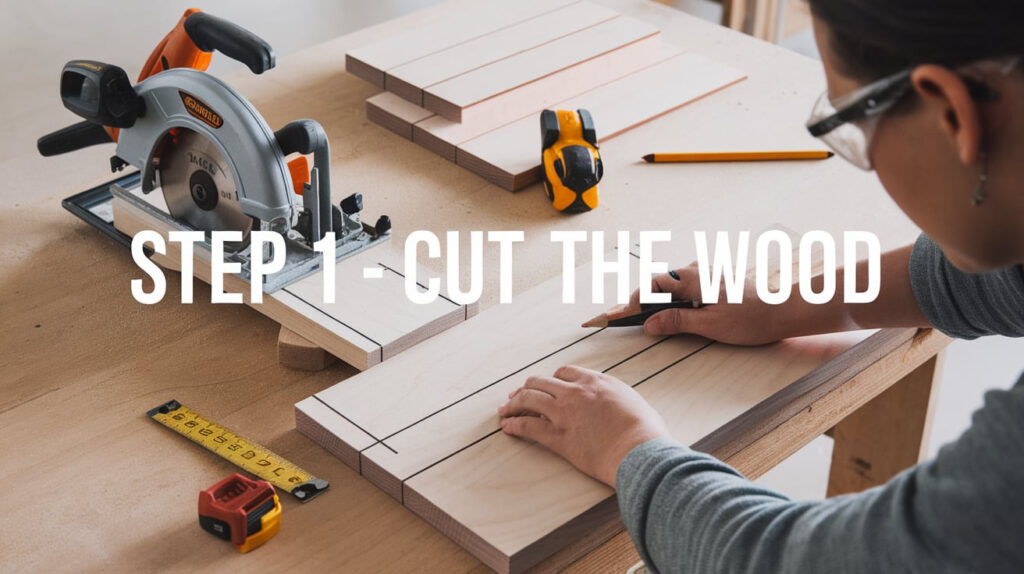
Before making any cuts, I always double-check my measurements. Measure twice, cut once is a rule that has saved me from wasting materials.
For a basic 2×4-foot raised bed with legs, you’ll need:
- 2 pieces at 4 feet long (long sides)
- 2 pieces at 2 feet long (short sides)
- 5-7 pieces at 2 feet long (bottom slats)
- 4 pieces at 30-36 inches (legs)
- 4 pieces at 18-24 inches (cross supports)
Safety tip: Always wear eye protection when cutting wood. I learned this lesson when a wood chip flew into my eye years ago.
Mark your cutting lines clearly with a pencil and straight edge. If you’re using a power saw, clamp the boards securely before cutting.
Step 2 – Build the Frame
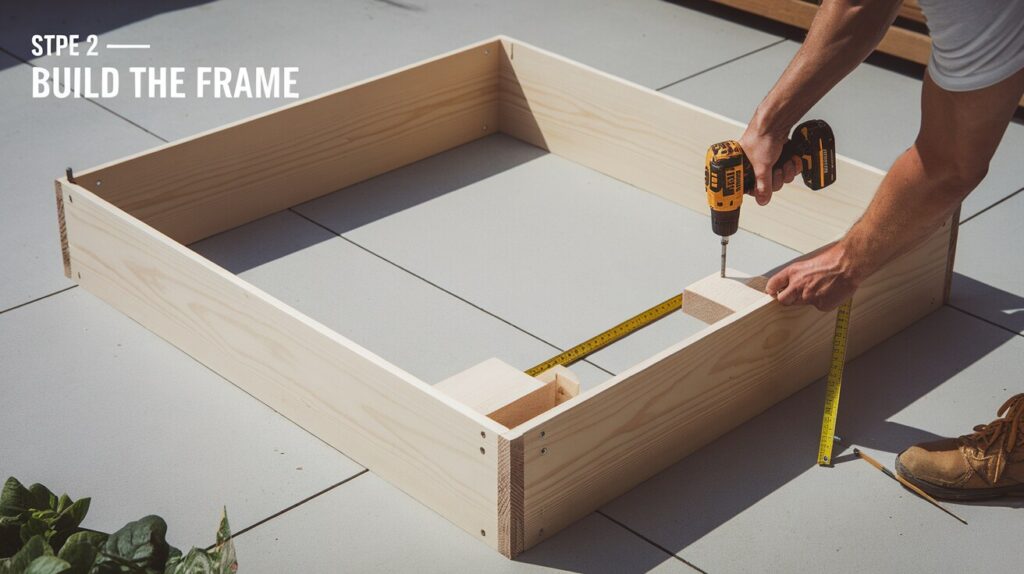
I find it easiest to start by building the main box before adding legs.
- Lay out your boards in a rectangle on a flat surface
- Pre-drill holes at each corner to prevent the wood from splitting
- Connect the short sides to the long sides using 2-3 screws at each corner
- Check for square corners by measuring diagonally from corner to corner – both measurements should be equal
A wobbly frame will cause problems later. Take your time with this step to make sure everything is straight and secure.
Step 3 – Attach the Legs
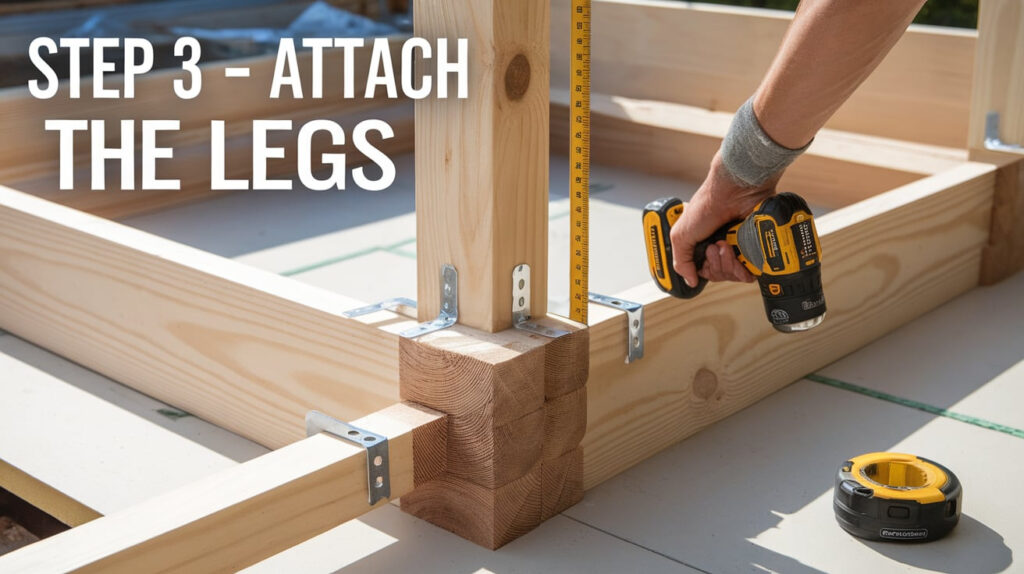
This is where your garden bed starts to take shape and stand on its own.
For each leg:
- Position the 4×4 post at the inside corner of your frame
- Secure it with at least 3 screws through the frame into the leg
- Use metal L-brackets for extra strength
- Add cross supports between legs on each side for stability
Make sure all legs are even by measuring from the ground up. Uneven legs will make your bed wobble and possibly tip when filled with soil.
Step 4 – Install the Base
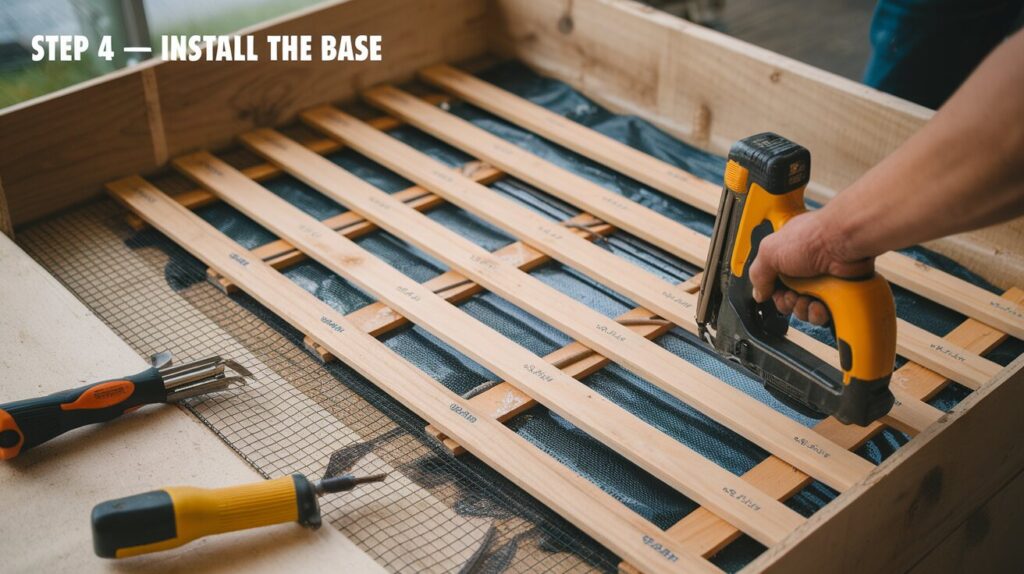
Your plants need a solid foundation that provides good drainage.
- Flip your frame upside down.
- Attach slats across the bottom, leaving small gaps (¼ inch) between each board.
- Cover the entire bottom with a mesh screen
- Add a layer of landscape fabric on top of the screen
I’ve found that drainage is crucial for plant health. Too much water trapped in the bed will rot your plants’ roots.
Step 5 – Optional Add-Ons
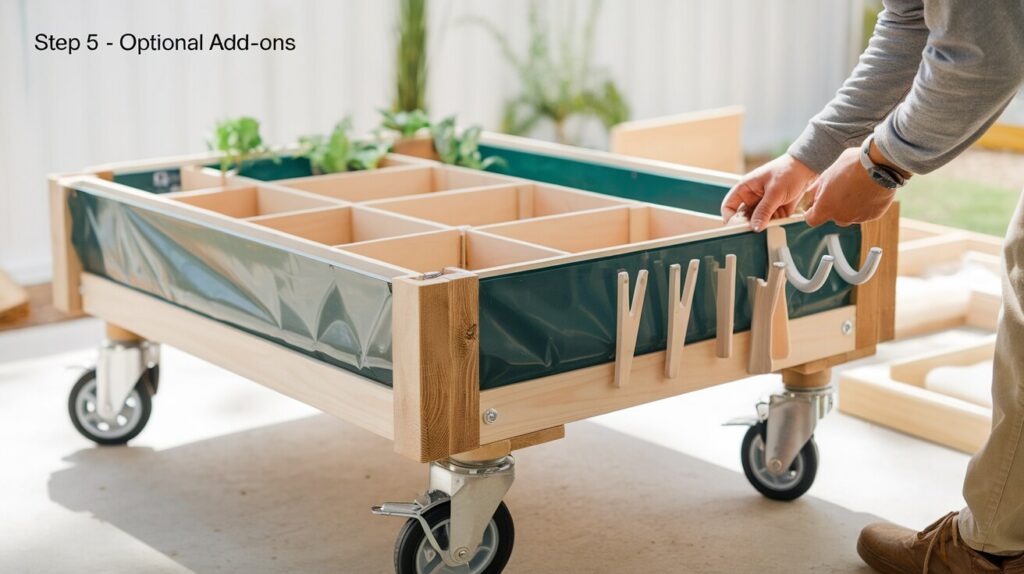
These extras can make your garden bed more functional:
- Casters: Attach one to each leg for mobility. Choose locking wheels that can hold at least 50 pounds each.
- Plastic liner: If you’re worried about chemicals from pressure-treated wood, line the inside walls with heavy plastic.
- Dividers: Add wooden partitions to create separate growing areas.
- Tool hooks: Attach small hooks to one side to hang gardening tools.
I added casters to my garden bed, and it’s been great for moving it to catch the best sun throughout the seasons.
Once everything is built, you might want to sand any rough edges and apply a non-toxic wood sealer if you’re using untreated wood.
Filling Your Raised Garden Bed
Best Soil Mix:
- 60% topsoil as your base
- 30% compost for nutrients
- 10% perlite or vermiculite for drainage
Fill to about 1 inch below the edge and mix in slow-release organic fertilizer throughout the soil.
Quick Planting Tips:
- Best for beginners: lettuce, herbs, radishes, bush beans
- Avoid corn and large spreading plants in small beds
- Plant only 4-5 different types in a 2×4-foot bed
- Follow spacing guidelines on seed packets
- Water thoroughly after planting and check the moisture often
I tried plain garden soil in my first raised bed and regretted it. The mix above has given me much better results.
Maintenance and Longevity Tips
Your raised garden bed will last for years with proper care. I check mine every spring before planting season starts.
Check the structure regularly:
- Tighten any loose screws at least twice a year
- Test leg stability by gently pushing on each corner
- Look for signs of wood rot, especially where the legs meet the ground
- Confirm that the cross supports remain firmly attached
Wood protection matters. I apply a food-safe wood sealer each spring after a light sanding. This simple step has kept my cedar bed looking good for five years now.
Don’t forget what’s inside the bed. Soil breaks down over time and loses nutrients.
To keep your garden productive:
- Add 2-3 inches of fresh compost each spring
- Replace about ⅓ of the soil every 2-3 years
- Test soil pH once yearly and adjust as needed
- Remove plant debris at the end of each season
Winter care tip: Cover your empty bed with a tarp in snowy regions. This reduces moisture damage and extends the life of your wood.
If you added wheels to your bed, check that they lock securely. A heavy bed that rolls unexpectedly can cause injuries or damage to plants.
These simple maintenance steps take just a few hours each year but can double the lifespan of your raised garden bed.
Common Mistakes to Avoid
I’ve made plenty of errors while building raised garden beds over the years. Learn from my mistakes so you don’t have to repeat them.
Using the wrong wood is a costly error. My first bed used pine boards that rotted within two seasons. Cedar, redwood, or pressure-treated lumber rated for ground contact will last much longer.
Poor drainage causes plant death. I once built a bed with a solid bottom that collected water like a bathtub. Make sure your base has:
- Enough drainage holes (at least one every 6 inches)
- Proper spacing between the bottom slats
- Landscape fabric that allows water through
Overfilling with soil puts tremendous pressure on your frame. Wet soil is surprisingly heavy! I’ve seen beds split at the seams from this pressure. Fill your bed to 1 inch below the top edge, not to the brim.
The legs need proper support. Without cross braces, your bed will wobble dangerously when full of soil. Each leg should connect to at least two support pieces for proper stability.
Other common mistakes include:
- Using indoor screws that rust quickly outs The building is too wide to reach the middle (keep width under 4 feet)
- Placing the bed in deep shade and wondering why plants don’t grow
- Skipping the pre-drilling step, which causes wood to split
I check all these points twice before considering a raised bed project complete. Taking time to avoid these mistakes will save you money and frustration.
Conclusion
Building a raised garden bed with legs is a project that’s within reach for most people. With basic tools, some careful planning, and an afternoon of work, you can create a functional growing space that puts less strain on your back and fits in small areas.
I’ve built several of these beds and continue to be amazed at how much food they produce. The elevated design makes gardening more comfortable and brings plants to eye level, where you can better watch for pests and problems.
Your raised bed can be customized to fit your exact needs. Make it smaller for a tiny balcony or add wheels if you need to move it regularly. The basic construction method stays the same.
Use durable wood that resists rot, and don’t skip the cross braces for stability. Create proper drainage in the base and use the right soil mix for container growing.
Have you built your own raised bed with legs? Share your experience in the comments! I’d love to hear what worked well and what you might do differently next time.