
Garage organization feels impossible when boxes, tools, and seasonal items fight for floor space. But look up! The ceiling offers valuable storage real estate that most homeowners ignore.
In this article, I’ll show you 11 practical ceiling storage solutions that free up your garage floor without breaking the bank. Real homeowners and garage organization experts have tested each idea.
We’ve researched dozens of options to bring you only the most useful and simple-to-implement ceiling storage methods. Our team has analyzed these solutions for durability, ease of installation, and cost-effectiveness.
Your search for garage organization ends here. These ideas work for spaces of all sizes—from small single-car garages to larger multi-car setups. Say goodbye to clutter and hello to a functional garage where you can park your car again!
Genius Garage Ceiling Storage Ideas
With these ideas, your garage ceiling becomes valuable storage space rather than wasted air. Start with one method that fits your needs and budget. You can always add more as you see the benefits!
1. Overhead Racks and Shelving
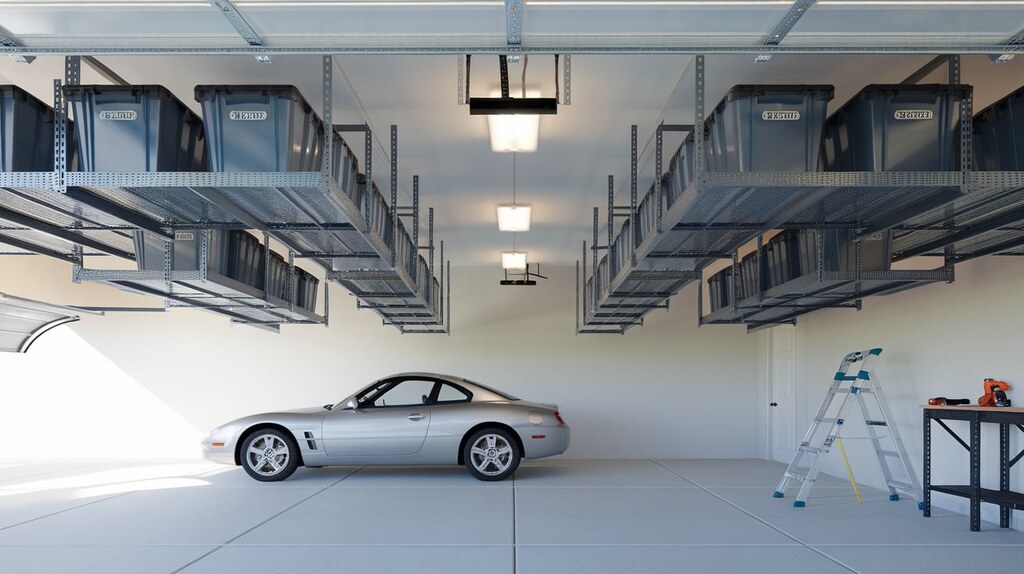
Looking up changed how I organize my garage. Overhead racks are a game-changer for storing holiday decorations, camping gear, and those bulky storage bins.
How to incorporate it:
- Measure your ceiling height and available space
- Find ceiling joists using a stud finder
- Choose racks sized for your space (usually 4’×8′ or 4’×4′)
- Gather help for installation day
- Secure all mounting brackets to joists with lag bolts
- Attach the frame and wire grid
You can install these racks yourself with basic tools. Most systems attach directly to ceiling joists for strong support. I recommend leaving 12-18 inches of space between the ceiling and the rack for easy loading.
Benefits you’ll notice right away:
- Your floor stays clear for parking and walking
- Large storage containers find a proper home
- Items stay visible but out of the way
Pro tip: Label your bins clearly from below so you can spot what you need without climbing a ladder each time.
More details to consider: These racks come in various sizes and weight capacities. For general household storage, a system rated for 250-300 pounds works well. Heavy-duty versions can hold up to 600 pounds when properly installed. The wire grid design prevents dust buildup compared to solid shelves.
Cost: $100-250 for a quality 4’×8′ system. Budget options start around $70, but I don’t recommend skimping on hardware that holds items over your head and car.
Installation time: 2-3 hours for the first rack, less for additional units once you get the hang of it.
Maintenance: Check the mounting bolts twice yearly to ensure they remain tight. Wipe down the wire grid occasionally to prevent dust buildup.
2. Ceiling Hooks and Hangers
Simple hooks make a huge difference. I’ve helped dozens of homeowners transform their garages with this basic fix.
How to incorporate it:
- Select hooks based on weight needs (check weight ratings)
- Locate ceiling joists for secure mounting
- Mark hooks positions with a pencil
- Pre-drill small pilot holes
- Screw hooks directly into joists
- Test each hook by hanging from it briefly
Strong ceiling hooks cost just a few dollars each but give you spots to hang:
- Bikes
- Ladders
- Garden tools
- Extension cords
- Hoses
The trick is placing them in smart spots. Keep frequently used items near the garage door. Put seasonal stuff toward the back.
Your garage will feel twice as big when these bulky items move from your floor to your ceiling.
More details to consider: Not all hooks are created equal. Look for vinyl-coated hooks for items that might get scratched, and raw metal hooks for maximum strength. J-hooks work well for most items, while specialized hooks exist for specific gear like bikes and ladders.
The size of the screw thread matters a lot. For heavy items (over 20 pounds), choose hooks with at least 1/4-inch thick threads that bite deep into the wood. For lighter items, 3/16-inch threads work fine.
Cost: $2-10 per hook, depending on size and quality. A typical garage might need 8-12 hooks total.
Installation time: About 10 minutes per hook once you locate the joists.
Safety note: Always install hooks into solid wood joists, never into drywall anchors or directly into the ceiling material. The extra time spent finding joists prevents accidents later.
3. Pulley Systems for Heavy Items
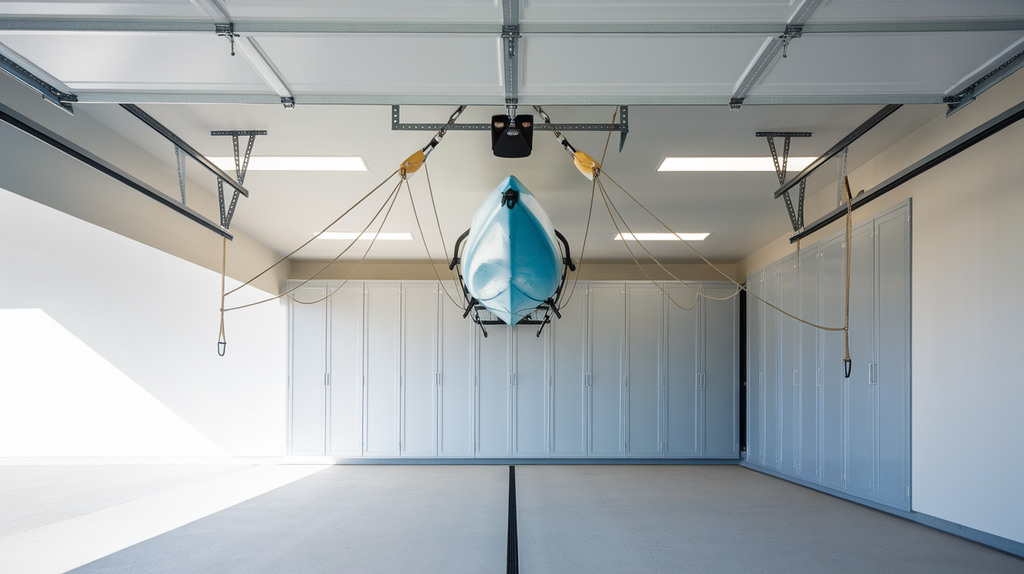
My back thanks me every day for installing a pulley system for my kayak. You’ll love how easy it becomes to handle heavy items.
How to incorporate it:
- Purchase a pulley kit rated for your item’s weight
- Find and mark ceiling joists
- Install mounting brackets into joists with lag bolts
- Thread the rope through the pulley system
- Attach the hooks or straps to your item
- Install a cleat on the wall to secure the rope
With simple mechanics, a pulley system lets you:
- Lift heavy items with minimal effort
- Store bulky gear safely overhead
- Lower items when needed without strain
Your kayaks, canoes, or cargo carriers can hang safely until your next outing. The best part? You can manage the whole system yourself, even with heavy loads.
More details to consider: The magic of pulley systems is in the mechanical advantage they provide. A quality 4:1 pulley system means you’re only lifting about 25% of the actual weight. This makes it possible for anyone to lift a 100-pound kayak with just 25 pounds of force.
Look for systems with auto-locking mechanisms that prevent accidental drops. The rope quality matters too—choose one that won’t fray over time and has low stretch properties.
Most pulley systems can be adjusted to work with various items. I switch between storing my kayak in summer and my cargo box in winter using the same pulley system.
Cost: $30-120, depending on weight capacity and features. The difference between cheap and quality systems is significant here—don’t cut corners.
Installation time: About 1-2 hours total.
Weight limits: Most home systems handle items up to 125 pounds, but specialized systems can manage up to 300 pounds safely.
4. Overhead Storage Platforms
Build once, store forever. A solid platform attached to your ceiling joists creates a flat storage surface for boxes and bins.
How to incorporate it:
- Map your ceiling joists and plan your platform size
- Cut 2×4s for the frame structure
- Secure the frame to the ceiling joists with lag bolts
- Cut plywood to size for the platform surface
- Attach plywood to the frame with screws
- Add safety rails if needed to prevent items from falling
I built mine using:
- 2×4 lumber for the frame
- Plywood for the platform surface
- Lag bolts to secure it to the ceiling joists
You choose the size that works for your space. Some homeowners cover a small section, while others utilize the entire ceiling.
Your least-used items find a perfect home up high, keeping floor space open for daily activities.
More details to consider: Custom-built platforms offer something commercial options can’t—a perfect fit for your unique space. I built mine around light fixtures and worked with ceiling height changes.
The depth of your 2×4 frame determines overall strength. For light storage (holiday decorations, empty luggage), a basic frame works fine. For heavier loads, consider adding cross-bracing every 16 inches.
Think about access when planning. Will you need a ladder? Should you install it near a wall for easier climbing? My platform sits 24 inches below the ceiling to allow room for tall items.
For a finished look, paint the plywood to match your garage color scheme. This simple step makes your DIY project look professional.
Cost: $100-200 for materials to build an 8’×8′ platform, depending on wood prices.
Installation time: 4-8 hours, depending on complexity and your carpentry skills.
Weight capacity: With proper construction into joists, expect 20-40 pounds per square foot of capacity.
5. Ceiling-Mounted Cabinets
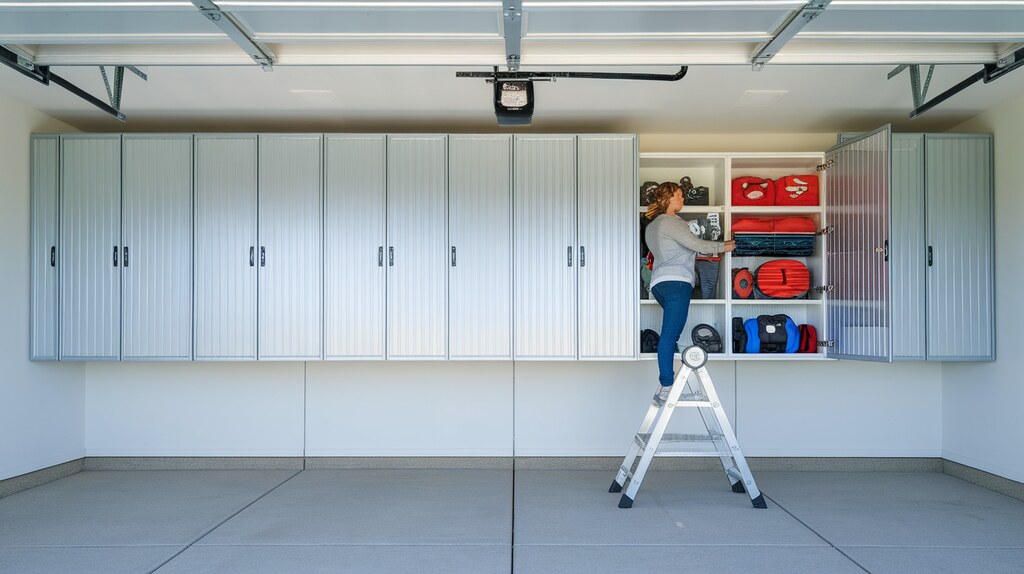
Want to keep dust off your stuff? Closed cabinets attached to the ceiling protect items while keeping them organized.
How to incorporate it:
- Select cabinets designed for ceiling mounting
- Locate and mark ceiling joists
- Pre-drill mounting holes in cabinet backs
- Use a friend or a jack to hold the cabinets in place during installation
- Secure cabinets to joists with lag screws
- Test door operation and adjust hinges if needed
These work well for:
- Car care products
- Seasonal decorations
- Paint supplies
- Sports equipment
Look for cabinets with doors that swing down or slide open for easy access. The enclosed space keeps everything clean and hidden.
Your garage instantly looks more organized when items move from open shelves to closed cabinets.
More details to consider: Cabinet door style makes a big difference in usability. Flip-down doors let you see all contents at once, but need clearance to open. Sliding doors work in tight spaces but limit full view of contents.
Materials matter in garage environments. Metal cabinets resist moisture better than particleboard options. If choosing wood cabinets, look for sealed or painted surfaces that won’t absorb humidity.
Weight distribution is critical. I installed French cleats behind my cabinets to spread the load across multiple joists. This prevents sagging over time and makes alignment easier during installation.
Consider adding LED strip lighting to the bottom of cabinets. This creates useful task lighting for your work area below while making good use of the cabinet’s location.
Cost: $120-350 per cabinet, depending on size, material, and features.
Installation time: About 1 hour per cabinet.
Storage capacity: A standard 30″ wide wall cabinet holds roughly 12-15 cubic feet of items.
6. Retractable Ceiling Storage Systems
This changed how I use my garage. With a retractable system, storage comes to you when needed.
How to incorporate it:
- Choose between motorized or manual retractable systems
- Measure and mark the ceiling joist locations
- Install mounting brackets into the ceiling joists
- Attach the lift mechanism according to instructions
- Connect the power source if using a motorized system
- Test the system with light loads before adding all items
These smart systems:
- Lower when you need access
- Raise back up when you’re done
- Keep items within reach without permanent ladders
I love how my holiday decorations drop down when December arrives, then hide away the rest of the year.
You save your energy since there’s no climbing or stretching to reach items.
More details to consider: Motorized systems offer convenience but cost more and require power access. Manual systems use a hand crank or pull cord and work during power outages. Both work well, but your budget and garage setup will determine which is better for you.
The platform size matters. Standard platforms run about 4’×4′, which holds 8-12 medium storage bins. Measure your most common storage containers before buying to ensure a good fit.
Safety features vary between models. Look for systems with automatic stops, load balancing, and backup safety cables. The best systems have locking mechanisms to prevent accidental lowering.
Consider ceiling height when planning. Most systems need at least 12-16 inches of clearance when raised, plus room for your storage items. In a standard 8-foot garage, this works fine, but check measurements in low-ceiling areas.
Cost: Manual systems start around $150, while motorized options range from $300 to $ 1,200 depending on size and features.
Installation time: 2-3 hours for manual systems, 3-4 hours for motorized versions.
Weight capacity: Typically 250-300 pounds for residential systems.
7. Adjustable Ceiling Racks
Set it up once, adjust as needed. Height-adjustable racks give you flexibility as your storage needs change.
How to incorporate it:
- Purchase an adjustable ceiling rack system
- Find and mark your ceiling joists
- Install the track system directly into the joists
- Attach the adjustable arms to the tracks
- Set your desired height with the adjustment mechanisms
- Test the weight capacity gradually
These systems use:
- Ceiling-mounted tracks
- Adjustable hanging arms
- Simple locking mechanisms for safety
You control how high or low items hang. This works great when you need to fit different-sized bins or equipment.
Your storage adapts to your life, not the other way around.
More details to consider: Track design varies between brands. Some use T-channel aluminum tracks with sliding mounts, while others use notched steel tracks with hook-and-pin height adjustment. The T-channel systems offer infinite height positions but cost more. Notched systems provide set height increments (usually 3-6 inches) but tend to be more affordable.
Many adjustable systems work as both ceiling racks and wall racks. This gives you options if you later decide to change your storage setup. Most tracks can be cut to custom lengths for the perfect fit in your space.
The best systems let you add accessories over time. Start with basic arms, then add specialized hooks, baskets, or tool holders that clip into the same track system. This makes your storage truly customizable.
Consider ease of adjustment when choosing. Some systems require two people to change heights, while others can be adjusted by one person. If you change heights often, this matters.
Cost: $80-250, depending on track length and included accessories.
Installation time: About 1-2 hours for a basic system.
Adjustment time: 5-15 minutes to change heights once installed.
8. Overhead Bicycle Storage
Bikes take up so much floor space! Moving them to the ceiling frees up room instantly.
How to incorporate it:
- Choose your preferred bike hanging method
- Find ceiling joists with a stud finder
- Mark hook or mount positions (allow space between bikes)
- Install hooks or mounting hardware into joists
- Lift bikes into position (get help for heavier bikes)
- Use a wall-mounted hook for the front wheel if hanging vertically
You have options:
- Simple bike hooks ($5-10 each)
- Pulley systems ($20-30)
- Specialized bike lifts ($40-60)
I hang bikes upside down by their wheels, which works great and doesn’t harm them.
Your bikes stay safe from bumps, scratches, and theft when stored overhead.
More details to consider: Bike type affects storage method. Road bikes with skinny tires work with almost any hook system. Mountain bikes with wide tires need specialized hooks or pulley systems. E-bikes are too heavy for basic hooks and need pulley systems or lifts rated for their weight.
Spacing matters when hanging multiple bikes. I leave at least 24 inches between hooks so handlebars don’t tangle. For families with bikes of different sizes, stagger the hanging heights to prevent conflicts.
Orientation options give you flexibility. Horizontal hangs (parallel to the ceiling) take more ceiling space but keep bikes completely out of the way. Vertical hangs (perpendicular to the ceiling) use less ceiling area, but the bike hangs down more into the room.
For hydraulic brakes, some experts recommend not hanging bikes upside down for long periods. If your bike has these brakes, consider horizontal or vertical wall mounts instead of ceiling hooks.
Cost: $10-20 for basic hooks for 2 bikes, $50-100 for a pulley system for 2 bikes.
Installation time: 30 minutes for basic hooks, 1 hour for pulley systems.
Weight limits: Standard hooks support bikes up to 40 pounds. Specialized systems handle bikes up to 100 pounds.
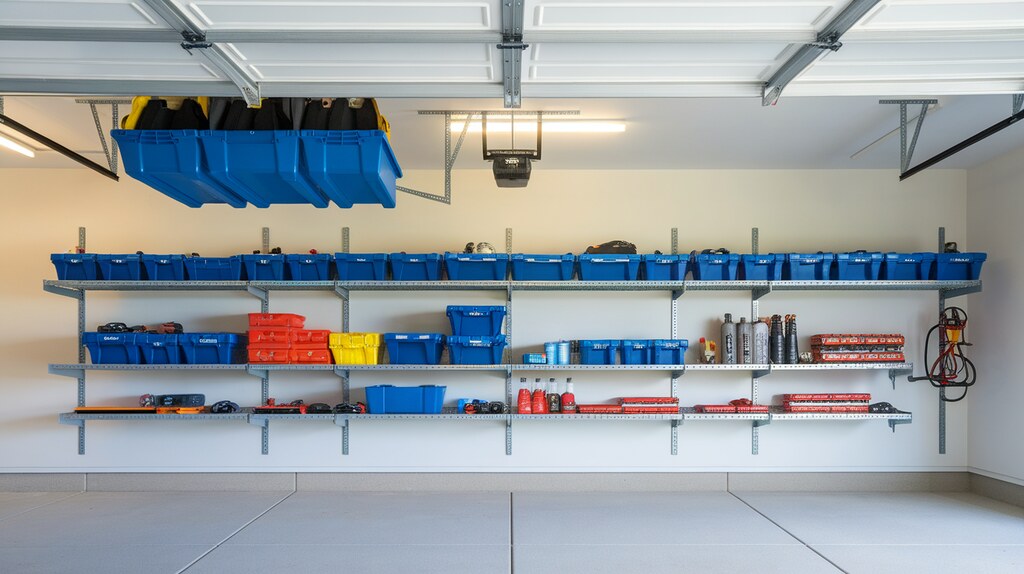
9. Ceiling-Mounted Tool Storage
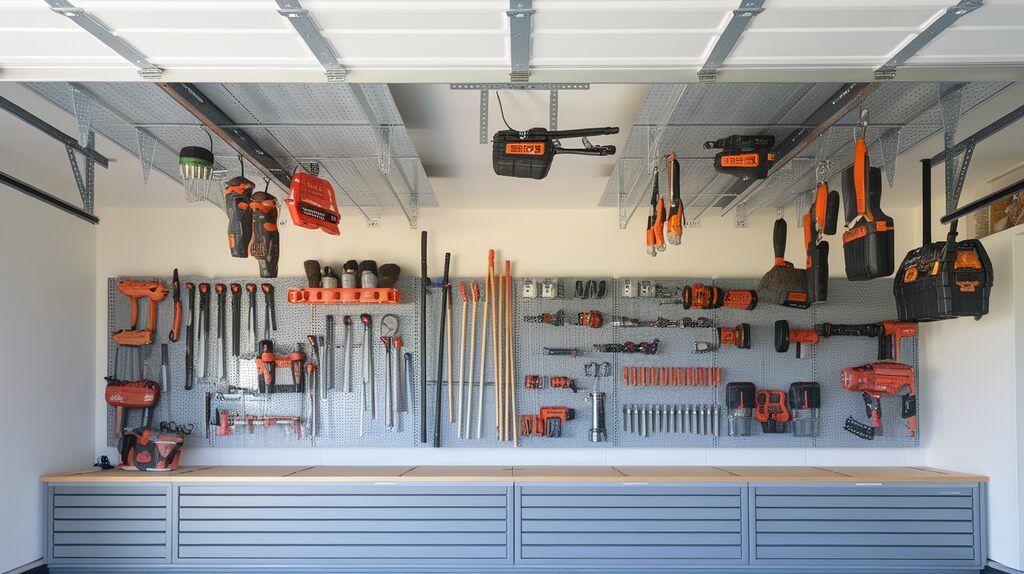
Finding tools quickly makes projects easier. Ceiling tool storage keeps everything in sight but out of the way.
How to incorporate it:
- Group your tools by function and frequency of use
- Select a ceiling tool storage system that fits your needs
- Find and mark joists for mounting
- Install mounting brackets or tracks
- Attach tool holders, hooks, or pegboard
- Organize tools by type and size for easy identification
Great options include:
- Sliding tool racks
- Hanging pegboards
- Tool pouches on tracks
The key is putting tools in logical groups. Keep drill bits with drills, measuring tools, and so on.
You’ll finish projects faster when you don’t waste time hunting for tools.
More details to consider: Visibility makes or breaks tool storage. Choose systems that display tools clearly from below. Some hanging pegboards tilt downward at a 15-30 degree angle specifically to improve visibility from your standing position.
Consider the weight distribution of your tools. Place heavier items (like drills and saws) closer to mounting points and lighter items (like screwdrivers) farther out on extensions. This prevents sagging and stress on the mounts.
Magnetic strips work wonders for small metal tools. Mount a strong magnetic strip to the bottom of a ceiling rack to hold wrenches, pliers, and screwdrivers. You can grab them with one hand without removing anything from a hook.
Color coding or shadow boards help maintain organization. Once tools have specific places, everyone in the family knows where to return them after use. This simple step makes ceiling tool storage sustainable long-term.
Cost: $50-150 for basic systems, $200-350 for premium sliding or motorized options.
Installation time: 1-2 hours, depending on complexity.
Accessibility factors: Consider your height and reach when planning. Most people can comfortably reach about 12 inches above their head without a ladder.
10. Heavy-Duty Ceiling Storage Racks
Some items need serious support. Heavy-duty racks handle the big stuff safely.
How to incorporate it:
- Select heavy-duty racks with appropriate weight ratings
- Map out your ceiling joists carefully
- Use a level to mark mounting positions
- Pre-drill holes to prevent wood splitting
- Use grade 8 hardware and lag bolts (not regular screws)
- Install with help from a second person for safety
These industrial-strength systems:
- Supports 600+ pounds when properly installed
- Use a thicker gauge steel
- Attach to multiple ceiling joists
I use mine for off-season tires, camping gear, and large storage totes.
Your peace of mind is worth it when storing heavy items overhead.
More details to consider: Construction quality separates true heavy-duty racks from standard ones. Look for welded (not bolted) connections, reinforced corners, and thick gauge steel (14 gauge or lower). The difference is visible when you compare them side by side.
Mounting methods matter more with heavy loads. The best systems use thick lag bolts (3/8-inch minimum) that penetrate at least 2.5 inches into solid wood joists. Some premium systems include joist reinforcement plates that spread the load across wider areas.
Consider ceiling clearance needs carefully. Heavy-duty systems typically hang lower than standard racks (8-12 inches from the ceiling) to improve stability. Make sure your garage door opener and the open door still clear the system when raised.
Think about what you’ll store and plan accordingly. Seasonal tire storage needs different support than camping gear. Some systems offer specialized tire cradles or hooks for specific heavy items. Most heavy-duty racks use solid metal platforms rather than wire grids.
Cost: $200-500, depending on size and weight capacity.
Installation time: 2-4 hours with proper tools and assistance.
Specialized uses: Perfect for storing car parts, construction materials, heavy equipment, and bulky outdoor gear.
11. Compact, High-Storage Solutions for Smaller Garages
Small garage? You have options too. Compact ceiling systems work in tight spaces.
How to incorporate it:
- Measure your garage’s usable ceiling area carefully
- Focus on corners and areas above car hoods/trunks
- Choose narrow profile storage solutions
- Keep a clearance map to avoid door opener tracks
- Use modular systems, you can expand later
- Consider combining wall and ceiling storage for maximum effect
Consider these space-savers:
- Corner ceiling racks
- Narrow overhead baskets
- Wall-to-ceiling angle racks
I’ve seen single-car garages gain amazing storage with just a few strategic ceiling additions.
Your small space can work harder with the right ceiling storage plan.
More details to consider: Map out your garage in zones to maximize small spaces. The areas above where your car hood and trunk sit provide valuable storage without affecting parking. These “fringe zones” often offer 2-4 feet of useful ceiling space.
Corner installations make the most of often-wasted space. L-shaped corner shelves or diagonal racks fit into corners where regular rectangular systems won’t work. Some specialized corner systems add up to 16 cubic feet of storage in spaces you weren’t using anyway.
Height becomes extra important in small garages. Multi-level hanging systems let you create tiers of storage at different heights. I’ve seen clever setups with seasonal items higher up and frequently used items at more accessible levels.
Look for slim-profile designs specifically made for tight spaces. Some newer systems extend just 12-16 inches from the ceiling while still providing useful storage. These work well above garage door tracks where clearance is limited.
Consider combination systems that integrate ceiling and wall storage. Some tracks run from the ceiling down walls, creating a continuous storage zone that maximizes every inch of your small garage.
Cost: $80-200 for specialized small-space solutions.
Installation time: 1-2 hours for basic systems.
Space efficiency: Good corner systems reclaim about 8-12 cubic feet of storage in otherwise unusable space.
Tips for Choosing the Right Garage Ceiling Storage Solution
Measure twice, buy once. Check ceiling height, vehicle clearance, and door tracks before purchasing.
Match storage to items. Heavy things need sturdy racks. Put seasonal stuff highest up. Keep weekly-use items within easy reach.
Plan for safe access. A simple step stool works for most items. Consider how you’ll retrieve what you store.
Install into solid joists only. Use proper hardware rated for your items’ weight. Never mount to just drywall.
Keep important areas clear. Don’t block door tracks, openers, vehicle doors, or walking paths.
The right ceiling system makes your garage feel twice as big while keeping everything organized and accessible.
DIY vs. Professional Installation: What’s Right for Your Ceiling Storage?
DIY works for basic projects. I installed hooks, simple racks, and pulley systems myself with just a stud finder, drill, and level. Most took under 2 hours and saved me hundreds.
Call a pro for complex or heavy systems. My DIY platform started to sag after a year. Professional help makes sense for:
- Custom overhead platforms
- Systems holding over 100 pounds
- Motorized or electrical setups
- Areas near wiring or HVAC
Safety trumps savings every time. Professional installation adds $200-500 but includes proper assessment, commercial hardware, and often a warranty.
Start with small DIY projects. As your confidence grows, tackle more complex systems—or know when to call an expert.
Maximizing Garage Ceiling Storage Efficiency
Label everything clearly. I use waterproof tags on all bins and write contents with thick markers on multiple sides. This saves me from digging through unmarked containers.
Group similar items together. I keep holiday decorations in one section, camping gear in another, and tools in a third. This system helps me find anything in minutes.
Choose flexible systems that adapt. My adjustable racks have been reconfigured three times as my storage needs changed. Look for tracks with movable mounting points and adjustable height options.
Create access zones based on use frequency:
- Bottom zone: Weekly-use items within easy reach
- Middle zone: Seasonal items requiring a step stool
- Top zone: Rarely used items that need a ladder
Keep a step stool handy. I hung mine by the garage door so I can quickly grab middle-height items without searching for something to stand on.
Conclusion
Looking up solved my garage storage problems. From simple hooks to motorized lifts, ceiling storage creates space where you thought none existed.
Overhead racks hold seasonal items. Hooks keep bikes and tools organized. Pulley systems make heavy lifting easy. Platforms create solid storage surfaces. Cabinets protect from dust. Retractable systems bring items down when needed.
Choose based on what you store, how often you need it, and your garage size. The best option solves your biggest storage problem first.
Take measurements this weekend and check your joist locations. Pick one idea to start with.
Share what worked in your garage in the comments below. The goal is simple: find what you need when you need it, while still having room to park.