
That awkward space between your kitchen cabinets and the ceiling doesn’t have to be a dust-collecting eyesore anymore. In this article, I’ll show you exactly how to change that wasted space into practical, functional storage with impressive before-and-after examples.
As a homeowner who struggled with this exact problem, I’ve researched every method to extend cabinets – from simple DIY solutions to professional custom builds. After helping dozens of friends tackle their own kitchen upgrades, I’ve learned what works (and what doesn’t).
If you want a budget-friendly weekend project or a dramatic high-end makeover, you’ll find:
- Step-by-step methods for every skill level
- Real-life before and after photos
- Cost breakdowns for each approach
- Expert tips to avoid common mistakes
Looking to maximize your kitchen’s vertical space and create that custom, high-end look? Let’s get rid of that cabinet gap once and for all!
Why Extend Kitchen Cabinets to the Ceiling?
Let me be honest – that space above your cabinets is wasted potential.
Here’s why ceiling-height cabinets make so much sense:
- Extra storage space for those special occasion platters and appliances
- No more dust collection on top of cabinets (a cleaning nightmare!)
- Visually taller ceilings make your kitchen feel bigger
- Higher-end, custom look without always needing a full renovation
- Better use of vertical space in smaller kitchens
The difference can be stunning. I’ve seen kitchens go from “meh” to “wow” with this one change.
Before and After: Real Kitchen Transformations
1. The Johnson Family’s Traditional Makeover

BEFORE: Standard 30″ cabinets with a 12″ gap to their 8′ ceiling. Beige paint made everything feel dated.
AFTER: Added matching cabinet boxes with crown molding. Their dark cherry cabinets now make a bold statement from floor to ceiling.
“We gained an entire cabinet’s worth of storage for things we rarely use but need to keep. Plus, the kitchen feels twice as expensive now!” – Sarah Johnson
2. Mark’s Modern Apartment Refresh

BEFORE: White laminate cabinets stopped short of the ceiling in his small urban kitchen.
AFTER: Added sleek aluminum-framed glass door cabinets to bridge the gap. The transparent doors keep the space feeling open while doubling his storage.
Mark did this as a weekend DIY project with ready-made cabinets from a big box store and basic tools.
3. The Miller’s Farmhouse Dream
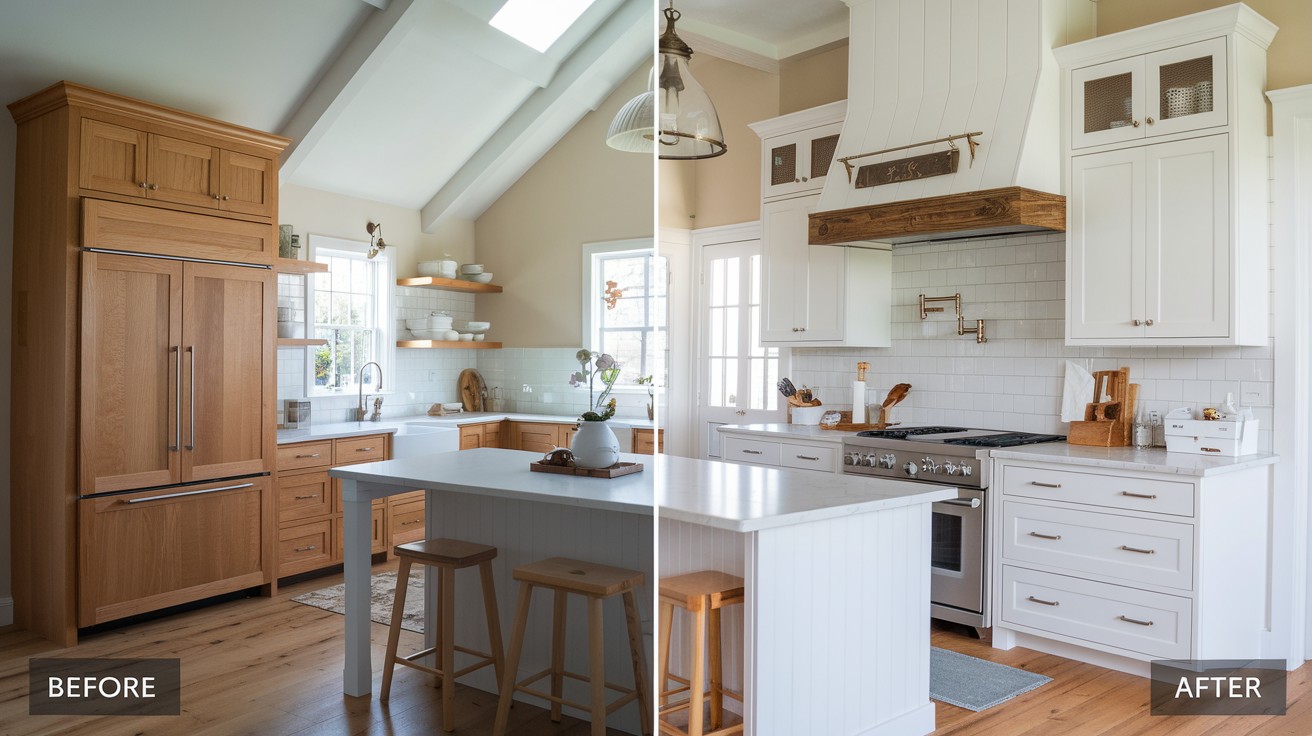
BEFORE: Oak cabinets with a large 18″ gap to their vaulted ceiling.
AFTER: Custom cabinet toppers with beadboard inserts and decorative corbels. The two-tone approach kept costs down – white uppers with the original oak lowers.
This project used a professional carpenter but cost less than half of new cabinets.
4. Jenny’s Budget-Friendly Solution
BEFORE: Builder-grade cabinets with a small 8″ gap.
AFTER: Simple crown molding installation with painted filler panels. Total cost: under $200!
“It took one Saturday and completely changed how polished my kitchen looks. Best bang-for-buck upgrade ever.” – Jenny
Methods to Extend Cabinets to the Ceiling
There’s no one-size-fits-all approach. Here are your best options:
a. Add Stock Cabinets + Crown Molding
- Best for: 12″-18″ gaps with matching cabinets available This method uses standard-sized cabinets mounted above existing ones.
- Cost: $75-$250 per linear foot
b. Custom Cabinet Toppers
- Best for: Unusual gap sizes or custom cabinetry Shorter versions of upper cabinets designed specifically for gaps.
- Cost: $100-$300 per linear foot
c. Full Cabinet Replacement
- Best for: Major renovations or very old cabinets If you already plan to replace cabinets, going ceiling-height is ideal.
- Cost: $200-$600+ per linear foot
d. Open Shelving to Bridge the Gap
- Best for: Modern styles, displaying decorative items Cost-effective option that lightens the look of your kitchen.
- Cost: $40-$150 per linear foot
e. Simple Solutions for Smaller Gaps
- Best for: Gaps under 12″ Use crown molding alone (under 8″) or filler panels with crown molding (8″-12″).
- Cost: $5-$50 per linear foot
What Style Best Suits Your Kitchen?
Your cabinet extension should match your kitchen’s personality. Here are the top styles that work best:
a. Classic Shaker Extensions
Perfect for: Transitional kitchens Shaker doors with simple frames work in almost any kitchen – they’re the little black dress of cabinet styles.
b. Farmhouse with Stacked Cabinets
Perfect for: Country-inspired kitchens Two-tone cabinets with beadboard details create that farmhouse appeal everyone loves.
c. Glass-Front for Airy Elegance
Perfect for: Small kitchens needing visual lightness Glass cabinets make your kitchen feel more open while hiding dust. Display only your prettiest items here!
d. Modern and Two-Tone Designs
Perfect for: Contemporary kitchens and statement spaces Choose frameless cabinets with minimalist hardware or try contrasting colors to draw the eye upward.
Functional Add-Ons to Consider
While extending your cabinets, why not make them work harder for you?
- Under-cabinet lighting that extends to new cabinets
- Pull-down shelving systems for accessing high storage
- Custom dividers for trays and oversized items
- Glass doors with LED lighting for display areas
- Ventilation solutions for above-refrigerator cabinets
I added pull-down organizers to my highest cabinets, and it’s been a game-changer for accessing holiday dishes!
Extending Cabinets into Adjacent Spaces
Don’t stop at just going up! Consider these extensions too:
- Above refrigerator – specialized deeper cabinets
- Over doorways – create visual continuity around the room
- Into dining areas – connect kitchen cabinetry to dining storage
- Around windows – frame windows with matching cabinetry
These techniques create a built-in, architectural look that raises your home’s value.
Budget Breakdown: What Does It Really Cost?
Let’s talk money – here’s what you might spend:
|
Method |
DIY Cost |
Professional Cost |
|
Crown molding only |
$100-$300 |
$300-$800 |
|
Stock cabinets |
$500-$1,500 |
$1,500-$3,000 |
|
Custom toppers |
Not recommended DIY |
$2,000-$4,000 |
|
Full replacement |
Not recommended DIY |
$5,000-$15,000+ |
|
Open shelving |
$200-$600 |
$600-$1,200 |
|
Filler panels |
$300-$700 |
$700-$1,500 |
Remember: These prices vary widely based on kitchen size and materials chosen.
Common Mistakes to Avoid
I’ve seen these errors too many times:
- Not considering ceiling unevenness – old houses rarely have perfectly level ceilings
- Forgetting about ventilation – cabinets near cooking areas need air circulation
- Ignoring proportion – too-tiny cabinets on top can look odd
- Skimping on support – those upper cabinets need proper wall anchoring
- DIYing beyond your skill level – some methods need professional precision
Pro Tips from a New Home Design Expert
I asked my friend Claire, a kitchen designer with 15 years of experience, for her insider tips:
“Take pictures inside your existing cabinets to the store when matching. Cabinet color is just half the battle – you also need to match interior finish.”
“If your ceiling is more than 9 feet high, consider a double-stacked look with two rows of uppers rather than extra-tall single cabinets.”
“The best time to extend cabinets is when you plan to paint them anyway. This hides any slight material differences between old and new.”
Conclusion
Taking your kitchen cabinets to the ceiling is a smart upgrade that pays off in multiple ways. Not only will you gain valuable storage space, but you’ll also create that custom, high-end look that buyers love.
The best part? There’s a solution for every budget and skill level. From simple crown molding that costs under $200 to dramatic custom extensions, you can change your kitchen’s look without a complete renovation.
Remember to measure carefully, consider your storage needs, and choose a style that complements your existing kitchen design. If you lack confidence in DIY installation, professional help is worth the investment.
I’ve seen firsthand how this one change can make kitchens feel larger, more luxurious, and better organized. No more dusty cabinet tops, wasted space, or that unfinished look!
Ready to take your kitchen to new heights? The ceiling’s the limit!
Frequently Asked Questions
How much does it typically cost to extend kitchen cabinets to the ceiling?
For a standard 10×10 kitchen, expect to pay $1,200-$2,500 for stock cabinet extensions with crown molding. Custom solutions range from $2,800-$5,000 depending on materials and complexity.
Will extending cabinets make my kitchen look too crowded?
Not when done properly! Use glass doors on upper cabinets or add some open shelving. The vertical lines actually draw the eye up, making your kitchen feel larger and more open.
How long does a cabinet extension project usually take?
Simple crown molding can be completed in a weekend for DIYers. Professional installations with stock cabinets typically take 2-3 days, while custom solutions may require 1-2 weeks including fabrication time.
What’s the minimum gap size worth extending?
Any gap over 8 inches is worth addressing. For smaller gaps (4-8 inches), simple crown molding often provides the best visual solution without the expense of additional cabinetry.
Can I match new cabinet extensions to my existing cabinets if they’re older?
Yes, with some planning! Bring a cabinet door to showrooms for color matching, or consider a contrasting yet complementary color for the extensions for a trendy two-tone look.