
In this blog, I’ll guide you through the complete process of building a DIY pallet firewood rack.
As the chill of winter settles in, there’s nothing quite like the warmth of a crackling fire. However, you need a reliable way to store your firewood to enjoy that cosy atmosphere.
That’s when I decided to take on a DIY project that I had been thinking about for some time
a DIY pallet firewood rack. This DIY not only provides a sturdy and organised place to keep my firewood dry and accessible but also adds a rustic charm to my outdoor space.
What is a Pallet Firewood Rack?
A pallet firewood rack is a practical storage solution made from repurposed wooden pallets. It’s designed to keep firewood neatly stacked and elevated off the ground, allowing proper airflow. This helps the wood dry efficiently while preventing moisture buildup, rot, and pest infestations.
These racks are often a cost-effective and DIY-friendly option for outdoor firewood storage. Easy to assemble, they offer a sustainable way to organize firewood while ensuring it remains in good condition for use.
Why Choose Pallet for DIY Firewood Rack Approach?
I found pallets for a DIY firewood rack is a smart and budget-friendly choice. Pallets are easy to find, often free, and make a great base for stacking firewood neatly.
They help keep the wood off the ground, which is super important for preventing moisture and rot. Plus, the open design of pallets allows for great airflow, so your firewood dries faster and burns better.
Another bonus? Pallets are sturdy and durable, so you don’t have to worry about them collapsing under the weight of the wood. And if you love a good DIY project, they’re easy to work with, making the process simple and rewarding.
It’s a practical, eco-friendly, and hassle-free way to store firewood right in your backyard.
https://www.instagram.com/reel/DDcxY2cJzGk/?utm_source=ig_web_copy_link&igsh=MzRlODBiNWFlZA==
Essential Materials and Tools Needed for DIY Pallet Firewood Rack
Before diving into the construction process, I gathered all the necessary materials and tools. And that made it easy for me to DIY my pallet firewood rack.
Essential Materials:
- Wooden Pallets: I used three standard pallets for the main structure. (But the number depends on the size of your firewood rack).
- Screws/Nails: I used galvanized screws, as they are rust-resistant and designed for outdoor use.
- Wood Glue: I used it for extra strength at joints.
- Additional Wood Planks: I kept some extra planks on hand for reinforcement. I ended up using a couple of extra planks for reinforcement on the base to ensure stability.
- Corrugated Metal Sheet: I opted for these metal sheets because they are durable, lightweight, and perfect for outdoor use.
Required Tools:
- Hammer or Screwdriver: For assembling the structure. I prefer a screwdriver because it’s faster and easier, especially for driving screws into the wood.
- Saw (Hand Saw or Power Saw): If you have a lot to cut, I suggest a power saw is much more efficient.
- Measuring Tape: To ensure accurate dimensions.
- Sandpaper: For smoothing rough edges and preventing splinters.
- Paint or Wood Sealant: Since the rack would be placed outside, I chose to add a coat of sealant to protect it from the elements.
Planning a DIY Pallet Firewood Rack
1. Sourcing Pallets
The first step in my DIY was sourcing pallets. The pallets I had were standard-sized, measuring 48 inches (4 feet) long by 40 inches (3.3 feet) wide, which was perfect for building my firewood rack.
You can find several options in local hardware stores or warehouses.
When selecting pallets, I looked for ones that were sturdy and free from damage. A quick inspection revealed stamps indicating they were heat-treated rather than chemically treated, ensuring they were safe for outdoor use.
2. Preparing the Pallets
Once I had my pallets, it was time to prepare them.
I started by cleaning the dust and then inspecting it for any broken boards or sharp nails sticking out. After this, I smoothed out any rough edges to prevent splinters using a sandpaper.
I planned for a rack approximately 6 feet long, 4 feet high, and 2 feet deep, which would comfortably accommodate about half a cord of wood (64 cubic feet).
3. Designing the Firewood Rack
With my materials ready, I moved on to designing the rack:
Choosing a Suitable Design: I opted for a horizontal rack that would allow me to stack logs easily. Additionally, I decided to create compartments for different wood sizes, making it easier to grab what I needed.
4. Measuring and Planning
Based on my available outdoor space and firewood needs, I carefully measured the dimensions of the rack:
- Base: 6 feet (length) x 2 feet (depth).
- Height: 4 feet (from the base to the top).
To visualize the structure, I sketched out a basic layout on paper, marking the placement of support beams and side panels for better assembly.
Step-by-Step Construction for DIY Pallet Firewood Rack
Now came the exciting part—building my pallet firewood rack! Here’s how I did it:
Step 1: Assembling the Base
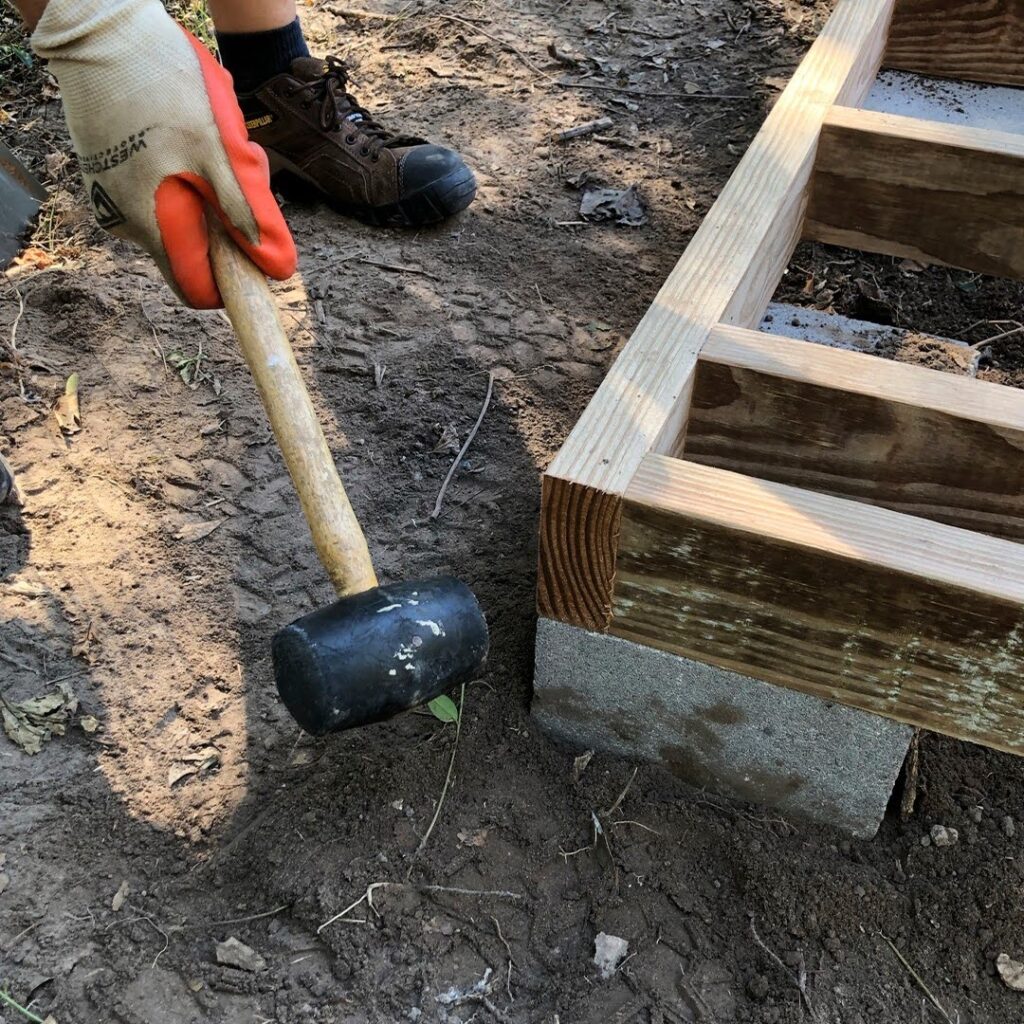
I started by laying one pallet flat on the ground as the base. The pallet measured 48 inches (4 feet) long by 40 inches (3.3 feet) wide.
This provided a stable foundation for the entire structure. To reinforce the base and ensure it could support the weight of stacked firewood, I secured 2 additional wooden planks (2 inches thick, 4 feet long) underneath the pallet using 2-inch galvanized screws.
I used approximately 12 screws for this step, evenly spaced for maximum stability.
Step 2: Building the Sides

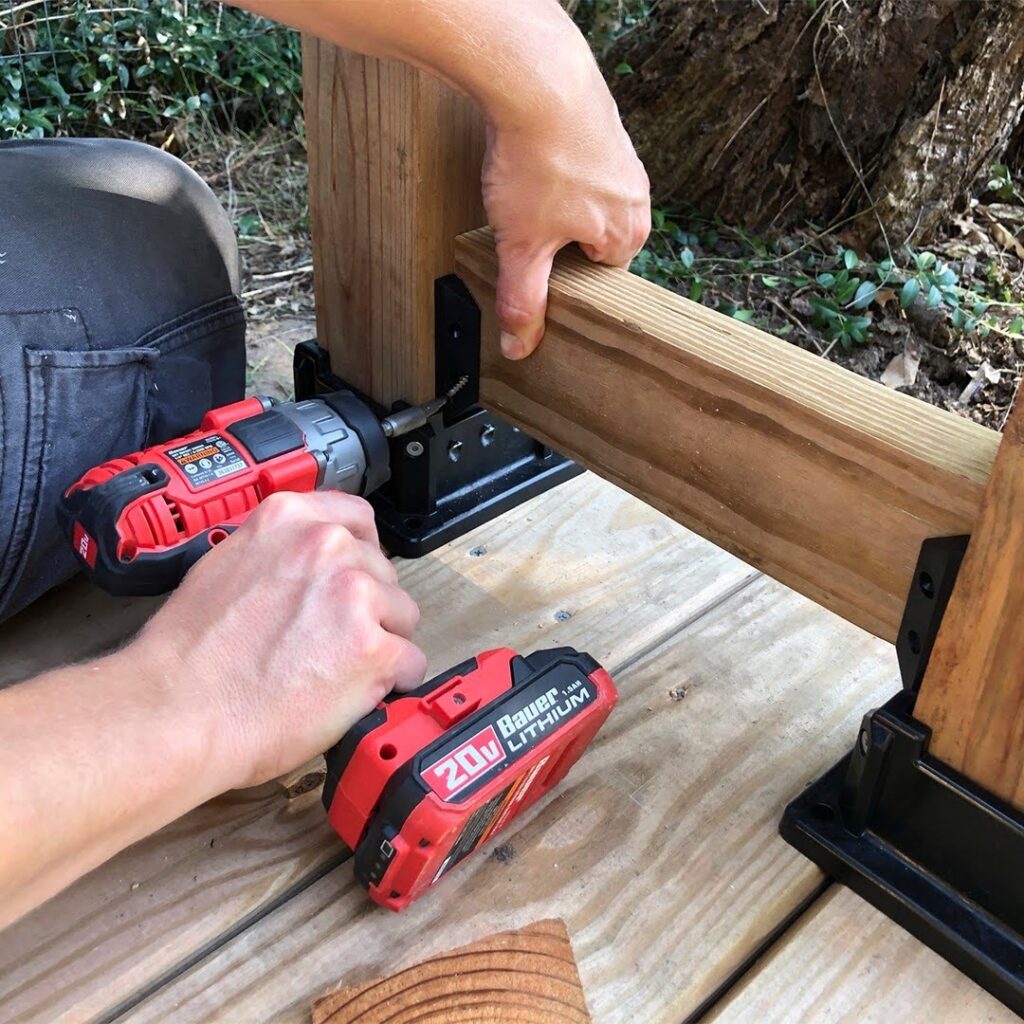
Next, I attached two pallets vertically on either side of the base pallet to form the side walls of the rack. These pallets were also standard-sized, measuring 48 inches (4 feet) long by 40 inches (3.3 feet) wide.
To secure them, I used 3-inch galvanized screws, which are ideal for outdoor use and provide strong connections. Each side required 8 screws, making a total of 16 screws for this step.
I made sure the pallets were perfectly vertical by frequently checking with a measuring tape and level during assembly. Ensuring level sides was crucial to avoid a leaning or unstable structure.
Step 3: Adding Support Beams
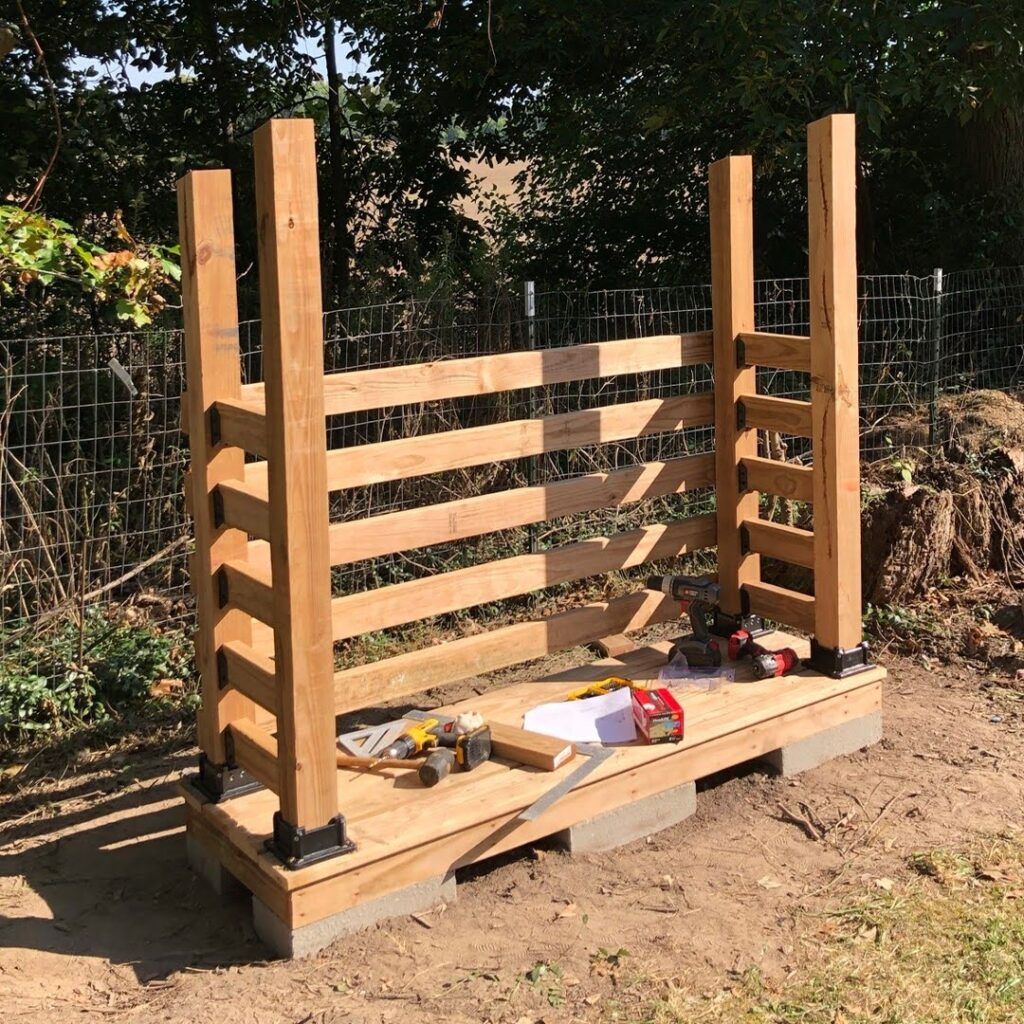
To enhance the rack’s strength, especially since it would hold heavy logs, I installed horizontal support beams across the back and front of the rack. I used 2 wooden planks (2inches thick, 6 feet long) for this purpose. These beams were attached approximately 2 feet from the bottom of the rack to evenly distribute weight.
Each beam was secured with 2.5-inch galvanized screws; I used 6 screws per beam (3 oneach side), totalling 12 screws for this step. This optional addition significantly improved the rack’s stability.
Step 4: Finishing Touches
Once the main structure was complete, I sanded down any remaining rough edges using 80-grit sandpaper. This not only enhanced safety by removing splinters but also prepared the wood for the final finish.
I chose to apply an outdoor wood sealant to protect against weather elements since my rack would be exposed outdoors year-round. The sealant not only preserved the wood but also added a nice sheen that made it look polished.
After sealing, I decided to add a layer of paint to give the rack a pop of colour and further protection. I chose a weather-resistant matte black paint, which complemented the rustic aesthetic of the wooden pallets and metal roof. Using a brush, I carefully applied two coats of paint, allowing each coat to dry completely before applying the next. The final result was a sturdy, weatherproof firewood rack with a sleek and stylish finish.
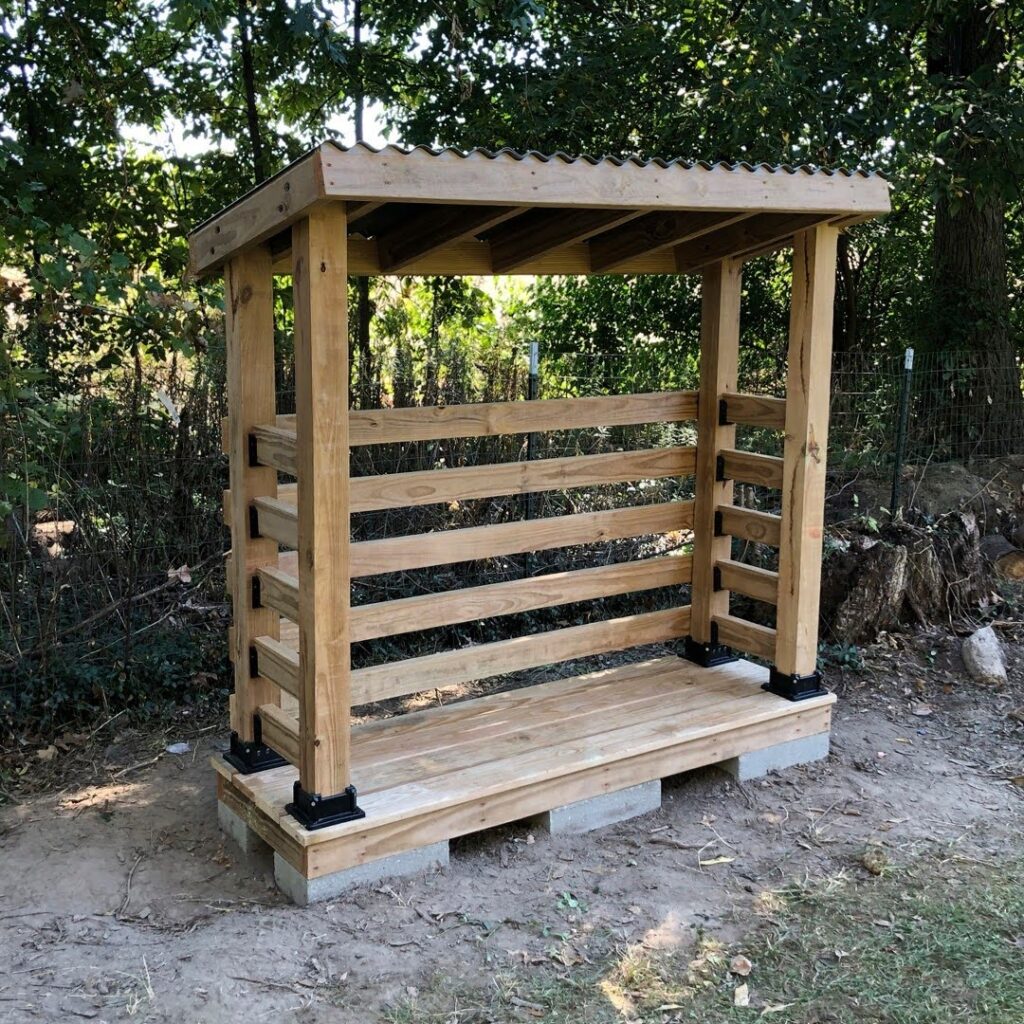
Final Placement of Firewood Rack Roof

To ensure my firewood stayed dry and protected from moisture, I decided to add a metal sheet roof to my firewood rack.
To ensure adequate coverage, I designed the roof to extend 6 inches beyond the rack’s edges on all sides. This overhang provides extra protection from water dripping down the sides. The final dimensions of the roof were:
- 7 feet long (to cover the 6-foot rack with an extra 6-inch overhang on each side).
- 3 feet wide (to cover the 2-foot depth with a 6-inch overhang on both the front and back).
Then, I chose corrugated metal sheets because they are durable, lightweight, and perfect for outdoor use. After some research, they seemed like the best option for a sturdy and long-lasting roof.
Next, I used my measuring tape to measure the top of the rack and cut the metal sheets to size. I made sure the sheets extended slightly beyond the edges of the rack to provide extra coverage from rain.
Finally, with the help of a friend (two pairs of hands made the job much easier!), I attached the metal sheets to the wooden beams of the rack. We used screws specifically designed for metal roofing to ensure a secure fit. The result was a practical and weatherproof roof that complemented the overall design of my firewood rack.
The metal roof not only protects against rain but also adds an industrial touch that complements the rustic look of wooden pallets beautifully!
Conclusion
Building my DIY pallet firewood rack has been an incredibly rewarding experience! Not only have I created an organized space for storing firewood but I’ve also gained valuable skills along the way—from sourcing materials to constructing something functional and aesthetically pleasing.
I encourage anyone looking for an affordable solution to their firewood storage needs to consider this DIY! With just some basic tools and materials—plus a little creativity—you can create your own customized pallet firewood rack that will serve you well for years to come.
Now it’s your turn! Gather some pallets, grab your tools, and start building your very own firewood rack. Let me know how your project turns out in the comments!