
In this blog, I will share budget-friendly DIY projects that can refresh your home without costing a fortune. You don’t need a big budget to make a big impact small, thoughtful updates can completely transform a space.
Whether it’s giving your kitchen a modern touch, adding charm to your outdoor area, or upgrading your décor, simple changes can go a long way. With a little creativity and under $200, you can take on projects like repainting walls, building custom furniture, or incorporating stylish storage solutions.
No matter your skill level, these ideas are easy to follow and perfect for anyone looking to update their home without overspending. If you’re ready to make your home feel brand new on a budget, let’s dive into some creative and affordable DIY ideas.
How to Improve Your Home for Less than $200?
Transform your home on a budget with simple upgrades like fresh paint, new lighting, DIY decor, and organized storage solutions all for under $200, enhancing both style and functionality.
Paint Your Countertops
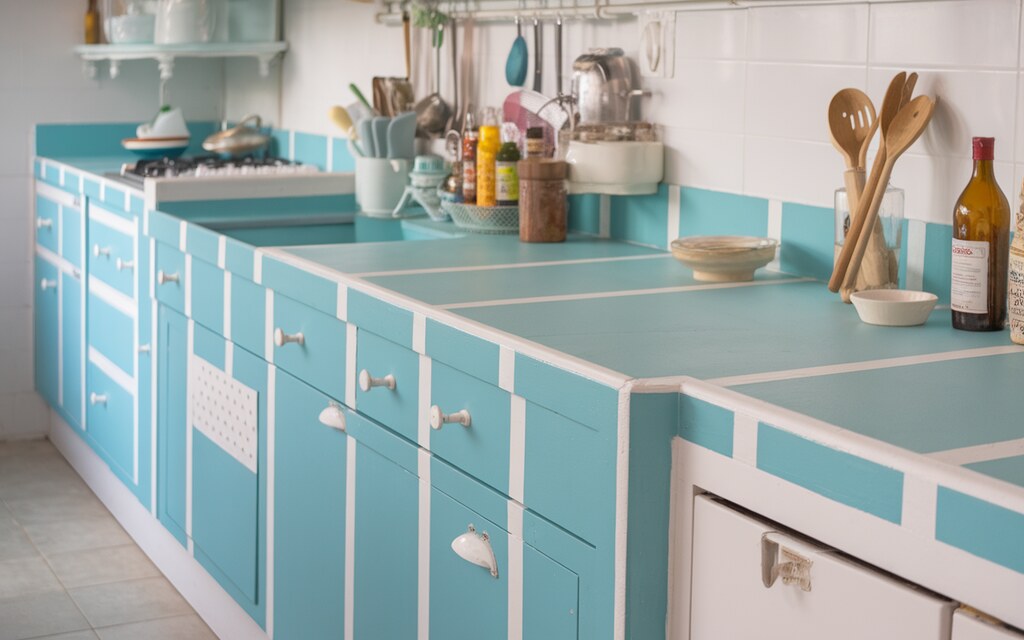
When I first thought about painting my countertops, I hesitated. It felt like a big task, but I wanted to refresh my kitchen without spending a lot. So, I gave it a try, and it was surprisingly easy!
First, I cleaned the surface thoroughly. This step is important because paint won’t stick to grease or dirt. Then, I lightly sanded the countertop to make it smooth. Next, I taped off the edges to keep the paint neat.
I chose a countertop kit for the paint, which cost less than $200. It included everything I needed, from primer to sealant. I applied the paint in thin layers, letting each coat dry before adding the next.
Finally, I sealed the surface to protect it. The result? My countertops looked brand new! This simple project transformed my kitchen and saved me a lot of money.
DIY Dining Table Makeover
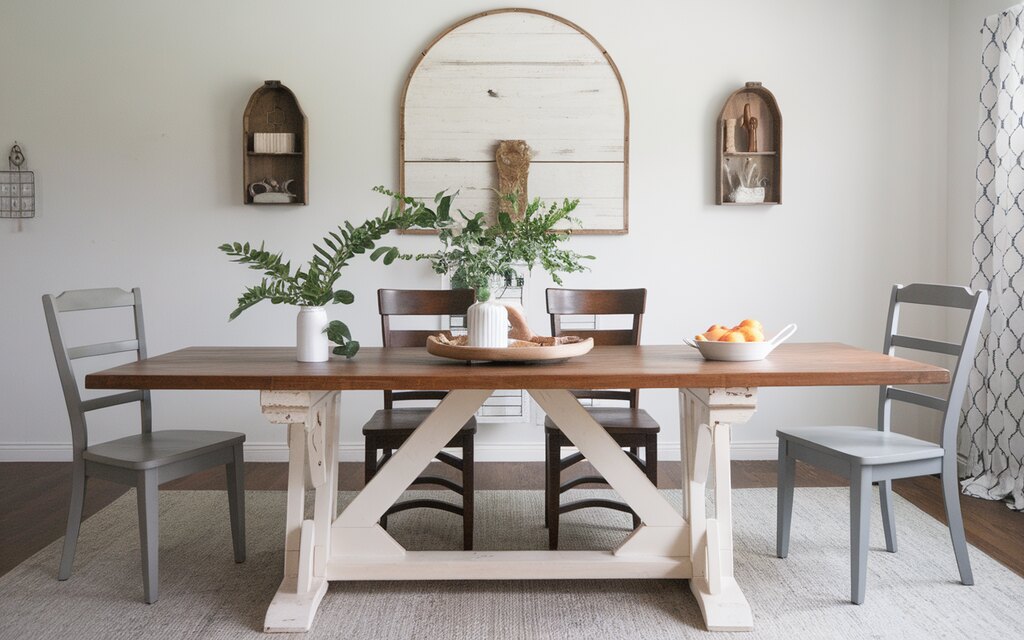
I wanted to give my dining table a fresh look without spending a fortune. So, I decided to do a simple DIY makeover. It was easier than I expected and cost less than $200!
First, I cleaned the table to remove any dirt. Then, I lightly sanded the surface to smooth out scratches. After that, I wiped off the dust to prepare it for painting.
I chose a durable furniture paint in a bold color. I applied thin coats with a small roller, letting each one dry. I added a clear sealant for the top to protect it from spills.
To finish the makeover, I replaced the old chairs with ones I found at a thrift store. A quick coat of paint made them match perfectly. This project was fun and affordable and greatly impacted my space.
Give Your Front Door a Fresh Coat of Paint
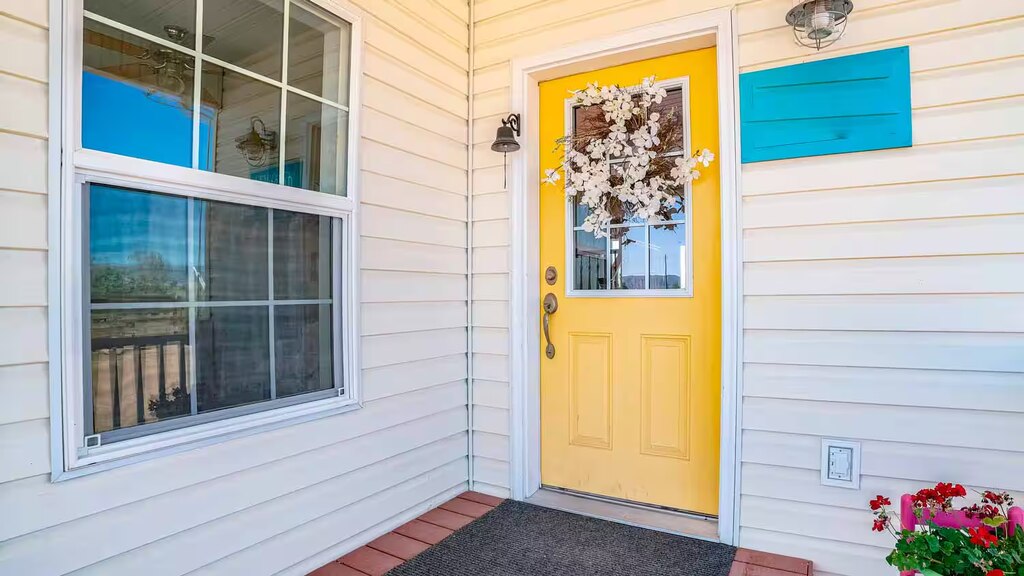
Last weekend, I decided to give my front door a makeover. It didn’t feel very interesting or match my home’s style. Painting it seemed like an easy, budget-friendly project, and it was!
First, I cleaned the door with soapy water to remove dirt and dust. Then, I lightly sanded it to smooth the surface. I used painter’s tape to cover the edges and hardware, keeping the paint neat.
I chose a bold color to make the door pop. A small can of exterior paint was all I needed, and it cost less than $50. I applied two thin coats using a brush, letting each dry in between.
By the end of the day, my front door looked brand new. It made such a big difference to my home’s curb appeal. This simple DIY improved my house for under $200, and I couldn’t be happier!
Replace Overhead Lighting or Ceiling Fans
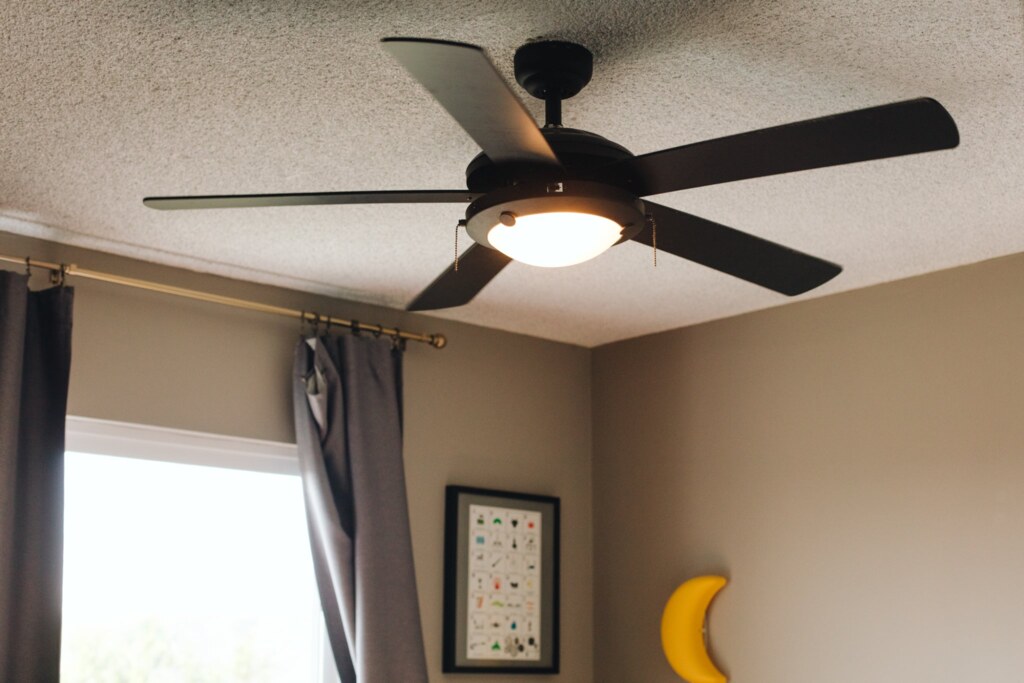
I used to avoid looking at my old ceiling fan. It was outdated and didn’t match my style. So, I decided to replace it with something modern. It was surprisingly simple, and I stayed under $200!
First, I turned off the electricity to stay safe. Then, I carefully removed the old fan, following an online tutorial. I kept the process slow and steady, step by step.
At the store, I found a stylish light fixture on sale. It had a clean, modern design and fit perfectly within my budget. I installed it with the help of a basic toolkit and double-checked every connection.
Once I flipped the power back on, the difference was amazing. The new lighting made the room feel brighter and more inviting. This small home improvement project took just an afternoon but completely transformed my space!
Build a Custom Mantle for Your Fireplace
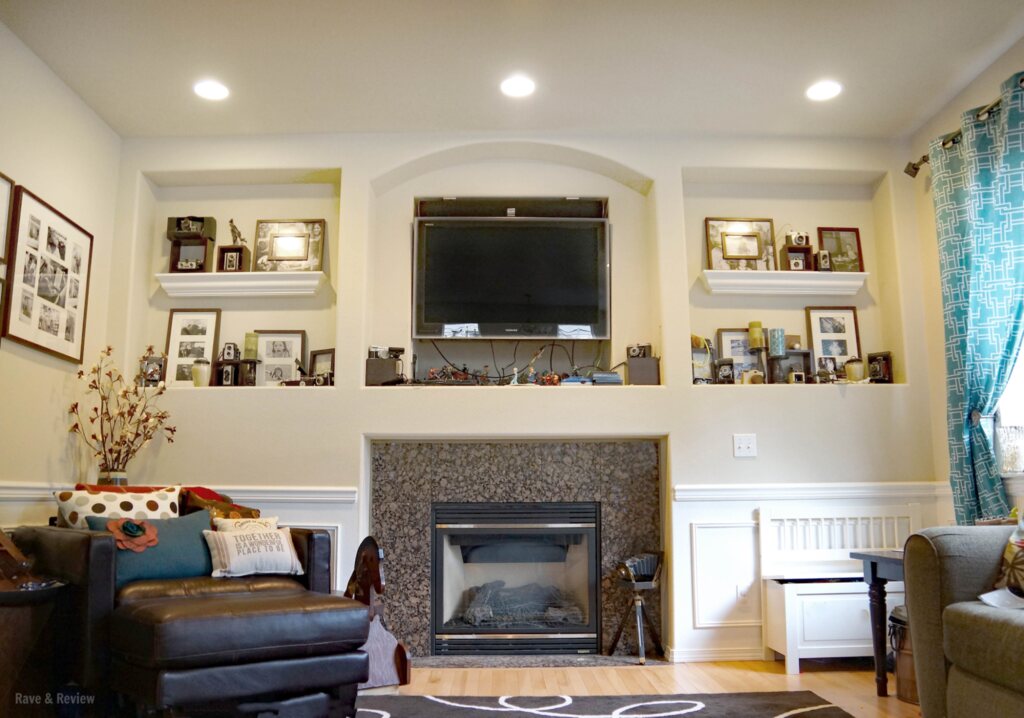
I’ve always wanted a beautiful mantle for my fireplace, but custom ones are so expensive. So, I decided to build my own. It was easier than I thought and cost less than 200!
First, I measured the space above my fireplace. Then, I went to the hardware store and bought wood, wood glue, and a small can of stain. The staff even helped me cut the wood to size, which saved me time.
At home, I assembled the mantle using glue and screws. I kept the design simple with clean lines. Once it was built, I sanded the wood to make it smooth and applied a rich stain for a polished look.
When I mounted it above the fireplace, it completely changed the room. Now, it’s the perfect spot for family photos and decor. This DIY project added so much character to my home for a tiny price!
Set the Mood With String Lights
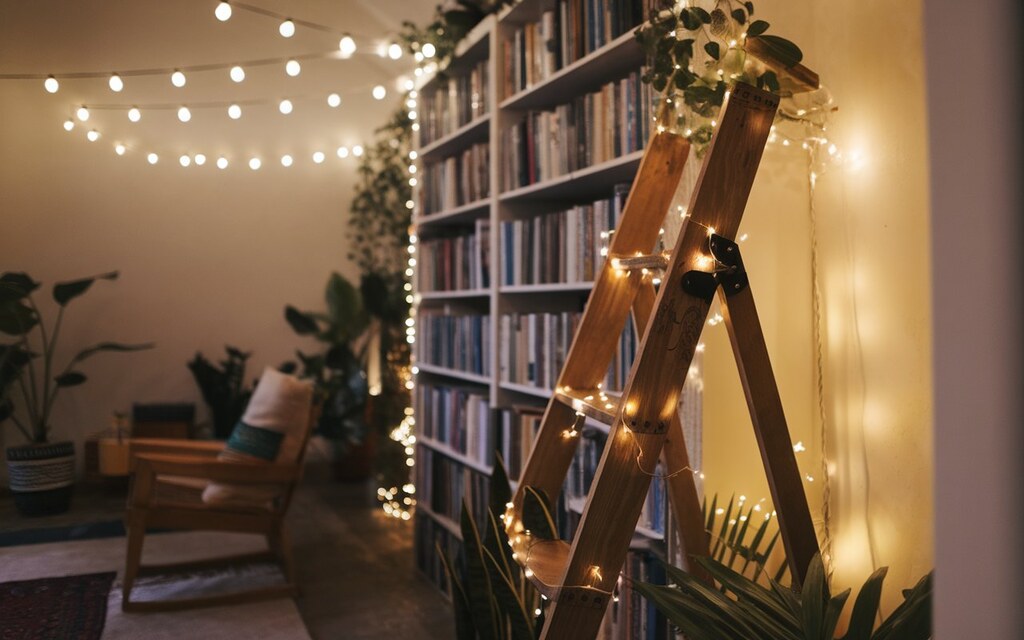
I’ve always loved cozy spaces and added string lights to my patio. It was such a simple and affordable way to improve my home. The whole project cost less than $120 and only took an hour!
First, I measured the area to determine how many lights I needed. Then, I bought warm white string lights from the store. They were inexpensive but looked elegant.
To hang them, I used small hooks and clips to keep everything secure. I zigzagged the lights across the patio to create a soft glow. It was so easy to adjust them until they looked perfect.
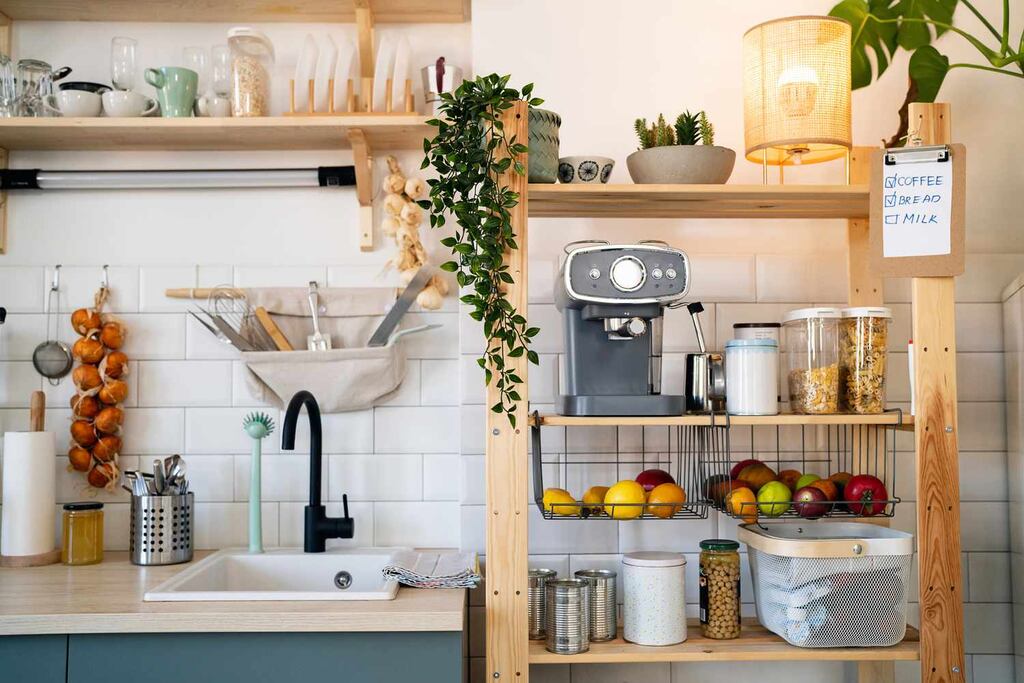
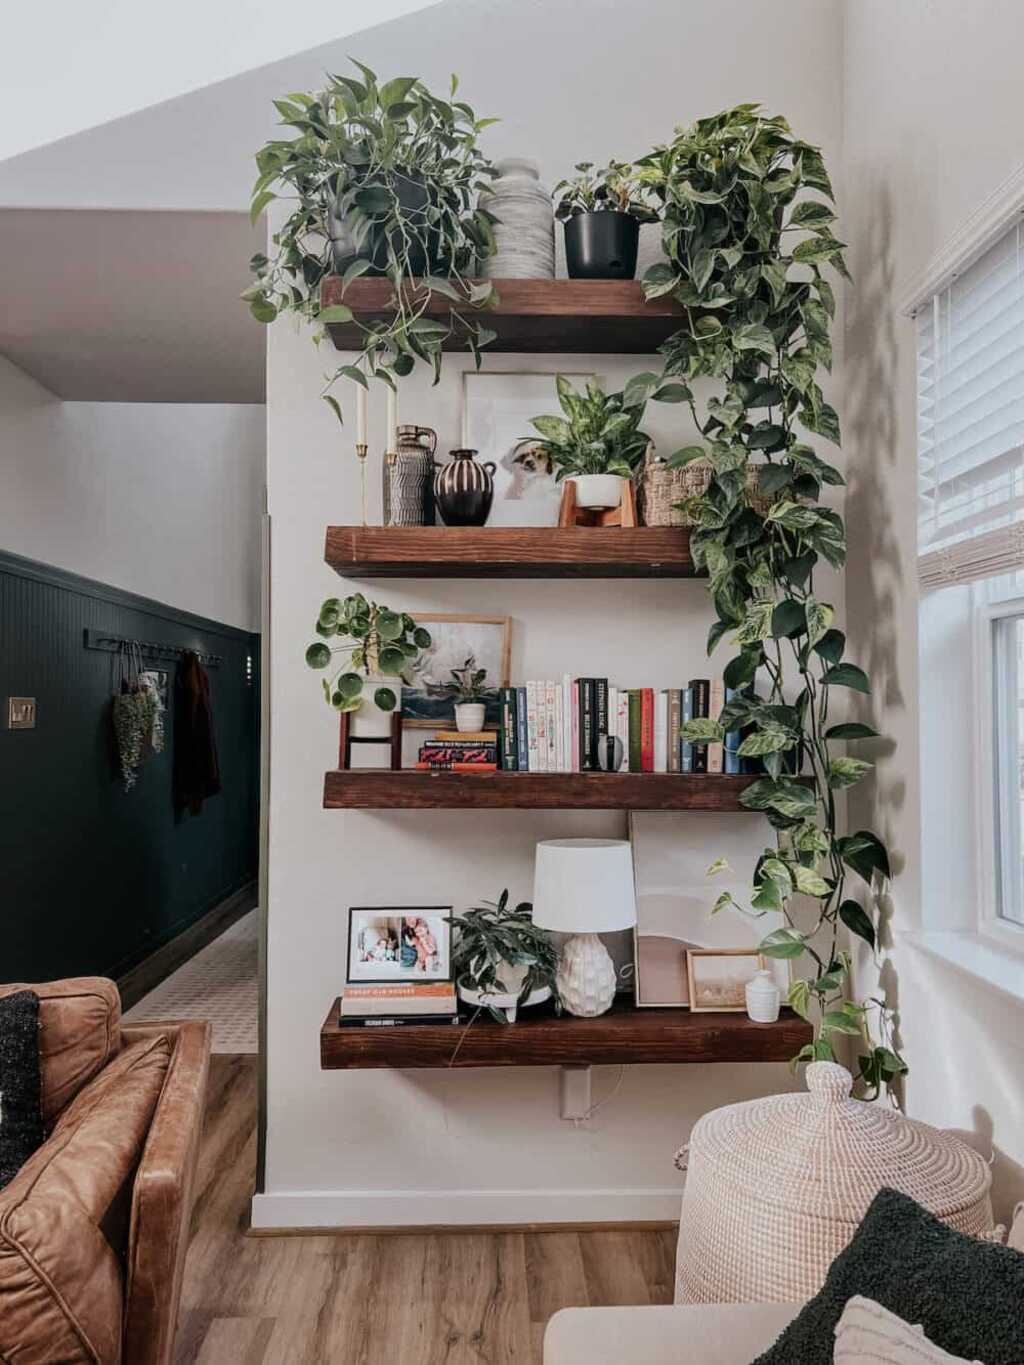
Add Shelving in the Kitchen
When I turned them on, the transformation was instant.
My kitchen always felt cluttered, so I decided to add some shelves for extra storage. This small improvement cost me less than $200, but it made a huge difference.
First, I picked a blank wall that wasn’t being used. Then, I measured the space and found affordable wooden shelves at a home improvement store. They even had brackets included, which saved money.
At home, I marked where I wanted the shelves and ensured they were level. Installing them was simple I just used a drill and a few screws. Within an hour, the shelves were up and sturdy.
Now, I use them to display dishes, spices, and even plants. Not only does my kitchen feel more organized, but it also looks so stylish.
Organize Your Spice Cabinet With Dollar Tree Containers
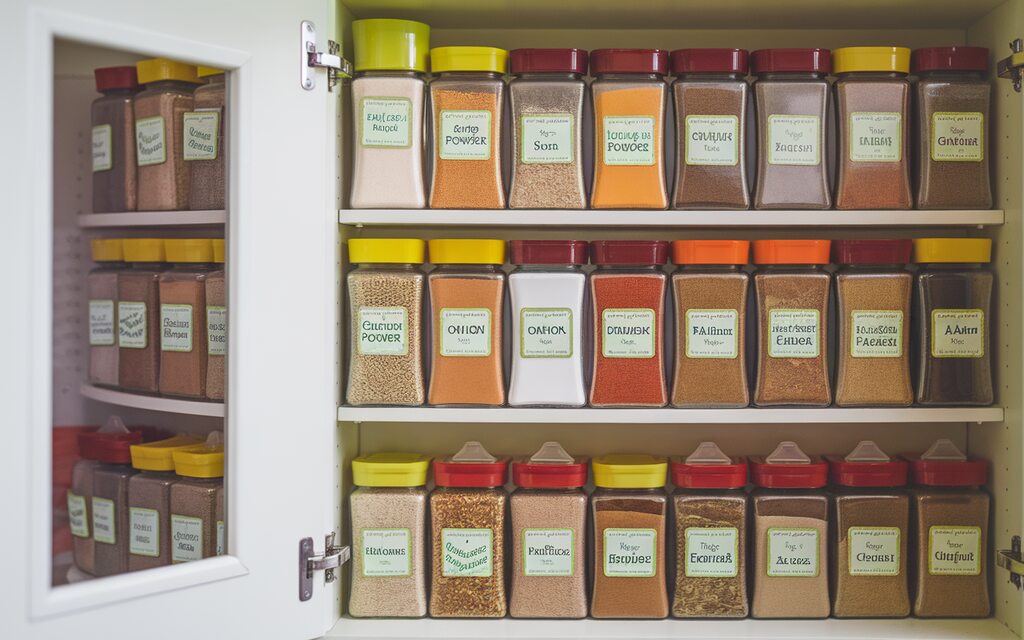
My spice cabinet used to be a mess. I could never find what I needed, and it drove me crazy. I decided to organize it using containers from Dollar Tree. The whole project cost less than $20 and changed everything!
First, I emptied the cabinet and sorted all my spices. I tossed out old ones and grouped the rest by type like baking spices and savory seasonings. Then, I picked up small matching containers from Dollar Tree.
I transferred the spices into the containers and labeled each with a marker. The clear lids made it easy to see everything at a glance. Next, I arranged the containers on small shelves inside the cabinet.
My spices are neat, easy to find, and take up less space. This quick and affordable project made my kitchen more functional and less stressful!
Create a Stunning Gallery Wall
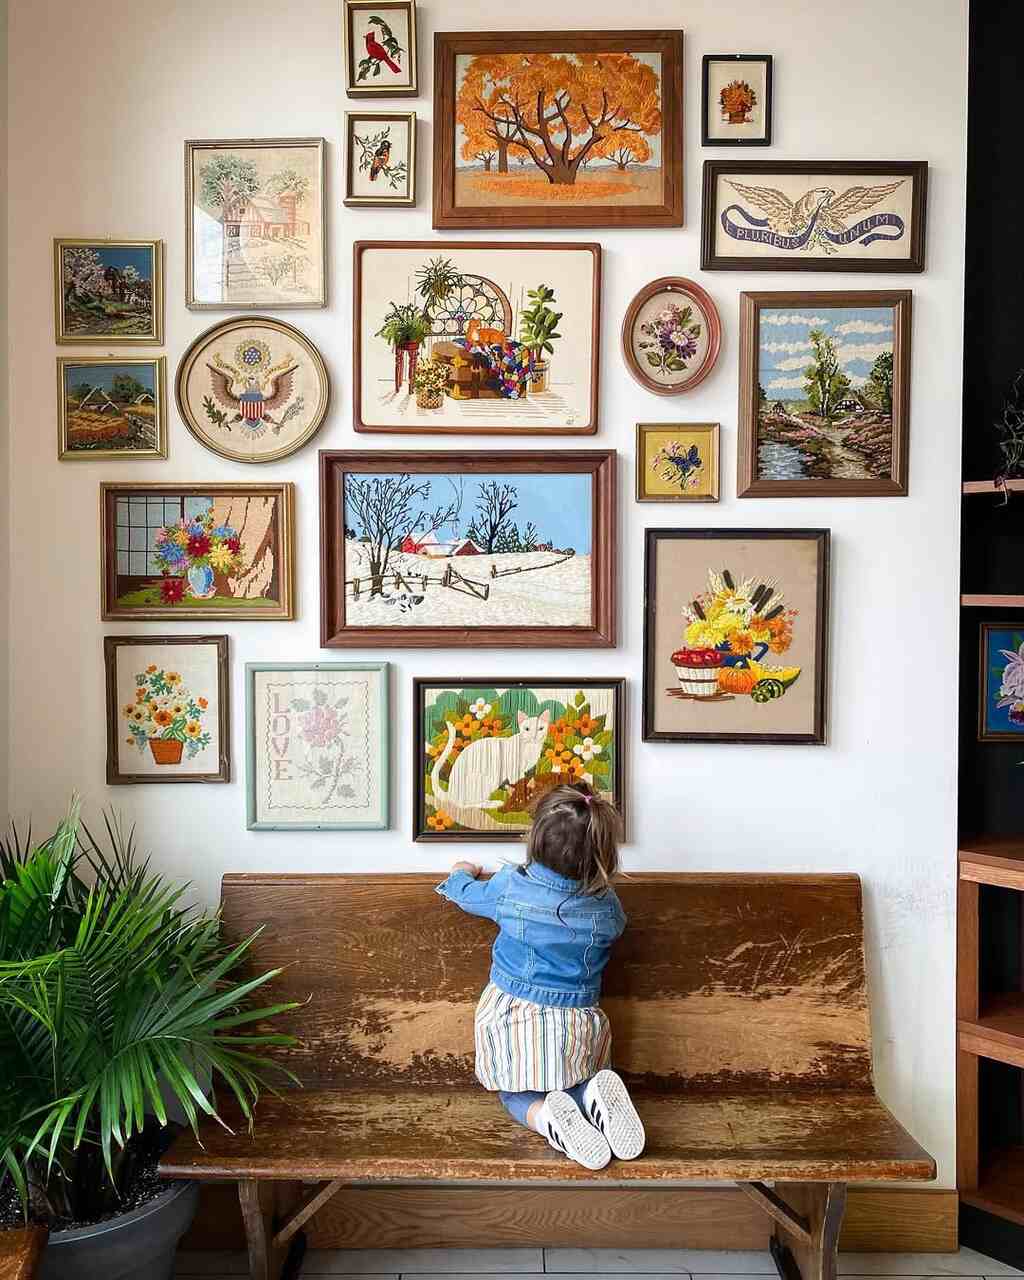
I wanted to fill my blank wall with something special, so I made a gallery wall. It was such a fun project, and I kept it under $200 by getting creative.
First, I gathered frames from thrift stores and sales. They didn’t match at first, but I painted them the same color for a clean look. Then, I printed photos, artwork, and even a few free printables I found online.
To plan the layout, I arranged the frames on the floor. I moved things around until I found a design I loved. Next, I used painter’s tape to mark the spots on the wall before hanging the frames.
When it was done, the gallery wall became the room’s highlight. It added personality, warmth, and style. This simple DIY turned an empty wall into something amazing!
Brighten Your Porch With Potted Plants
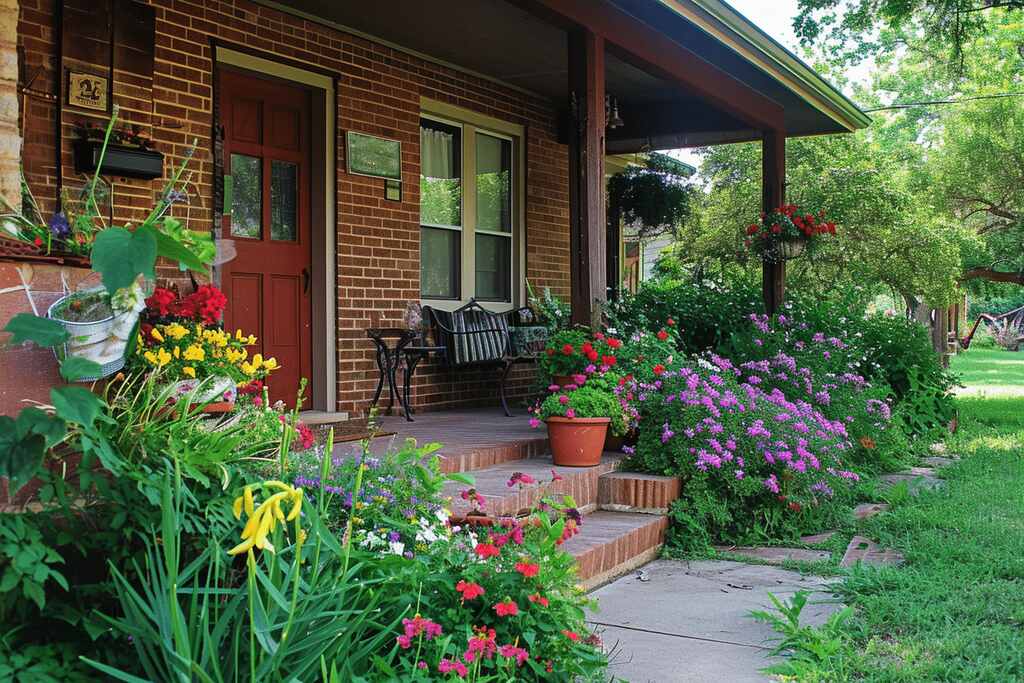
My front porch used to feel plain and uninviting. I decided to add potted plants for a quick and affordable improvement. It was easy, fun, and cost me less than $200.
First, I visited a local garden center and picked a few low-maintenance plants. I chose a mix of flowers and greenery to add color and texture. Then, I found inexpensive pots in different sizes at a discount store.
I arranged the plants in their pots at home, adding fresh soil for healthy growth. I placed them strategically around my porch some by the steps and others near the door.
The transformation was immediate. The plants made my porch look lively and welcoming. Now, every time I come home, the space feels cheerful. Adding potted plants was easy to boost curb appeal without spending a lot!
Landscape Around Your Backyard Patio
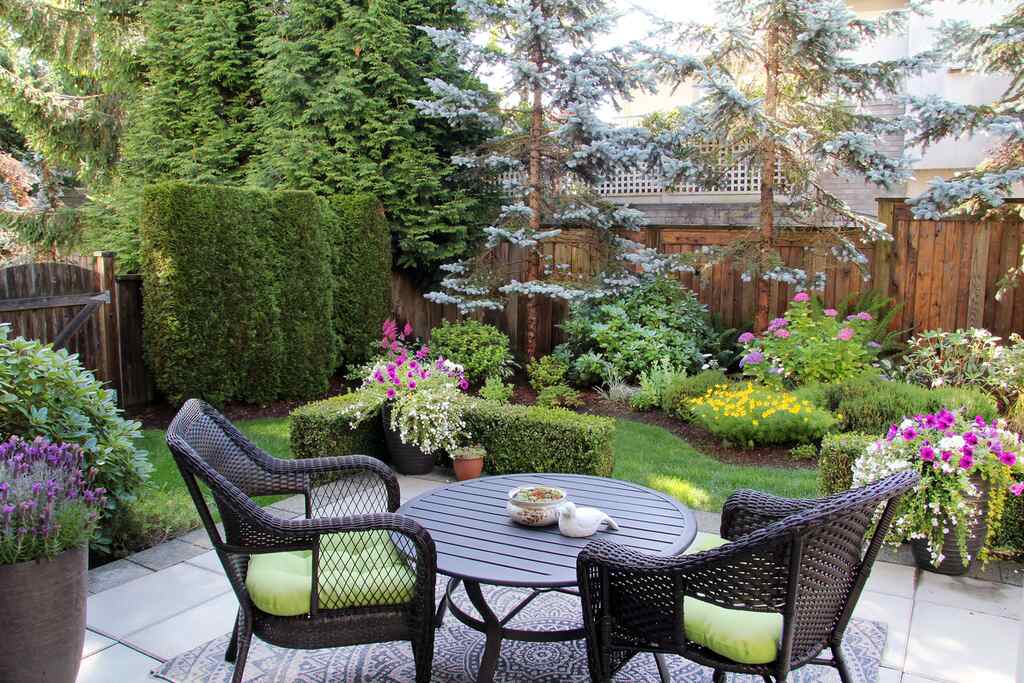
I wanted to make my backyard patio more inviting, so I decided to add some landscaping. It was a simple project, and I kept it under $200 by getting creative.
First, I cleared away any weeds and old plants around the patio. Then, I visited a garden center and picked up some affordable flowers, shrubs, and mulch. I also found a few small rocks for extra texture.
I planted the flowers and shrubs in neat rows around the edges of the patio. The mulch added a clean, polished look. To finish, I scattered the rocks to create a natural border.
The change was amazing. My patio now feels like a cozy outdoor retreat. It’s the perfect spot for relaxing or entertaining. Landscaping was an easy and budget-friendly way to make my backyard shine!
Add Bistro Lights to Your Patio or Porch

My patio felt dull in the evenings, so I added bistro lights. It was a simple and affordable way to make the space warm and inviting. Plus, it cost me less than $200!
First, I measured the area to determine how many lights I needed. Then, I bought a string of bistro lights from a local store. They were easy to hang and came with hooks to secure them.
I draped the lights along my patio’s edges, ensuring they were spaced evenly.
The lights gave off a soft, cozy glow that completely transformed the atmosphere. Now, my patio is perfect for outdoor dinners or relaxing in the evening. Hanging bistro lights was a quick DIY that added charm to my space without breaking the bank.
Build a DIY Floating Firewood Holder
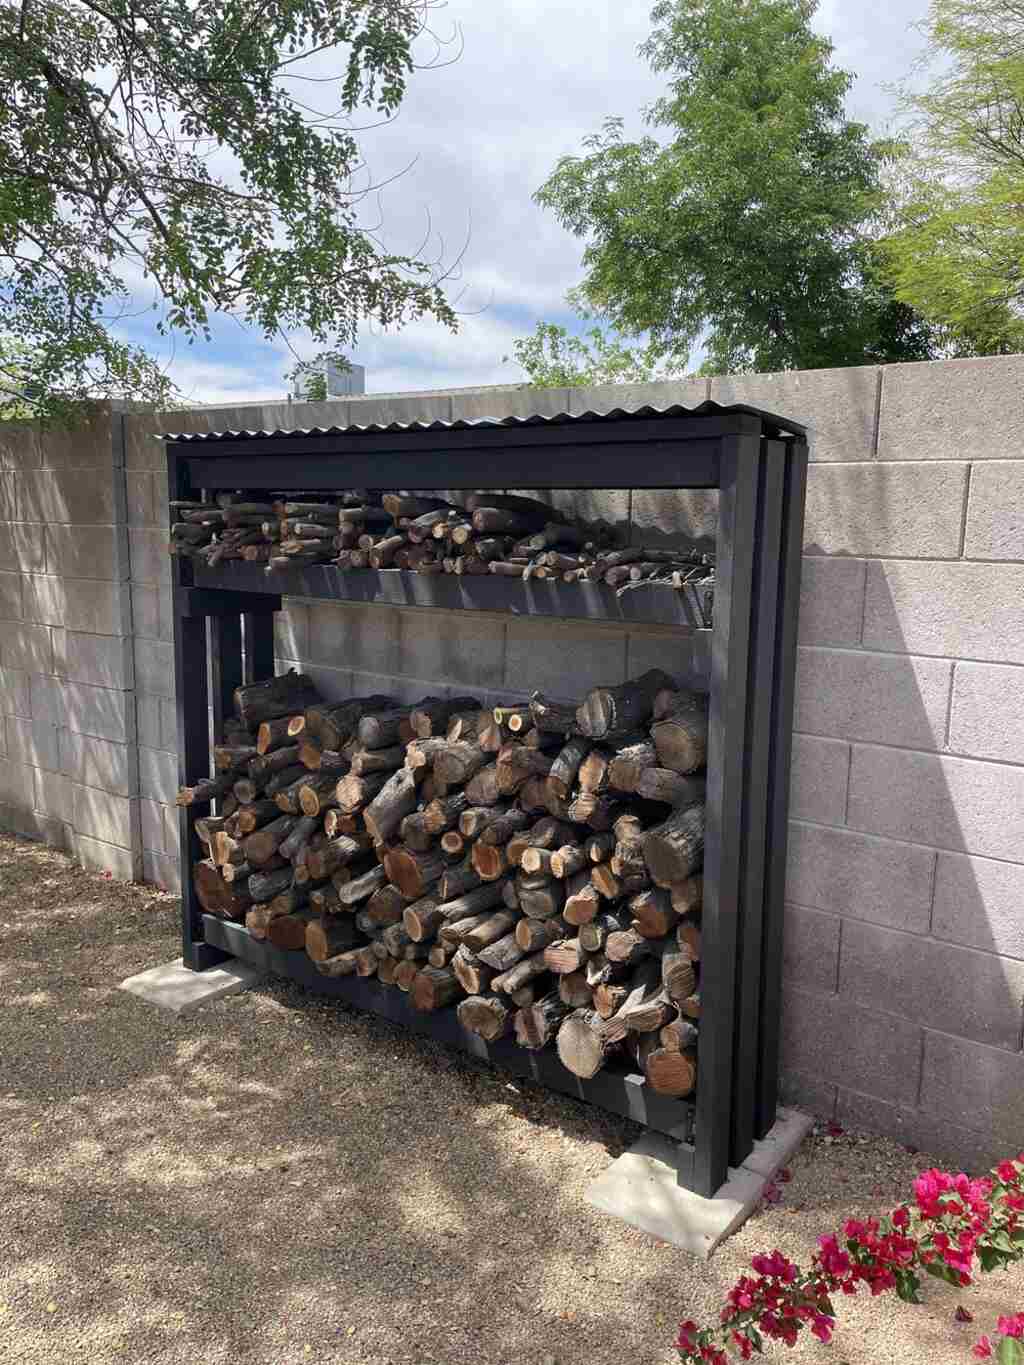
I needed a practical way to store firewood near my fireplace, so I decided to build a floating firewood holder. It was a simple DIY project that cost me less than $200.
First, I gathered the materials: a few wooden planks, brackets, screws, and wood stains. I measured the space where I wanted to hang the holder, then cut the planks to size.
Next, I attached the brackets to the wall and secured the wood planks to create a floating shelf. I stained the wood to give it a rustic, polished look.
Once everything was in place, I neatly stacked the firewood on top. The floating design saved space and gave my living room a sleek, modern touch. This easy project organized my firewood and added style to the room all for under $200.
Build Wood Shelving for Extra Storage
I needed more storage in my living room, so I built a wood shelving. It was a simple project and cost me under $200.
First, I measured the space where I wanted the shelves to go. Then, I bought some wood planks, brackets, screws, and a bit of wood stain. I chose affordable materials to keep costs low.
Next, I cut the wood to the right size and attached the brackets to the wall.
I made sure the shelves were level before securing them in place. After that, I stained the wood to give it a clean, polished finish.
Finally, I placed my books and decor on the shelves. The new storage helped organize the room and gave it a stylish look. Building these wood shelves was an easy, budget-friendly way to improve my home!
DIY Sliding Barn Door

I’ve always loved the look of sliding barn doors but didn’t want to spend too much. So, I decided to make my own. The project was fun and affordable, costing me less than $200.
First, I measured the space where I wanted the door. I then bought some wood, hardware, and a sliding door kit. The materials were inexpensive and easy to find.
I built the frame for the door by cutting the wood to size. Then, I stained it to match the style of my home. I attached the sliding hardware and made sure the door slid smoothly.
Once it was up, my room looked completely different. The sliding barn door added character and saved space, too. This DIY project was simple, cost-effective, and made my home feel more stylish!
Conclusion
Improving your home doesn’t have to be expensive. With a little creativity, simple DIY projects can make a significant impact without stretching your budget. It’s refreshing a room with new paint or crafting a custom piece, small upgrades can bring new life to your space.
I hope these ideas inspire you to tackle your budget-friendly home improvements. Even the smallest changes can enhance both function and style.
Have you tried any DIY projects under $200? Share your experiences and ideas in the comments I’d love to hear them.
FAQs
What is the cheapest way to cover an outdoor kitchen?
The most budget-friendly options include using a pergola with a tarp, a retractable shade sail, or repurposed materials like corrugated metal roofing or reclaimed wood.
Can I build a covered outdoor kitchen myself?
Yes! With basic DIY skills, you can create a covered outdoor kitchen using simple structures like a wooden frame, a patio umbrella, or a gazebo kit.
How do I weatherproof my outdoor kitchen?
Use weather-resistant materials such as treated wood, stainless steel, or stone. Apply waterproof sealants, invest in durable covers, and ensure proper drainage to prevent water damage.
What is the best roofing for a budget-friendly outdoor kitchen?
Affordable options include polycarbonate panels, metal sheets, or a wooden pergola with a waterproof fabric cover.
How can I add lighting to my outdoor kitchen on a budget?
Use solar-powered lights, LED string lights, or battery-operated lanterns to create a cozy ambiance without increasing electricity costs.