
Looking for a simple fix for your cluttered entryway? A hall tree might be exactly what you need. This multipurpose furniture piece combines hanging space, storage, and seating to transform how you use your entrance area every day.
In this article, you’ll learn how to build your hall tree in a weekend. We’ll cover the materials you’ll need (all available at local hardware stores) and provide step-by-step instructions anyone can follow.
A functional entryway makes daily life better. No more searching for keys, tripping over shoes, or wondering where to put bags when you come home. This project solves these common problems with a straightforward design that works in small or large spaces.
I’ve built five hall trees for friends and family with this exact method. The design is tested and proven to last for years with normal use. Even if you’ve never built furniture before, you can complete this project with basic tools and minimal woodworking experience.
Ready to create a more organized home entrance? Let’s get started!
Plan & Design Your DIY Hall Tree
Measure Your Entryway
Grab your tape measure and write down:
- Width of your wall space (typical hall trees need 3-4 feet)
- Depth you can extend into the room (18-24 inches is standard)
- Height from floor to ceiling (most hall trees are 6-7 feet tall)
Got a small space? I built a 24-inch wide hall tree that works great in my apartment. Think vertical when space is tight.
Remember: Leave at least 3 feet of clearance for doors to open fully. Add 6 inches of buffer space around your hall tree for comfortable use.
Choose the Right Design
Match your home style:
- Rustic: Reclaimed wood with black metal hooks
- Modern: Clean lines and light-colored wood
- Farmhouse: White paint with wood accents
Consider what features you need:
- A bench for sitting while putting on shoes? (Standard height: 18 inches)
- Number of hooks for coats and bags? (Allow 8-10 inches between hooks)
- Shoe storage to keep your floor clear? (Plan 12×8×6 inches per pair)
- Mirror for last-minute checks? (Consider 12×24 inches minimum)
I like a bench with storage underneath-practical and space-saving.
Keep it simple. Draw a rough sketch with measurements before you start. This helps you plan materials and visualize the final product. Bags?
- Shoe storage to keep your floor clear?
- Mirror for last-minute checks?
I like a bench with storage underneath-practical and space-saving.
Keep it simple. Draw a rough sketch with measurements before you start. This helps you plan materials and visualize the final product.
Gather Tools and Materials
Let’s get everything ready before we start building. I always lay out all my supplies first – it saves time and prevents mid-project store runs.
Materials Checklist
Here’s what you’ll need for a basic hall tree:
- 2×4 lumber: 4 pieces (8 feet long) for the frame
- 1×12 pine boards: 3 pieces (6 feet long) for the bench and shelves
- 3/4-inch plywood: one 4×4-foot sheet for the back panel
- Wood screws: box of 2-inch and 1 1/4-inch screws
- 6 coat hooks: strong metal ones that can hold winter coats
- 4 L-brackets: to support the bench seat
- Wood glue: one small bottle
- 220-grit sandpaper: one pack
- Paint or stain: your choice of color
- Clear polyurethane: to protect the wood
I spent about $120 on materials for my last hall tree. You might spend less if you use scrap wood or catch a sale.
Money-saving tip: Check the “oops” paint section at your hardware store. I found a gallon of gray paint for $9 instead of $35!
Tools You’ll Need
Must-haves:
- Measuring tape
- Speed square
- Electric drill with drill bits
- Level
- Sanding block or electric sander
- Screwdriver (both Phillips and flat-head)
- Pencil
Helpful extras:
- A miter saw or a circular saw for cutting boards
- Pocket hole jig for strong, hidden joints
- Brad nailer for quick assembly
- Clamps to hold pieces while gluing
Don’t have all these tools? No problem. I borrowed a miter saw from my neighbor for my first project.
Tip for beginners: If you’re just starting, most hardware stores will cut your wood for you. I did this for my first hall tree, and it worked great.
Before you begin, clear a good workspace. Your garage floor or driveway works well. I like to lay down an old sheet to catch sawdust and paint drips.
Got everything? Great! Now we’re ready to start building.
Build Your DIY Hall Tree in Easy Steps
Let’s get building! I’ll walk you through each step of this project. Take your time – rushing leads to mistakes (I learned this the hard way).
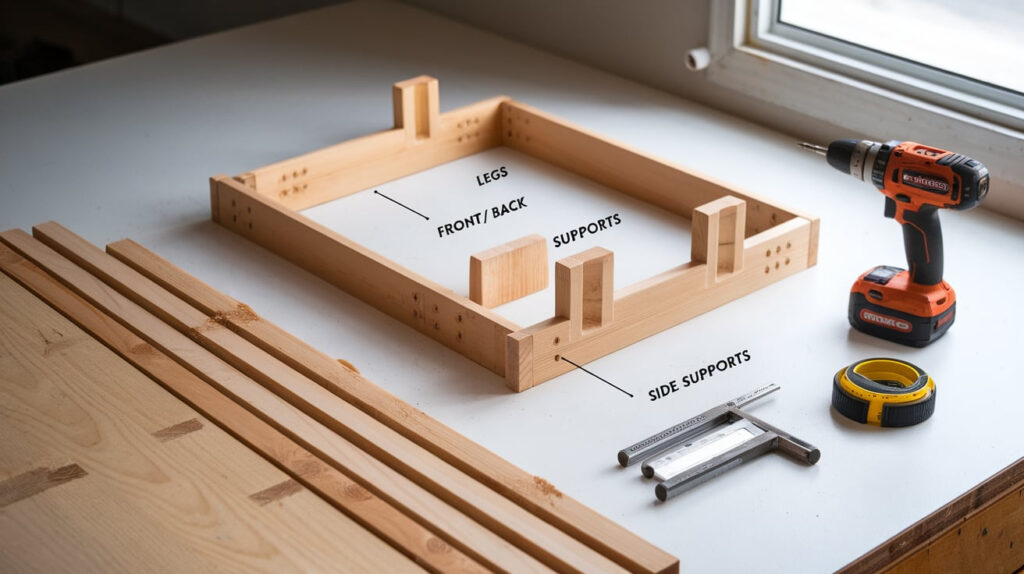
Step 1: Build the Bench Base
Start with the foundation of your hall tree. The bench needs to be strong enough to hold a person’s weight.
First, cut your 2×4s:
- 4 pieces at 16 inches long (legs)
- 2 pieces at 36 inches long (front/back supports)
- 2 pieces at 15 inches long (side supports)
Form a rectangle with your long and short sides. Check that corners are square. I use a speed square for this.
Attach the pieces using 2-inch screws. Two screws at each joint works well.
Next, add the legs to each corner. Make sure they’re all the same height – uneven legs will make your bench wobble.
For the seat, cut your 1×12 boards to 36 inches. Lay them across the top frame. Secure with 1¼-inch screws from underneath so they don’t show.
Want shoe storage? Add cross supports halfway up the legs and lay another board across them.
Step 2: Construct the Back Panel
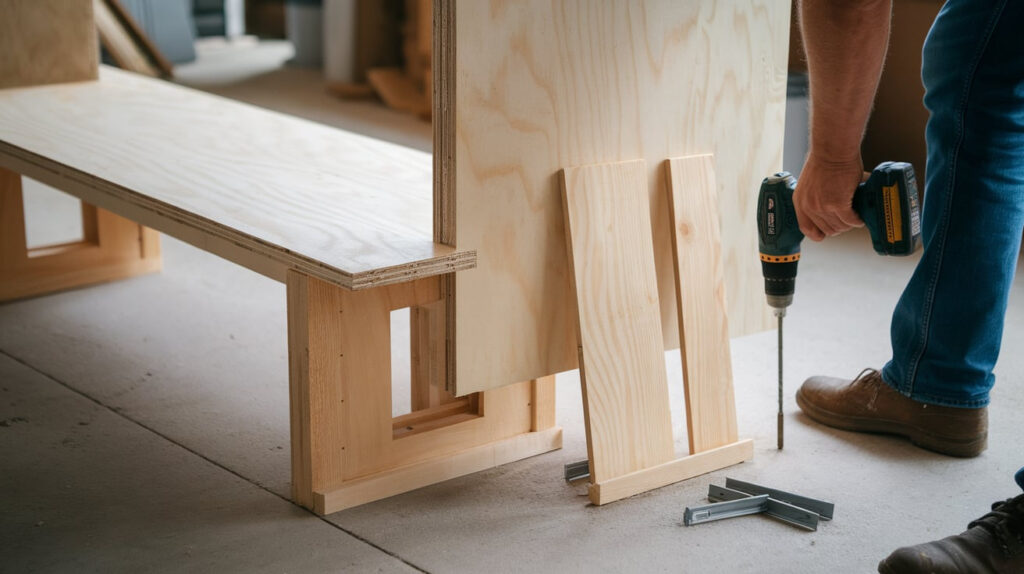
The back panel gives your hall tree stability and style.
Cut a piece of plywood to 36 inches wide by 48 inches tall. Or use three 1×12 boards side by side.
Line up the back panel with the rear edge of your bench. The panel should sit directly on the floor for the best support.
Attach the panel to the bench frame with 2-inch screws. I use 4 screws across the bottom edge.
For extra strength, add 2 small L-brackets connecting the panel to the bench frame.
Step 3: Add Storage Features
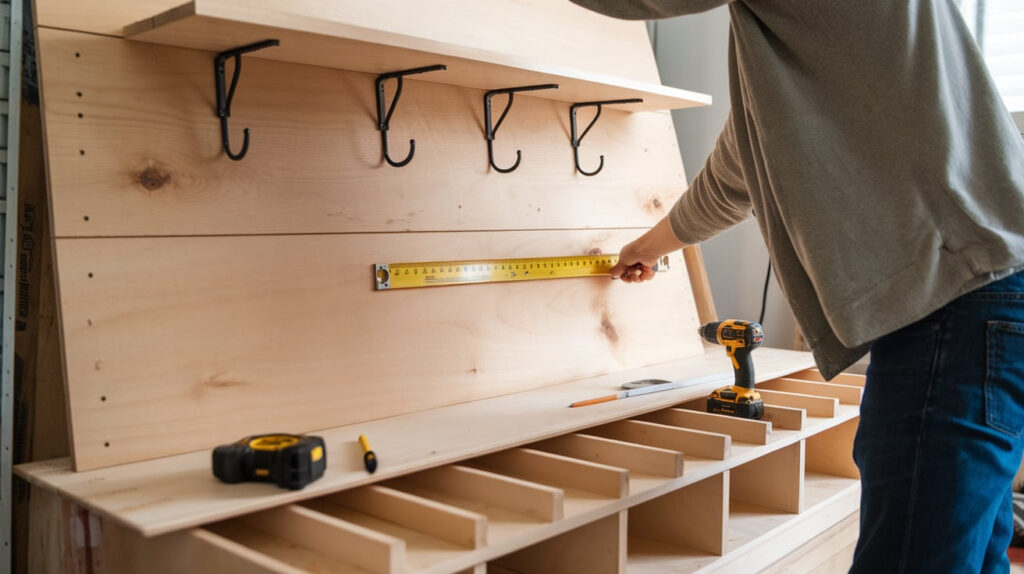
Now for the fun part – making your hall tree functional!
For coat hooks:
- Mark a line 60 inches from the floor across your back panel
- Space 4-6 hooks evenly across this line
- Use a level to keep your line straight
- Pre-drill small holes for each hook to prevent splitting
- Screw in the hooks firmly
My tip: Press down while turning the screws to keep them from slipping out of the screw slots.
For an upper shelf:
- Cut a 1×8 board to match the width of your back panel
- Attach small brackets to the back panel, 12 inches from the top
- Rest your shelf on these brackets
- Secure with screws from underneath
For cubbies under the bench, add dividers cut from 1×12 boards. Space them evenly and attach with screws.
Step 4: Sand and Finish the Hall Tree
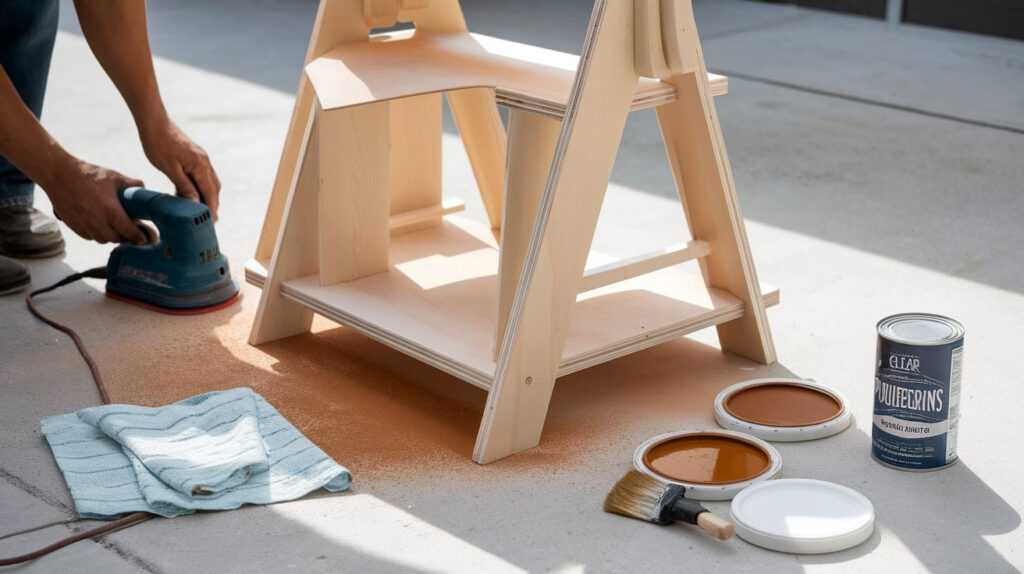
Good sanding makes a huge difference in the final look.
Start with rough edges and corners. Sand with 120-grit paper first, then 220-grit for a smooth finish.
Sand in the direction of the wood grain. Going against the grain leaves scratches.
Remove all dust with a damp cloth before finishing.
For paint:
- Apply primer first for better coverage
- Use 2 thin coats instead of 1 thick coat
- Let dry completely between coats
For stain:
- Apply with a clean cloth in even strokes
- Wipe off excess after 5 minutes
- Let dry for 24 hours
- Add clear polyurethane to protect the wood
I like to do this step outside or in a well-ventilated area. The fumes can be strong.
Step 5: Style and Secure in Your Entryway
Almost done! Let’s set up your new hall tree.
Move it into place in your entryway. Check that it sits level on your floor. Use small shims under any leg that doesn’t touch the floor.
Safety first: Secure the hall tree to the wall so it can’t tip over. I use two L-brackets at the top corners, screwed into wall studs.
Now add your personal touches:
- A small cushion on the bench
- Baskets in the cubbies
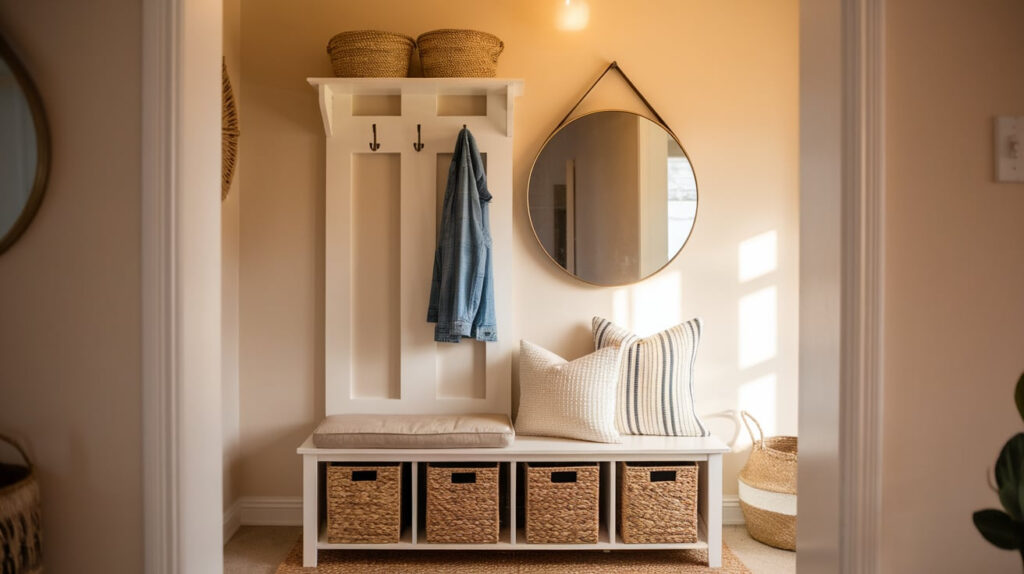
- Maybe a small mirror above the hooks
Stand back and look at what you’ve made. Pretty impressive, right? Your entryway looks completely different now.
The best part? When friends ask where you got it, you can say, “I built it myself.”
Personalize Your Hall Tree
Make your hall tree uniquely yours with these simple touches.
Color Schemes
For modern homes:
- White with light wood accents
- Black with brass hardware
- Gray with white trim
For warm, cozy spaces:
- Navy blue with bronze hooks
- Forest green with wood tones
- Dark stain with clear coat
Try two-tone painting: I painted the bench seat dark brown and the back panel cream for a friend. It looked much more high-end than a single color.
Hardware Choices
The right hardware transforms your hall tree:
- Cast iron hooks for a rustic feel
- Matte black for modern spaces
- Antique brass for warmth
- Wooden pegs for a minimalist look
Install adult hooks at 60 inches high and kids’ hooks at 40 inches so everyone can reach.
Match cabinet pulls on drawers to your hook style for a coordinated look.
Decorative Accents
Small touches make a big impact:
- Frame a mirror on the back panel
- Add a small shelf for keys and a wallet
- Install a mail sorter on one side
- Use labeled baskets in cubbies
I added a chalkboard section to mine for quick notes and reminders.
Consider lighting: A battery-powered motion light helps find items on dark mornings.
What personal touch will make your hall tree perfect for your home?
Conclusion
Building your hall tree is a weekend project with lasting benefits. You’ll save money compared to store-bought options while creating exactly what your space needs. I built my first hall tree five years ago, and it still serves my family daily, holding coats, corralling shoes, and keeping our entryway tidy.
The small effort to measure, build, and personalize pays off every time you walk through your front door. Your guests will be impressed, but more importantly, you’ll enjoy the satisfaction of using something you made with your own hands. Ready to transform your entryway? Grab your measuring tape and get started!