
Blank walls can make a room feel empty, but you don’t need to spend much to bring them to life. DIY wall art offers a creative and affordable way to transform any space. These projects let you design one-of-a-kind pieces that express your personality far better than anything you can buy in a store.
For years, homeowners and design lovers have turned simple materials into meaningful art. Whether you’re decorating a new home or giving your current space a fresh look, DIY wall décor makes it easy to create something that truly feels like your own.
The beauty of making your own wall art lies in the freedom it offers. You can experiment with colors, textures, and techniques until you find what fits your style best. These projects are not only budget-friendly but also deeply personal, allowing every detail to match your vision.
In this guide, you’ll learn how to create stunning wall art from scratch. Each step is simple, enjoyable, and designed to help you craft décor that makes your walls feel complete.
Get Started: Tools and Materials You’ll Need
You need the right tools and materials to start any DIY wall art project. Getting everything ready saves time and lets you create whenever inspiration hits. Let me show you what you’ll need to begin your creative trip.
Simple supplies for beginners
DIY wall art is super flexible—you don’t need fancy supplies to create something amazing. Here are the key items I suggest if you’re just starting:
- Canvas options: Pre-stretched canvases in various sizes, canvas boards, or even heavyweight paper
- Paint varieties: Acrylic paints (dry quickly and work on most surfaces), watercolors, or craft paints
- Brushes: A set with different sizes and shapes (flat, round, and detail brushes)
- Additional tools: Palette knife, palette or paper plate for mixing colors, pencil, eraser, ruler
- Finishing touches: Picture frames, hanging hardware, adhesives, and sealants
Acrylic paints are great for beginners because they mix with water but become water-resistant after drying. They stick well to most surfaces without any special prep work.
Where to find affordable materials
Beautiful wall art doesn’t have to break the bank. You can create stunning projects with budget-friendly materials from different places.
Craft store chains run weekly coupons and seasonal sales—I wait for these deals before buying big items like canvases. Dollar stores are a great spot to find basic supplies like paintbrushes, frames, and standard-sized canvases.
Thrift stores are a rich source of frames, canvases (paint over the old ones), and unique items for your wall art. Etsy and Amazon sometimes offer great deals on art supplies, especially bulk purchases.
Your home might already have everything you need. Old picture frames, fabric scraps, magazines for collages, or garden materials like branches and pressed flowers can become stunning wall pieces at no cost.
Note that some supplies need better quality—especially items that help your artwork last longer. The most unique DIY wall art ideas often come from trying out unexpected materials.
Easy DIY Wall Art Projects to Try First
Feeling nervous about starting your first wall art project? These beginner-friendly ideas are simple, affordable, and perfect for adding a creative touch to your space. Each one lets you express your style while keeping the process fun and relaxing.
Below are a few simple yet beautiful DIY wall art ideas you can easily try at home:
- Create a Custom Portrait with Paint by Number Kits: Paint by number kits have evolved into stylish art projects for adults. They allow you to turn personal photos—whether family portraits, vacation memories, or pet pictures—into custom artwork without needing painting experience. Kits such as Number Artist DIY portrait kits come with everything you need: a pre-numbered canvas, quality brushes, and carefully mixed paints made for your image.
- Painted Canvas Art: Painting on canvas is one of the easiest ways to create art that fits your home. You can experiment with bold colors, textured layers, or minimalist patterns that match your room’s palette.
- Printable Quotes and Typography: If freehand painting feels intimidating, printable quote art is a great alternative. You can design motivational sayings or download ready-made prints, then add your own touch with watercolor backgrounds or subtle illustrations.
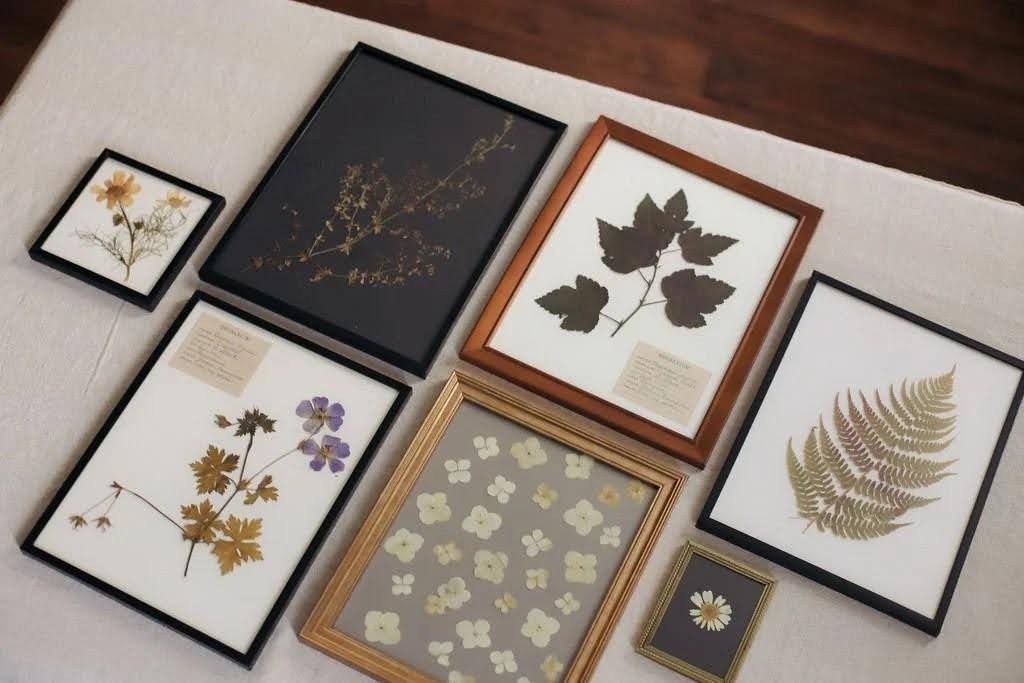
- Pressed Flower Frames: Turn nature into timeless décor by pressing flowers from your garden or special events. Once fully dried, arrange them between glass panels or on cardstock for a delicate floating effect.
Creative Ideas to Personalize Your Space
Adding personal touches can turn any house into a warm, inviting home. These creative ideas go beyond simple DIY projects, helping you design wall art that reflects your story and style.
Explore these easy ways to transform your walls into a reflection of who you are:
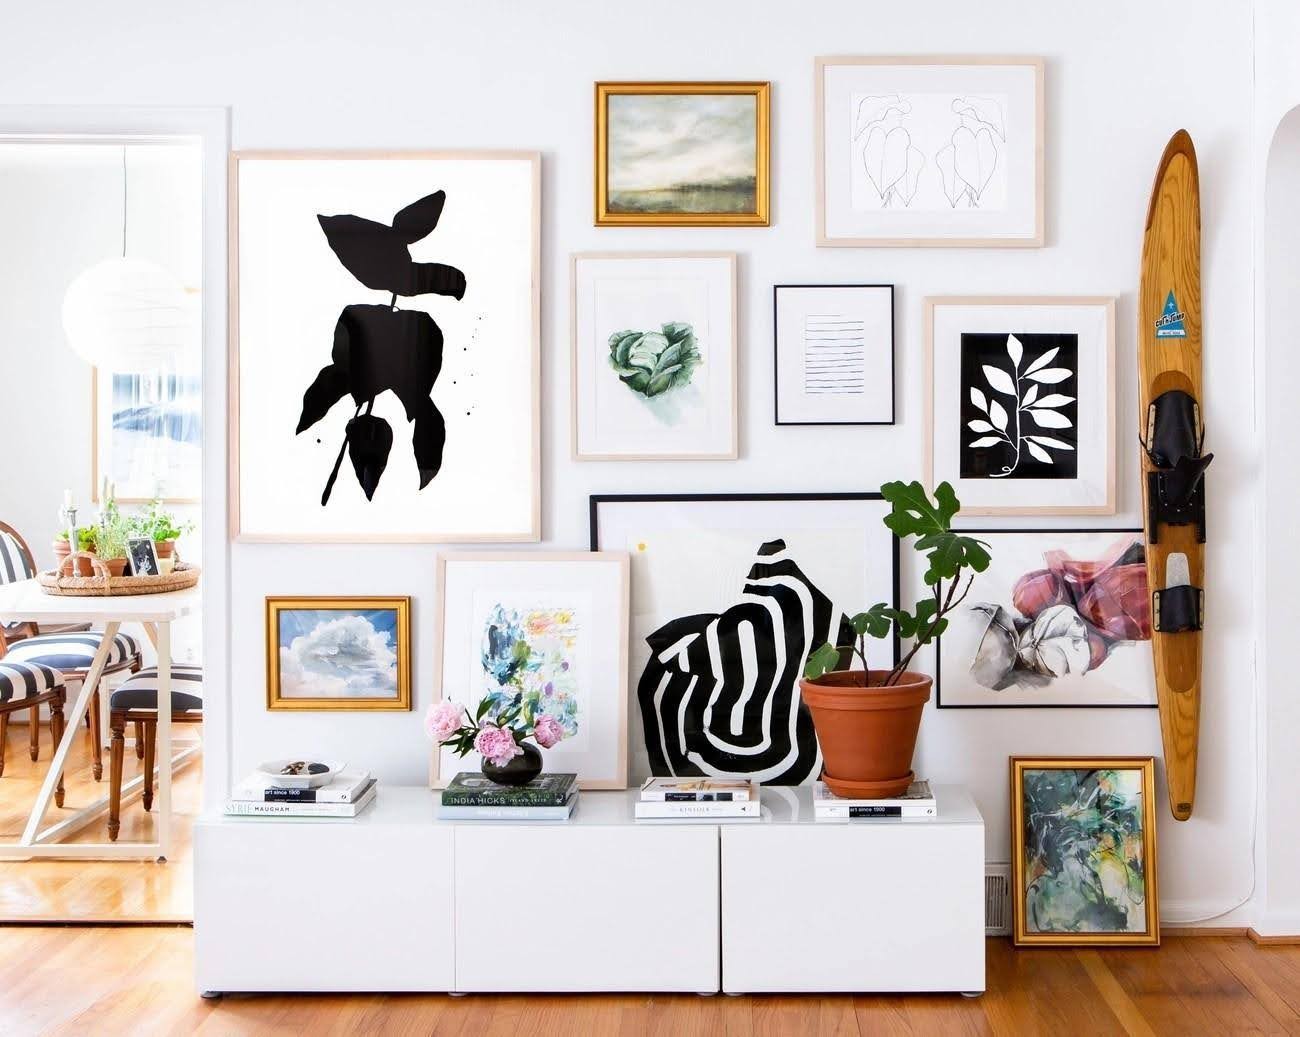
- Gallery Wall with Personal Photos: A gallery wall brings your favorite memories to life while adding personality to any room. Create a cohesive look by using similar frames, a matching color palette, or photos with a shared theme. Before hanging, arrange your layout on the floor and keep frames about 5–10 cm apart for balance.
- Upcycled Items as Wall Décor: Thrift shops are full of hidden gems waiting for a creative touch. Old windows can be refreshed with botanical prints, and cast-iron grates look stunning with a new coat of paint. Picture frames can hold string displays for photos or notes, and woven baskets add beautiful texture to any wall.
- Nature-Inspired Art Using Leaves or Shells: Nature offers endless artistic inspiration. Try pressing leaves between wax paper and heavy books, then arrange them on cardstock or inside glass frames for a delicate look. Seashells collected from the beach can be glued onto wooden planks or displayed in shadow boxes. Each piece adds natural beauty and a personal story to your home.
- DIY Wall Shelves with Décor Elements: Floating shelves serve as both storage and stylish wall art. Combine family photos, plants, and small decorative items to create a balanced display. You can even make your own shelves using leather belts and wooden boards or repurpose wood trays for unique wall storage. These shelves not only save space but also showcase your creative spirit.
How to Display and Style Your DIY Art
The way you showcase your DIY creations can make them shine. A well-thought-out display can turn even simple pieces into eye-catching features in your home.
Choosing the right wall and layout
Your art will look best when its center sits about 57-60 inches from the floor—right at eye level for most people. When you place art above furniture, leave 6-8 inches of space to create a nice visual flow. The artwork should take up 1/2 to 2/3 of your furniture’s width to look balanced.
Here are some layout options to think over:
- Symmetrical arrangements work best with similar-sized pieces for formal spaces
- Asymmetrical layouts create energy by mixing different-sized works
- Floor planning helps you see the big picture—lay out everything before you start hanging
Mixing different art styles
You can blend different styles by finding something that ties them together. This could be colors that work well together, related subjects, or frames that complement each other. Yes, it is variety that makes things interesting, so mix up sizes, orientations, and materials throughout your space.
Using frames, mats, and hangers effectively
You can give your artwork an instant lift with custom-colored mats. Just paint white mats with interior paint to get that designer look. Large mats create a museum-quality feel that makes DIY projects look more polished. To keep everything secure, you might want to use both traditional hanging hardware and adhesive strips—this stops your art from moving over time.
Conclusion
Creating your own wall art is about more than filling empty space. It is a chance to connect with your creativity, experiment with new ideas, and make something that feels deeply personal. Each brushstroke, pressed flower, or upcycled find becomes part of your story, adding warmth and individuality to your home.
The beauty of DIY wall art lies in how it grows with you. As your tastes change, you can refresh your pieces, swap frames, or try new techniques. There is no single right way to decorate, only the joy of discovering what feels authentic to you.
Start small, enjoy the process, and let your walls reflect who you are. A home filled with art you created yourself will always feel more inviting, more meaningful, and more alive.