
Your garbage cans stick out like sore thumbs. I’ll show you exactly how to fix this.
This guide covers 15 proven fence designs that hide your bins completely. You’ll find step-by-step instructions for every skill level. From simple pallet screens to custom wooden enclosures.
I’ve built dozens of these myself. Some took an hour. Others needed a full weekend. All of them worked. You’ll learn which materials last longest, how much each project costs, what tools you actually need, and smart ways to save money.
No more ugly plastic bins ruining your curb appeal. Your neighbors will wonder where your trash went.
Ready to transform your yard? Let’s start building.
Why Hide Your Garbage Cans?
Curb appeal matters. Your home’s first impression starts at the street. Exposed trash cans scream “messy homeowner.”
Here’s what happens when you hide them:
- Your property value goes up
- Neighbors stop complaining
- Animals can’t get into your trash
- Wind won’t blow your bins around
- You feel proud of your yard again
Plus, many HOAs require trash can screening. Why fight it? Build something beautiful instead.
What to Consider Before Building
Location is everything. Your fence needs to work with your yard, not against it.
Think about these questions first:
- How many bins do you have?
- Do you need easy access for trash day?
- What’s your budget?
- How much time can you spend?
- Does your HOA have rules?
Check local codes too. Some areas limit fence height or require permits. A quick call to city hall saves headaches later. Measure twice, build once. Standard garbage cans are 32 inches tall and 22 inches wide. Add 6 inches of clearance on all sides.
Tools & Materials You Might Need
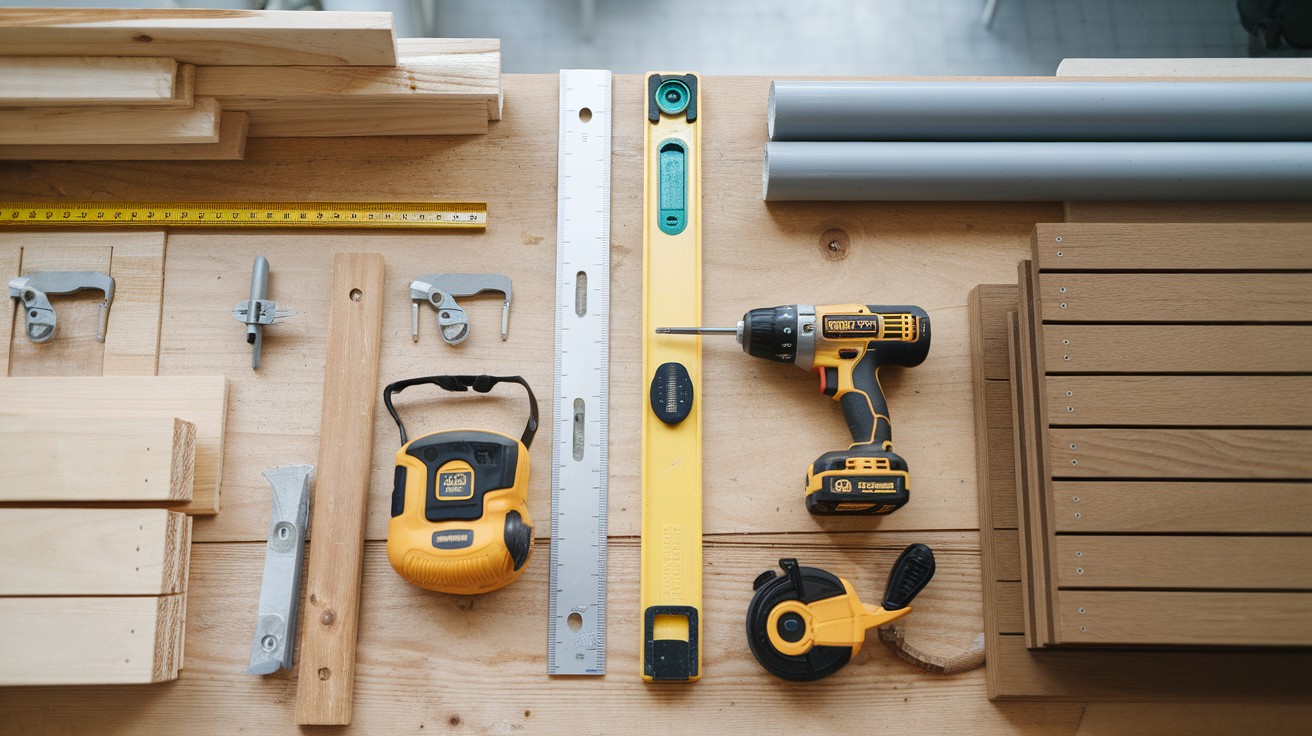
Basic tools work for most projects:
- Drill with bits
- Circular saw or miter saw
- Level
- Tape measure
- Screws and nails
- Post-hole digger (for permanent builds)
Materials vary by project:
- Wood (cedar, pine, or treated lumber)
- Fence panels
- PVC pipe and fittings
- Concrete mix
- Hardware cloth
- Hinges and latches
- Wood stain or paint
Don’t buy everything at once. Pick your design first, then shop for specific materials.
Wood & Pallet Projects
1. Simple Pallet Enclosure
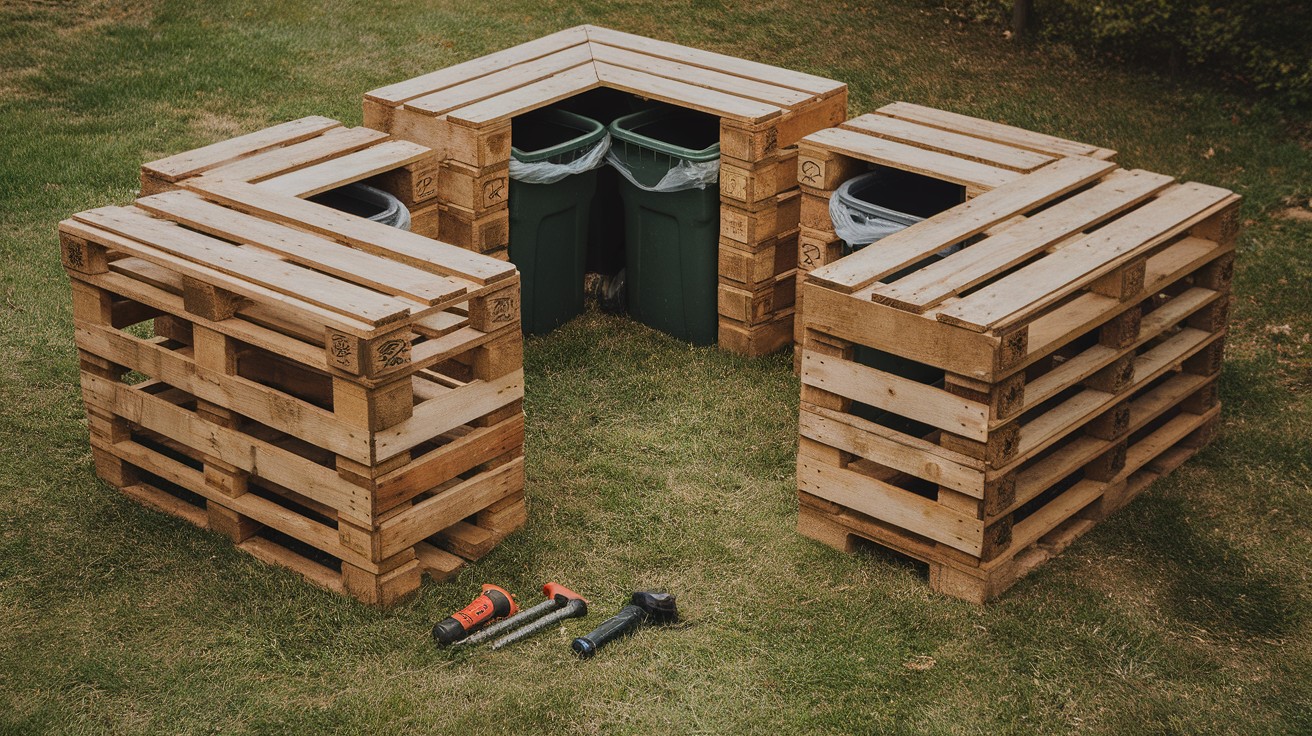
Free materials = happy wallet. Pallets cost nothing and look rustic. Perfect for farmhouse or cottage styles.
What you need: 3-4 wooden pallets, wood screws (3 inches), drill, and level.
Steps: Stand pallets on their side and screw them together at corners. Leave one side open for access. Sand rough edges smooth.
Pro tip: Check pallets for stamps. Avoid ones marked “MB” (methyl bromide treated).
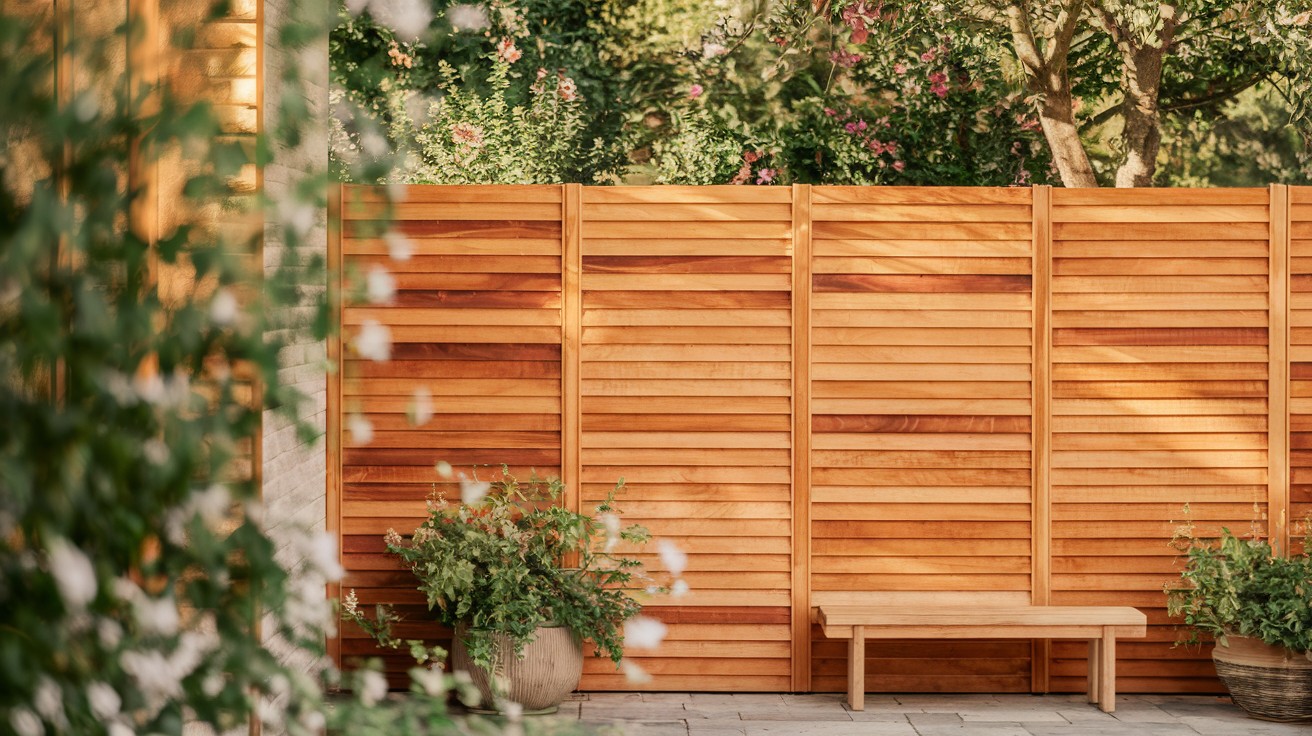
2. Horizontal Slat Fence
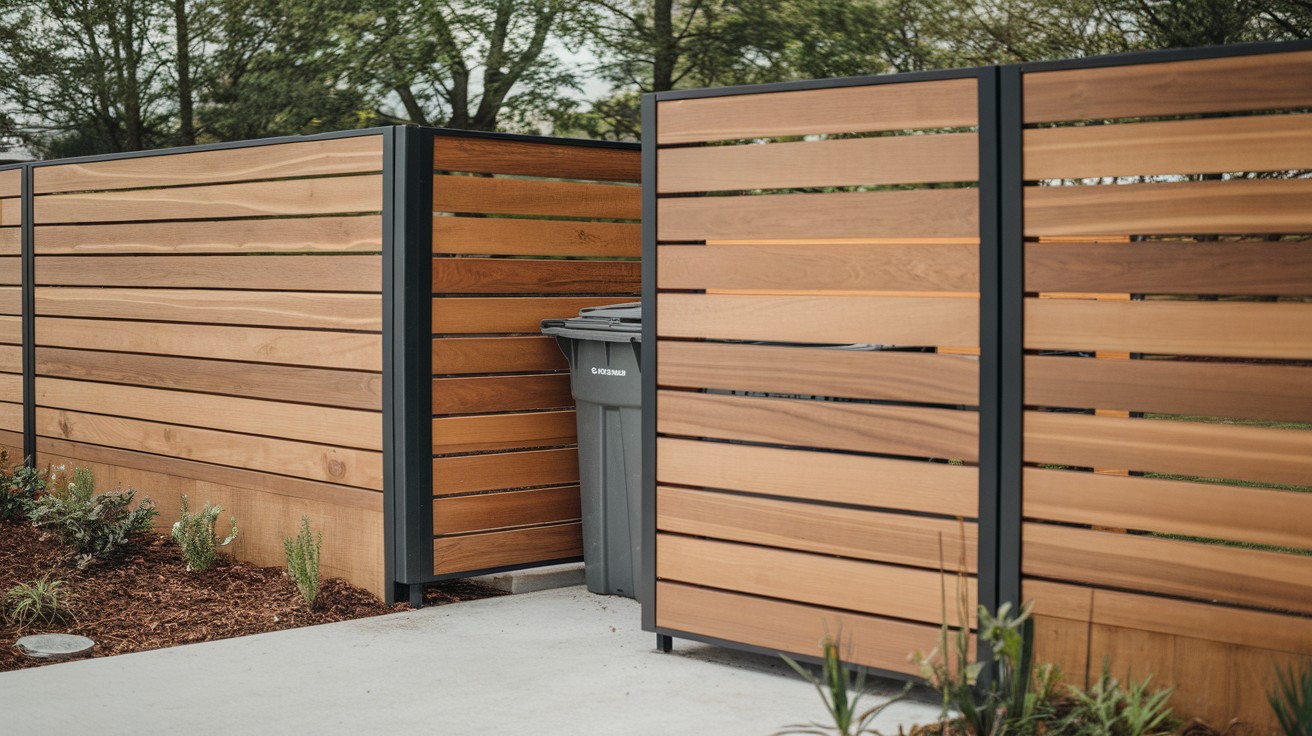
Modern homes love clean lines. This design costs more but looks expensive. Worth every penny.
Materials needed: 1×6 cedar boards, 4×4 posts, galvanized screws, and concrete mix.
Quick build: Set posts 6 feet apart and attach boards horizontally with 1-inch gaps. Start from bottom, work up. Keep boards level with a string line.
Time investment: One weekend for a 3-sided enclosure.
3. Fence Panel Enclosure
Lazy Sunday project. Pre-made panels save time. You just connect the dots.
Shopping list: 3 fence panels (6 feet wide), metal brackets, concrete anchors, and gate hardware.
Assembly: Position panels in U-shape and connect with metal brackets. Anchor to the concrete pad and add a gate on the open side.
Bonus: Panels come in many styles. Pick what matches your home.
4. Cedar Privacy Screen
Investment grade quality. Cedar naturally resists rot and bugs. It’ll outlast you.
Why cedar wins: It naturally resists rot and bugs, weathers to beautiful silver-gray, smells amazing when you cut it, and insects hate it.
Build it right: Use stainless steel screws since cedar corrodes regular ones. Pre-drill holes to prevent splitting. Apply cedar stain yearly and build on gravel base for drainage.
Portable & Modular Solutions
5. Rolling Trash Can Fence with Wheels
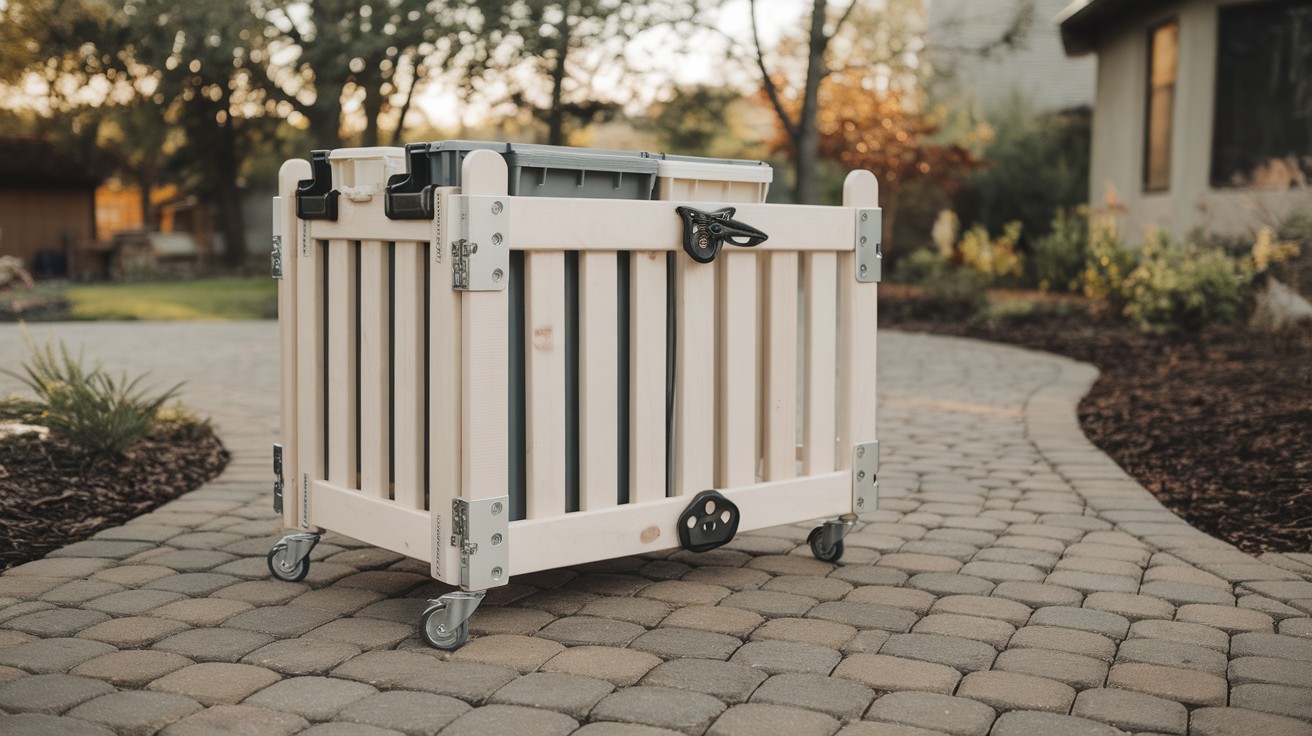
Move it when you need to. Cleaning day becomes easy when your fence rolls away.
Key components: Heavy-duty casters, lightweight frame (aluminum or PVC), quick-connect hinges, and rubber stops.
Smart design features: Wheels lock in place, panels fold flat for storage, handle makes moving simple, and works on any surface.
6. Folding Screen Panel
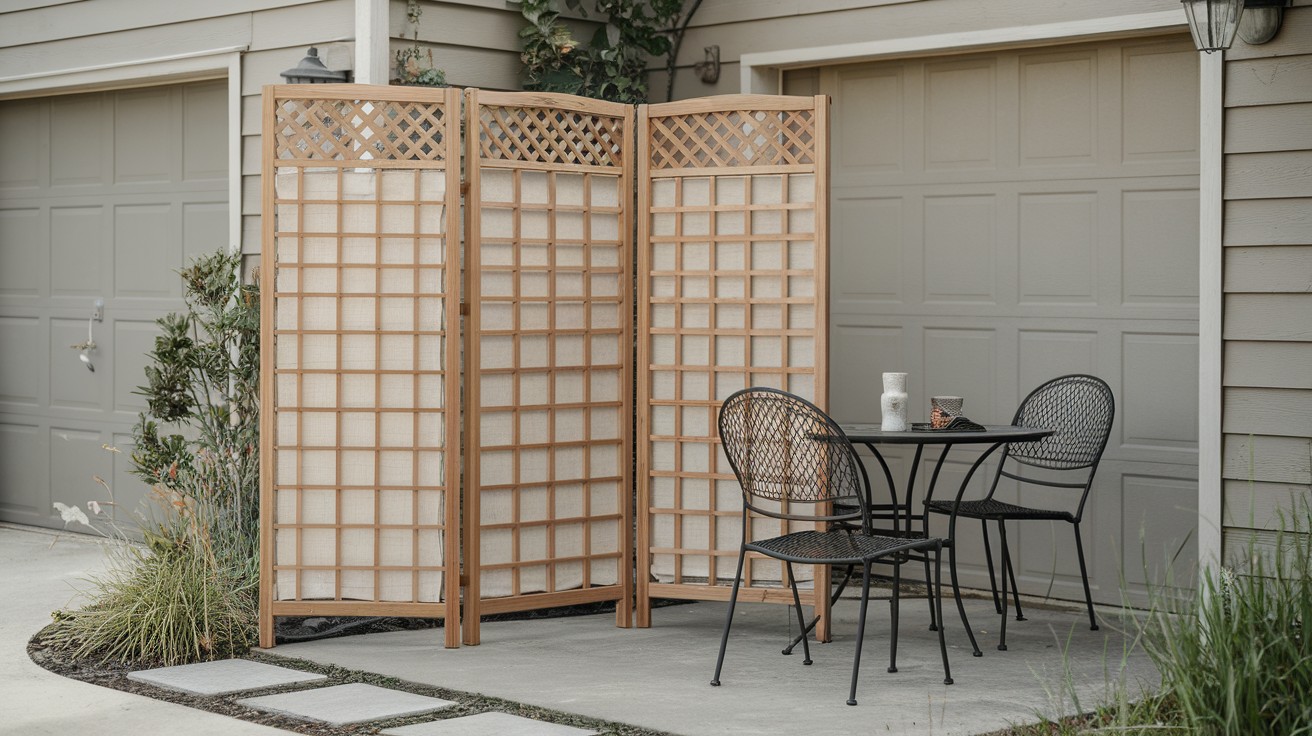
Apartment dwellers rejoice. No permanent installation required. Perfect for renters.
Materials: Wooden screen frames, outdoor fabric or lattice, piano hinges, and rubber feet.
Benefits: Sets up in minutes, stores in the garage, needs no tools, and costs under $75.
7. PVC Pipe Privacy Fence

Kid and pet safe. No sharp edges or splinters. Weathers any storm.
Why PVC rocks: Never needs painting, won’t rot or warp, handles wind great, and stays easy to clean.
Construction tips: Use PVC cement on all joints and paint with plastic-specific paint. Anchor with concrete footings and add UV protectant spray.
Decorative DIY Fences
8. Lattice Garbage Can Screen
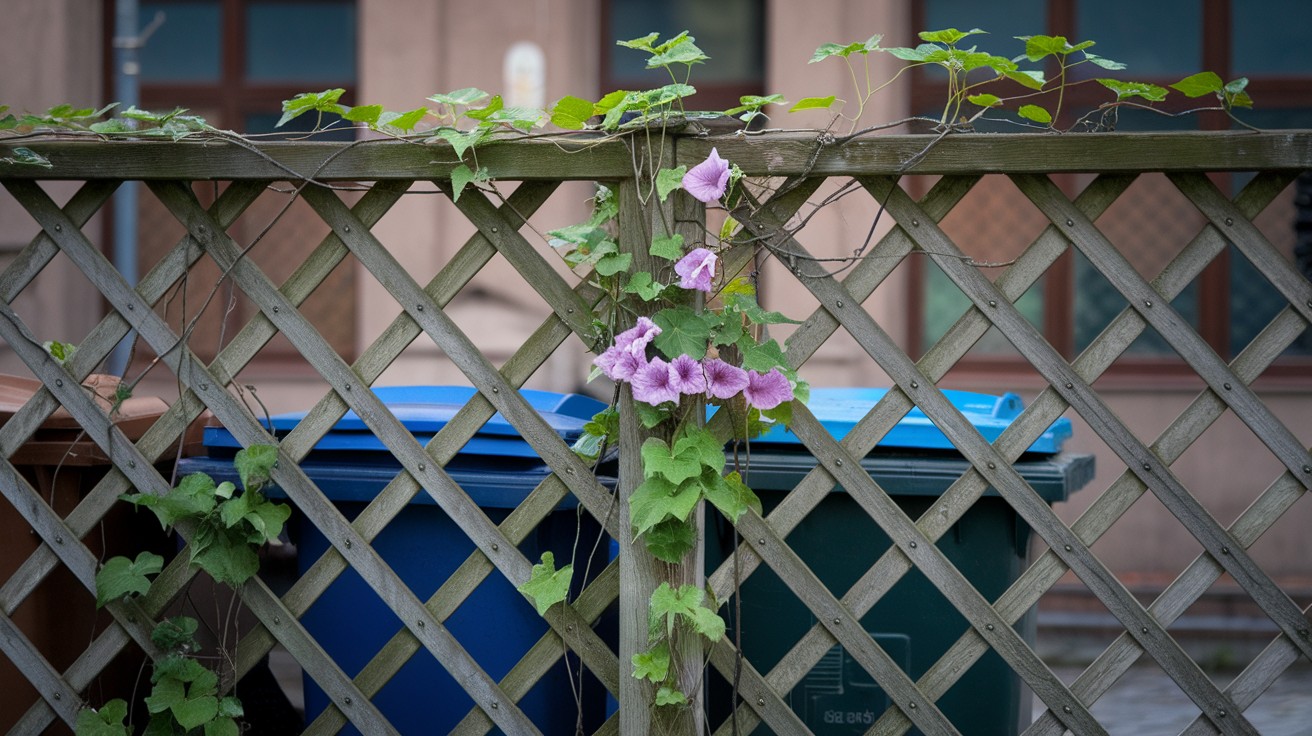
Turn ugly into pretty. Plants climb the lattice naturally. Your trash area becomes a garden feature.
Plant suggestions: Morning glory gives fast coverage, clematis produces beautiful flowers, honeysuckle smells great, and ivy provides year-round green.
Installation: Build a simple frame and attach lattice panels. Plant climbing vines at base and add drip irrigation if needed.
Wait time: Full coverage takes one growing season.
9. Living Fence with Planters
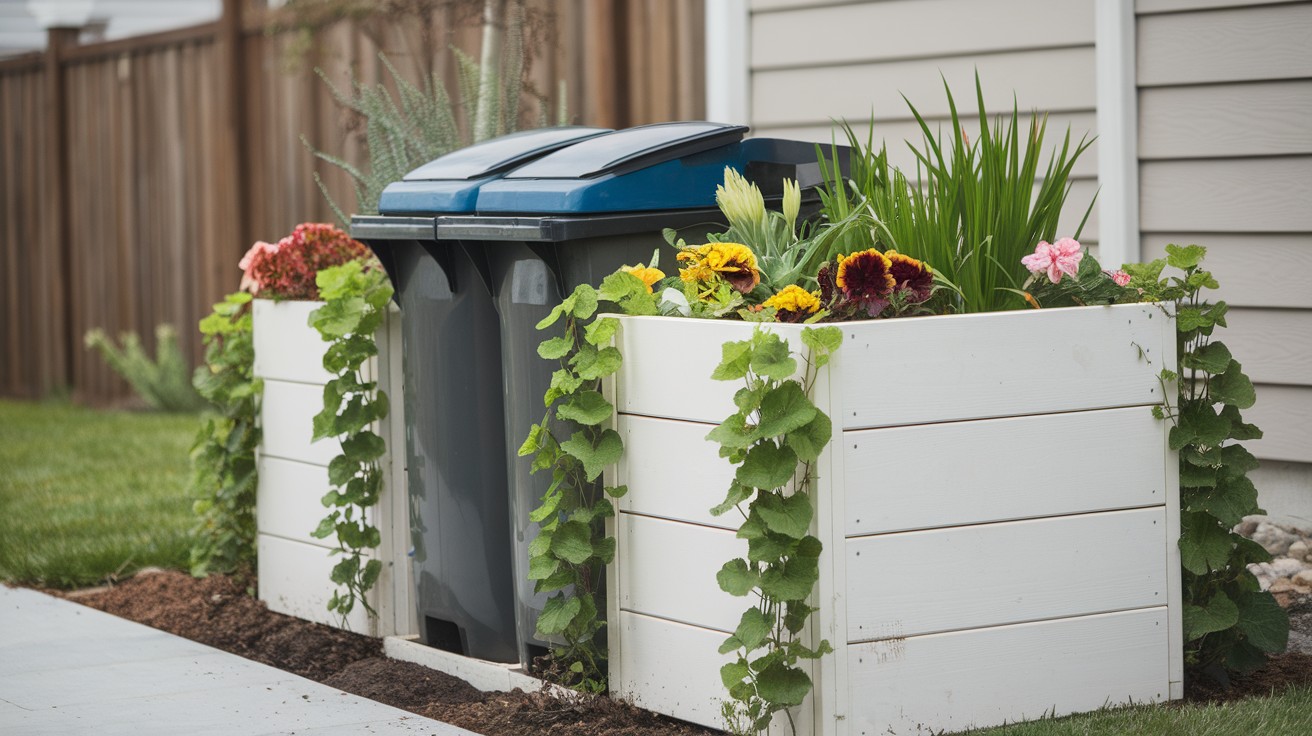
Two problems, one solution. Hide trash AND grow flowers. Genius move.
Design elements: Built-in planter boxes, trellis sections for vines, drip irrigation system, and seasonal flower rotation.
Plant combinations that work: Tall plants in back like sunflowers and hollyhocks. Medium in the middle such as zinnias and marigolds. Short in front including petunias and alyssum.
10. Shutter Fence
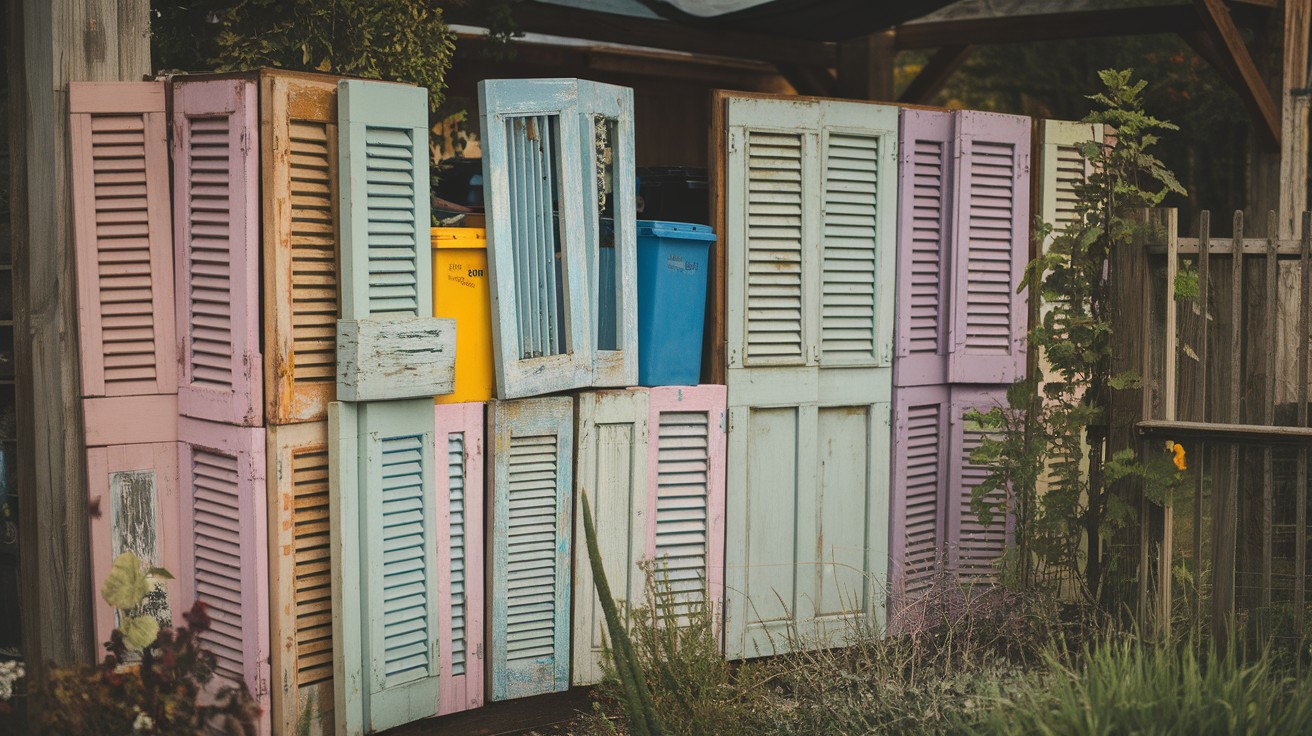
Vintage charm on a budget. Old shutters get new life as trash screening. Thrift stores sell them cheap.
Prep work: Strip old paint safely, sand smooth, prime with bonding primer, and paint with exterior paint.
Assembly tricks: Reinforce hinges with longer screws and add weather stripping. Use marine-grade hardware and build on a pressure-treated frame.
Structural & Custom Builds
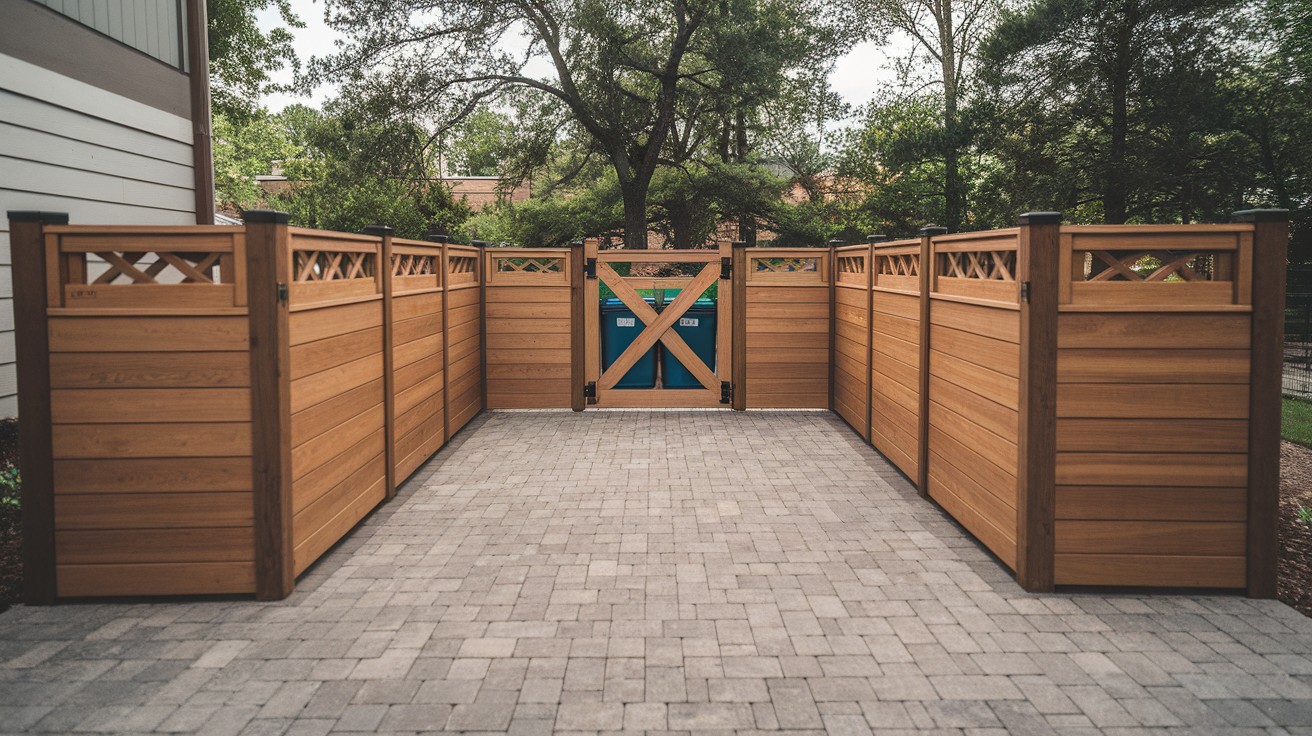
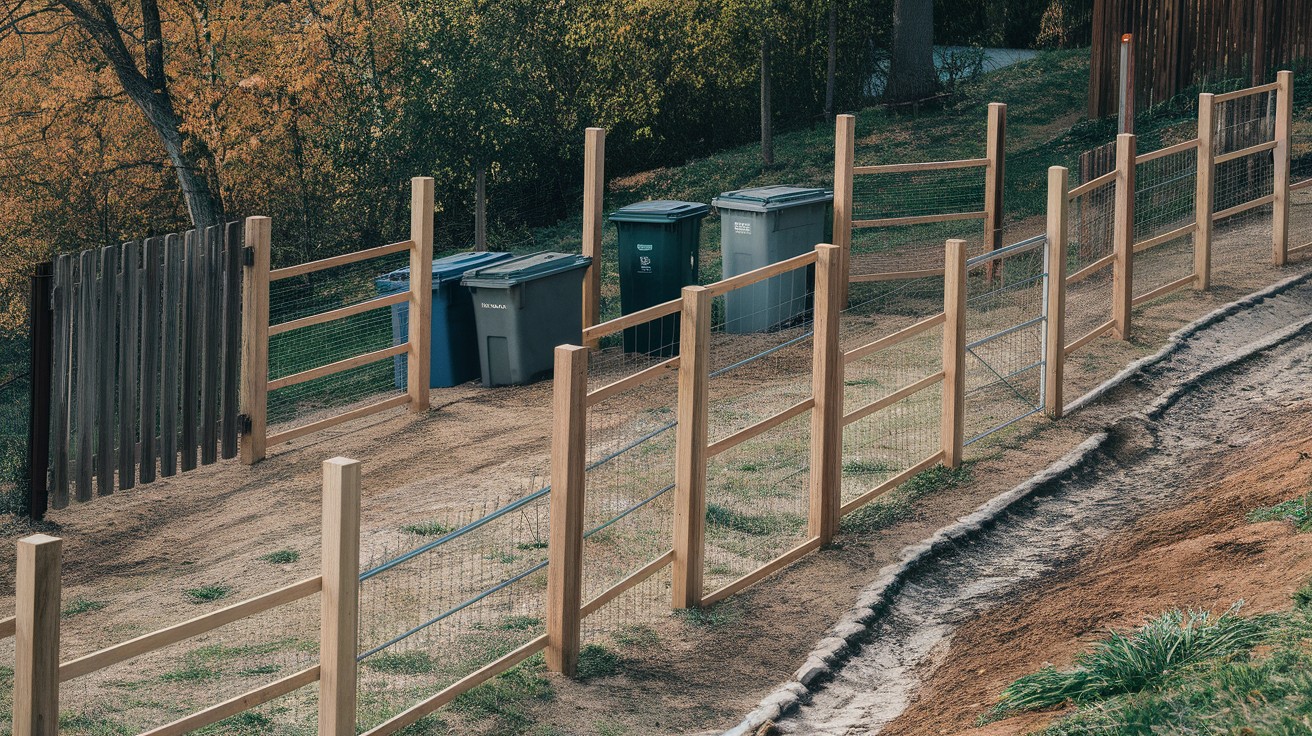
11. Three-Sided Fence with Gate
Security meets style.
Keep bins locked up tight. No more midnight raccoon parties.
Gate options:
- Single swing door
- Double doors for big bins
- Sliding panel
- Lift-up lid design
Locking mechanisms:
- Slide bolt (simple)
- Padlock hasp (secure)
- Spring latch (convenient)
- Magnetic catch (quiet)
12. Corner Fence for Small Yards

Maximize tight spaces. Corner installations use space efficiently. Perfect for tiny lots.
Space-saving features:
- Angled entry door
- Bins on rolling platforms
- Vertical storage hooks
- Fold-down work surface
Measurement tips:
- Allow 3 feet for door swing
- Check utility line locations
- Plan for hose access
- Keep 2 feet from property line
13. Attached Fence Extension
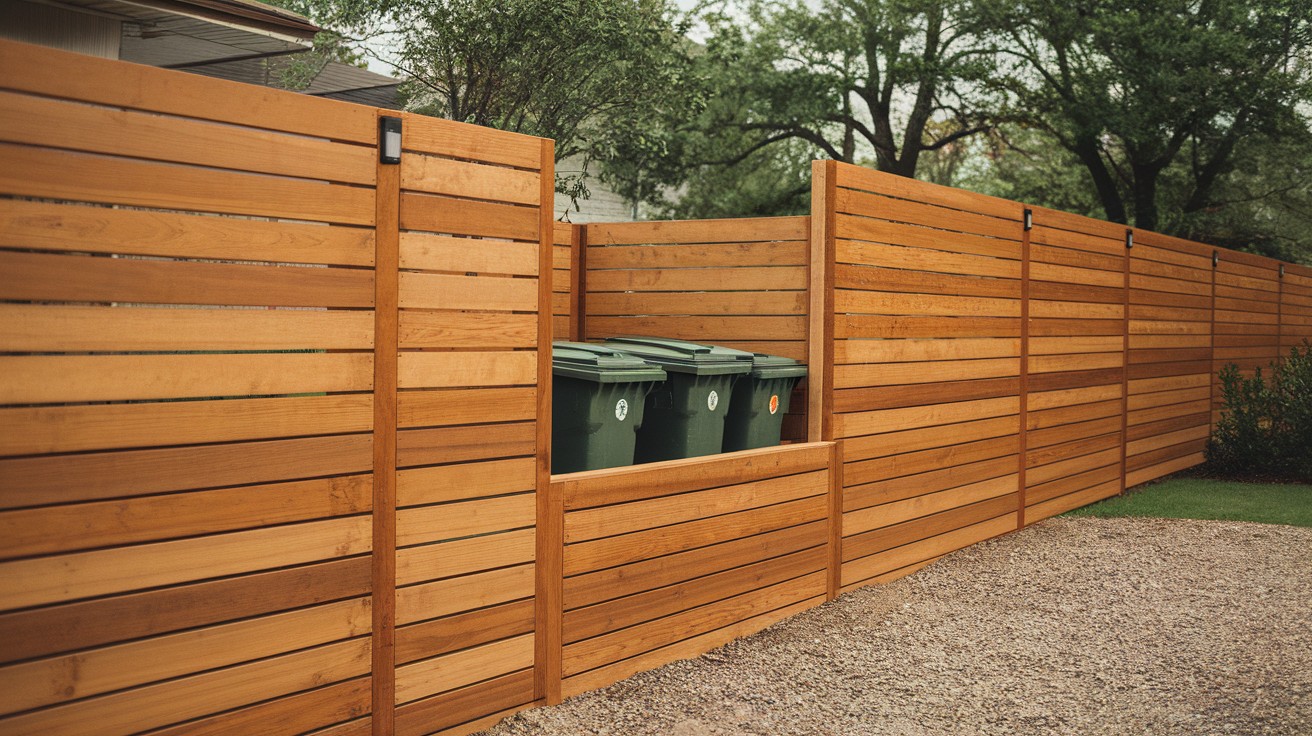
Seamless integration. Extend your existing fence to include trash storage. Looks like it was always there.
Matching techniques:
- Use same materials
- Copy post spacing
- Match fence height
- Use identical hardware
Connection methods:
- Bolt to existing posts
- Add new posts between old ones
- Use fence brackets
- Weld metal connections
14. Concrete Block Base + Wooden Top
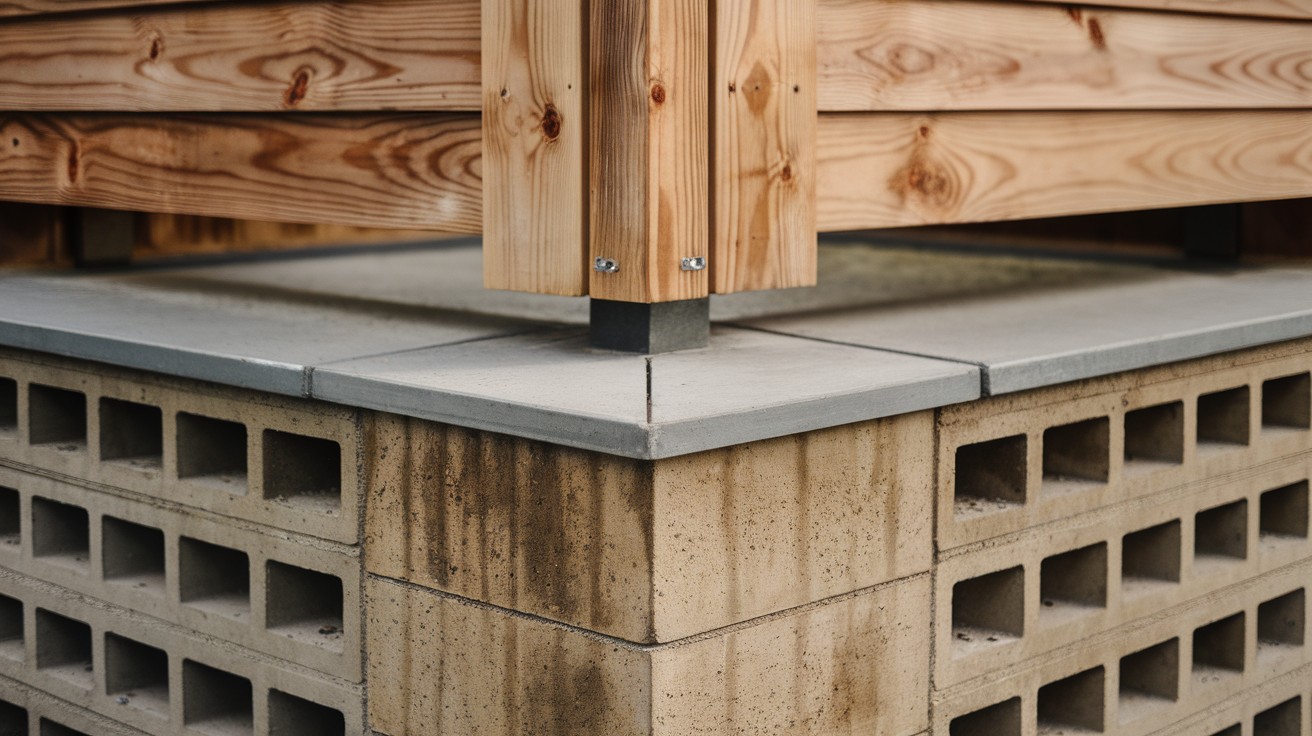
Best of both worlds. Concrete handles moisture. Wood adds beauty.
Why this combo works:
- Concrete won’t rot at ground level
- Wood provides privacy up high
- Easy to repair sections
- Looks substantial and permanent
Construction sequence:
- Pour concrete footing
- Lay first course of blocks
- Install anchor bolts
- Build wooden frame on top
- Add siding or panels
15. Sloped Yard Solution
Hills won’t stop you. Stepped fence sections follow your yard’s natural slope.
Sloped yard challenges:
- Water runs toward fence
- Posts need different lengths
- Gates won’t swing level
- Drainage becomes critical
Solutions that work:
- Step panels down in sections
- Use adjustable hinges on gates
- Install French drain behind fence
- Vary post heights gradually
Customization Tips
Make it yours.
Standard designs work, but custom touches make neighbors jealous.
Color choices matter. Match your home’s trim for a seamless look. Use contrasting accent colors to make your fence pop. Try two-tone combinations for modern appeal, or consider natural wood tones for timeless beauty.
Hardware upgrades transform basic builds. Stainless steel lasts forever without rust stains. Oil-rubbed bronze looks classy and matches most home styles. Powder coating prevents rust better than paint. Marine grade hardware handles any weather.
Functional additions solve daily problems. Motion sensor lights help you see on dark mornings. Tool storage hooks keep cleaning supplies handy. Garden hose reel mounts save yard space. Electrical outlet boxes power pressure washers.
Style modifications show your personality. Add decorative post caps for finished looks. Install window boxes for year-round flowers. Cut decorative patterns with a jigsaw. Include address numbers so delivery drivers find you easily.
Budget Breakdown
Know your numbers before you start. Here’s what different approaches cost:
Budget builds ($25-75):
- Pallet enclosure – $25
- Folding screen – $50
- PVC pipe fence – $75
Mid-range projects ($75-200):
- Horizontal slat fence – $125
- Lattice screen – $100
- Fence panel enclosure – $175
Premium builds ($200-500):
- Cedar privacy screen – $300
- Living fence – $250
- Three-sided with gate – $450
Money-saving tips:
- Buy materials during off-season sales
- Check Craigslist for used fence panels
- Ask contractors for leftover materials
- Join bulk buying groups
Hidden costs to plan for:
- Concrete for footings – $20-40
- Hardware and fasteners – $25-50
- Tools you don’t own – $50-150
- Permits (if required) – $25-100
Conclusion
Your trash can eyesore ends today. You now have 15 proven ways to hide those ugly bins. Pick the design that matches your style and budget.
Start with something simple. The pallet enclosure costs $25 and takes two hours. Perfect for beginners. Remember to measure your space first and check local building codes. Choose weather-resistant materials that last. Plan for easy trash day access too. I’ve given you everything you need. Materials lists, step-by-step instructions, and real cost estimates. No guesswork required.
Your neighbors will wonder where your garbage went. Your property value goes up instantly. Time to get building.
Your yard makeover begins now.
Frequently Asked Questions
How much does a DIY garbage can fence cost?
Budget builds start at $25 for pallet enclosures. Premium cedar designs cost up to $500 but last 15+ years.
Do I need building permits for trash can fencing?
Most areas don’t require permits for fences under 6 feet tall. Check with your local building department to be sure.
What’s the easiest fence design for beginners?
The simple pallet enclosure works best every time. Just screw three pallets together and you’re done in two hours.
How do I keep animals out of my enclosed bins?
Add a tight-fitting gate with a spring latch. Motion sensor lights also scare away raccoons and other nighttime visitors.
Can I build a fence on a sloped yard?
Yes, step your fence panels down following the slope. Use different post heights and install proper drainage behind the fence.