
Ever walked into a room with gorgeous ceiling beams and thought “I need that in my house.” Well, you can have it without breaking your back or your wallet.
Faux beams deliver that warm, rustic charm of real wood at a fraction of the cost. They’re lightweight, no need for structural support, simple to install, and won’t crack or warp over time.
I built this guide for everyday homeowners who want stunning ceilings without hiring professionals. Whether you’re sprucing up your first home or refreshing your space on a budget, this is your blueprint to success.
I’ve installed these in countless homes and made every possible mistake so you don’t have to. Follow along, and you’ll soon enjoy that custom, cozy ceiling you’ve been dreaming about—with the satisfaction of having built it yourself.
Why Choose Faux Beams?

Let’s be real, solid wood beams are stunning but they’re heavy and expensive. Faux beams give you that same wow factor without the headaches.
For my own farmhouse kitchen, I chose faux beams because they cost 70% less than solid wood. I could install them myself in a weekend. My ceiling didn’t need extra support.
The best part? Guests can’t tell the difference. They work with nearly any style—rustic cabins, modern farmhouses, or even sleek industrial spaces. Real wooden beams often require structural reinforcement and professional installation. Faux options eliminate these concerns while maintaining the visual impact.
A single solid beam can weigh hundreds of pounds. Faux beams weigh just 10-15 pounds for the average room.
Tools and Materials You’ll Need

You don’t need a workshop full of expensive gear to create beautiful faux beams.
Here’s what’s essential:
- Miter saw or circular saw for clean, straight cuts
- Drill with various bits for pilot holes and screws
- Tape measure (at least 25 feet long)
- Level (2-foot level works best)
- Stud finder to locate ceiling joists
- Hammer for basic assembly
- Sandpaper (120 and 220 grit)
- Pencil for marking measurements
These are the building blocks of your beam project:
- 1×6 pine boards (for three-sided beams)
- 2×2 lumber for ceiling mounting cleats
- Wood screws (1½” and 3″ lengths)
- Construction adhesive (one tube per two beams)
- Wood filler for nail holes
- Wood stain or paint in your chosen finish
- Clear polyurethane for protection
- Finishing nails (1½” recommended)
If you want to make life easier, consider these optional tools:
- Nail gun with compressor speeds up assembly dramatically
- Corner clamps hold boards at perfect 90° angles
- Orbital sander makes surface prep much faster
- Paint sprayer creates even stain application
- Laser level for perfect beam alignment across the room
Remember, you can always borrow the pricier tools from a friend or rent them for a day. The investment in basic materials is still far less than hiring a pro or buying solid beams!
Planning Your Faux Beam Project

Solid wood beams look amazing but cost a lot and weigh too much. Faux beams give you the same great look for less money and hassle.
These lightweight options work for any style home. You can create rustic farmhouse looks, modern industrial designs, or classic traditional spaces with the same basic materials.
One person can easily install faux beams. No need for extra ceiling support or hiring a crew to lift heavy timbers into place. The savings are huge. My living room beams cost under $200 total for materials. The same look with real wood would have cost over $1,500.
Faux beams transform plain ceilings into standout features. They add character to open floor plans and make rooms feel more finished and designed.
How to Build Faux Beams
Building faux beams is easier than you might think. Here’s how to create beautiful beams with basic tools
1. Cutting Wood to Size
Measure your ceiling length and add 2 inches for overlap. For a U-shaped beam, cut three 1×6 pine boards to this length.
Make all cuts at once using a miter saw. This ensures your boards match perfectly and creates cleaner joints.
Use a speed square to mark straight lines before cutting. This prevents angled cuts that would create gaps in your finished beam.
2. Assembling the Beam Structure
Lay one board flat as the bottom of your beam. Apply wood glue along both long edges where the side boards will attach.
Position the two side boards against these edges, forming a U-shape. Make sure all bottom edges align perfectly flush.
Secure with finish nails every 12 inches along both sides. The nails hold everything in place while the glue dries.
3. Sanding and Prepping Surfaces
Sand all visible surfaces with 120-grit sandpaper first. This removes mill marks and creates a uniform surface for staining.
Move to 220-grit for final sanding. The finer grit creates a smooth finish that accepts stain evenly without visible scratches.
Remove all dust thoroughly with a tack cloth. Even tiny dust particles can create bumps in your final finish.
4. Staining or Painting for Desired Finish
Apply wood conditioner to prevent blotchy results on pine. This makes a huge difference in the professional look of your beams.
Use a foam brush to apply stain with the wood grain. Work in small sections and wipe off excess after a few minutes.
Seal with clear polyurethane for protection. This final coat prevents color fading and gives your beams a subtle sheen.
How to Install Faux Beams on Your Ceiling

Installing faux beams is easier than you might think. First, find your ceiling joists using a stud finder and mark their locations. These are crucial because they provide the solid support your beams need.
Next, install wooden cleats (simple 2×2 boards) by screwing them directly into these joists. Think of these cleats as the hidden shelf that will hold your beams.
When your cleats are secure, simply slide your hollow beams over them. The beam should fit like a glove over the cleat. Secure everything by driving finish nails through the sides of the beam into the cleats.
Finally, hide any nail holes with matching wood putty and seal gaps where the beam meets the ceiling with a thin line of caulk. These small finishing touches make your DIY project look professionally installed.
The whole process typically takes just a few hours, and the transformation is dramatic!
Design Ideas and Finishing Techniques
For a classic rustic look, try a dark walnut stain with light sanding on the edges. This creates natural-looking wear that mimics centuries-old beams.
Modern farmhouse style works best with lighter finishes. A whitewash technique (1 part white paint mixed with 2 parts water) gives that perfect Joanna Gaines look.
Want something bold? Consider painting your beams black for striking contrast against a white ceiling. This industrial approach works beautifully in loft spaces.
Installation patterns matter too. Single beams create elegant simplicity, while grid patterns create “coffers” – those recessed ceiling squares seen in luxury homes.
Decorative metal straps and bolts at beam joints add character and authenticity. These inexpensive additions make a big difference in the final appearance.
For truly unique beams, consider adding subtle LED lighting strips tucked into the top edges. This creates beautiful indirect lighting that highlights your ceiling work.
Common Mistakes to Avoid
- Measuring only once (always double-check)
- Not mounting into ceiling joists
- Using materials too heavy for DIY installation
- Skipping wood conditioner on pine
- Forgetting to pre-drill screw holes
- Rushing drying time between finish coats
- Not checking if your ceiling is level first
- Installing beams too close together
Conclusion
You’ve now got all the knowledge to transform your plain ceiling into a showstopper with DIY faux beams. Remember, this project doesn’t require professional-level skills, just patience and attention to detail. I’ve seen complete beginners create stunning results their first time.
What I love most about faux beams is the massive visual impact compared to the moderate effort. Dollar for dollar, it’s one of the most dramatic home improvements you can make.
This project connects you to traditional craftsmanship. There’s something deeply satisfying about creating architectural elements with your own hands.
Your ceiling becomes a conversation starter. Guests will marvel at your handiwork, never suspecting these aren’t solid timber beams. Share your results online to inspire others. The DIY community thrives on real projects from real homeowners like you.
Frequently Asked Questions
Are faux beams strong enough to hang items from?
No, faux beams are decorative only and cannot support weight. They’re hollow structures designed for visual impact, not structural support. Never hang lights, plants, or decorations directly from them. Instead, install proper mounting hardware into ceiling joists, then position your beams around these mounts.
How do I handle electrical fixtures that are in the way?
You have two options. You can notch the beam to fit around the fixture by cutting a section from the top where it would intersect with the light. Or you can relocate the fixture, which often works better for recessed lighting. For chandeliers, consider incorporating them into your design by centering a beam junction around the fixture.
Will faux beams look fake up close?
When properly finished, faux beams are convincing even under close inspection. The key is your finishing process. Use techniques like distressing and multi-layered staining to mimic natural wood aging. Since these beams are viewed from below and typically 8+ feet up, minor imperfections aren’t noticeable to guests.
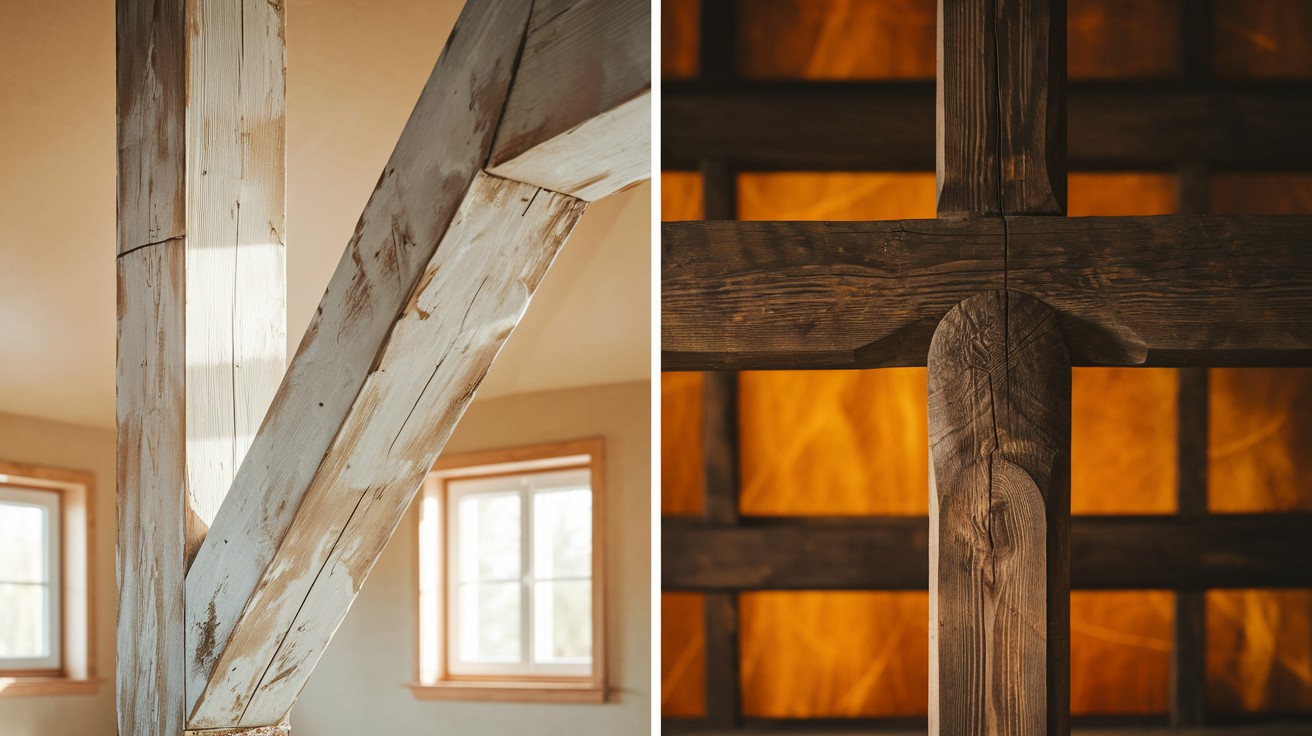
How do I handle beam intersections?
Creating intersections requires planning but isn’t difficult. Install your longest beams first, then measure and cut crossing beams to fit between them. Use mitered corners where beams meet. Add a decorative wooden block at intersections to hide any small gaps and create a finished appearance similar to traditional timber framing.
Can I install faux beams on a vaulted ceiling?
Yes! Vaulted ceilings actually showcase faux beams beautifully. Cut your support cleats at the correct angle to match your ceiling slope. Measure this angle using an angle finder tool. For best results, position beams run from the lowest point to the highest point of the vault, creating a dramatic line that draws the eye upward.