
Basements often remain the most underutilized spaces in our homes, but with the right attention to detail, they can become stylish and functional rooms. One of the most impactful yet budget-friendly transformations you can make is updating your basement ceiling.
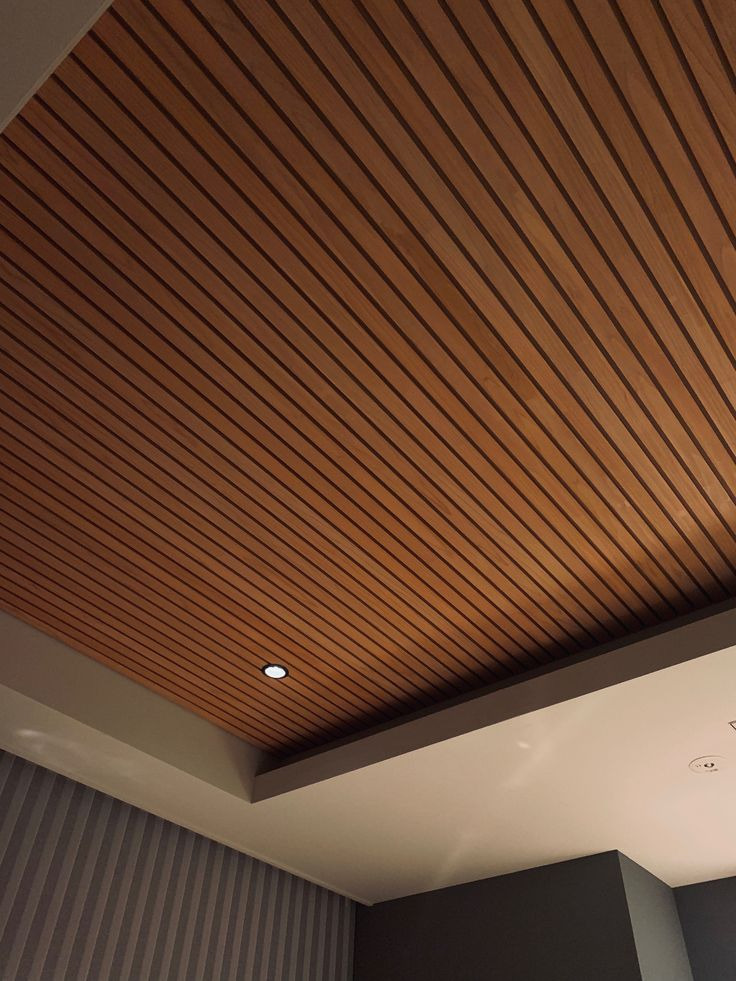
When my family renovated our basement, we discovered that the ceiling makes all the difference in creating the right ambiance. We transformed our once dark, cluttered space into a cozy, rustic hideaway by installing a wooden plank ceiling that added character and warmth.
In this blog, I’ll share our wooden plank project along with three other DIY basement ceiling ideas that can elevate your space regardless of your style preferences or budget constraints. From the natural warmth of wood to clean painted finishes and elegant beadboard options, these ideas will help you transform your basement into a space you’ll be proud to show off.
My Wooden Plank Ceiling Project: A Personal Touch of Rustic Charm
I knew that when it was time to renovate our basement, it should feel inviting and connected to the rest of our house. We wanted our basement to be like our living room, not some little corner left behind.
I decided on a wooden plank ceiling to really add texture and warmth to the space. This was not for aesthetics alone it was about producing an environment that I wanted to appear cozy, grounded, and unique.
Here’s the step-by-step process for transforming our basement ceiling using reclaimed wood:
Materials
- Reclaimed planks of varied tones, combining light and dark
- Measuring tape
- Saw-to cut the required length of wood
- Drill-to provide stability
- Wood screws or nails- to hammer in the planks onto the ceiling
- Wood finish stain-I personally used a warm honey finish to endow it with that rustic tone
- Sandpaper (for smoothing rough surfaces)
- Wood filler (for filling small gaps to give a smoother finish)
Instructions to Make:
Measured the ceiling, planned the pattern, and made sure the planks were going to fit in such a way that would create a uniform, symmetrical look. A staggered pattern was chosen to add a more dynamic, interesting visual appeal to the ceiling.
- Prepare the Wood: The reclaimed wood needed some preparation. I sanded each piece to remove splinters, then stained them with a warm honey finish to enhance the natural grain.
- Cut the Planks: Using a saw, I cut the planks to the lengths desired, making sure that each piece was cut to precision. I labeled each piece for easy installation.
- I installed the planks of the ceiling from the corner, using screws. Each plank I attached directly to the joists of the ceiling was also done with attention so that all the planks were level and aligned. The staggered design really made it have a very rustic feel.
- Finishing touches : With all the planks in position, I filled gaps with wood filler and touched up stains where necessary. Final touches were a quick dusting or residue removal.
Tips:
- Use a stud finder to locate ceiling joists and ensure your planks are securely attached
- Pre-drill holes in the wood to avoid splitting when screwing them into place.
- Mix woods or textures for a richer, more layered look, yet at the same time, natural and unique.
This wooden plank ceiling really transformed our basement from an unused space to the living room where we hang out and entertain, hence achieving a sense of fulfillment and warmth throughout the room.
2. Painted Ceiling
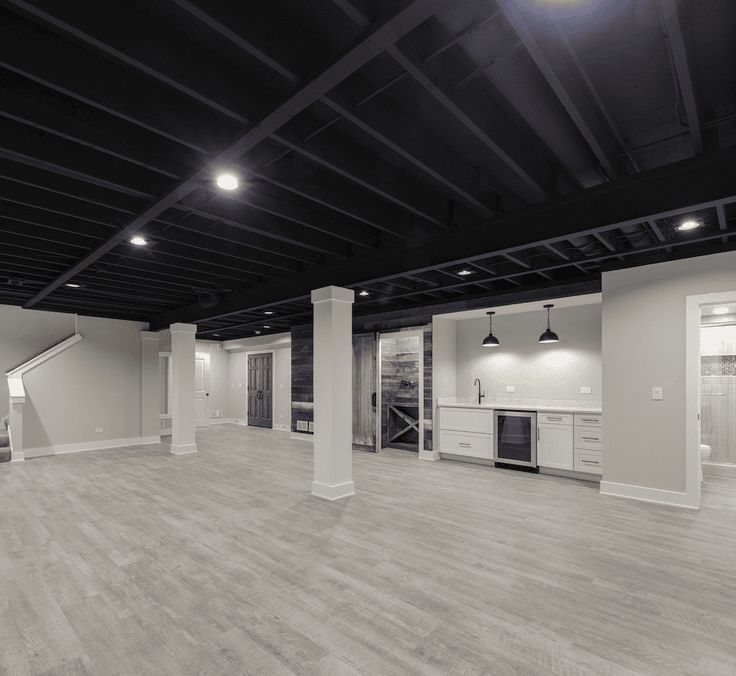
Clean, modern, bold. Painting your basement ceiling is a cost-effective way to refresh the room, and it’s ideal for hiding imperfections like exposed pipes or beams.
Materials Needed:
- Paint (choose a color that complements your room’s theme dark shades like black or deep gray hide imperfections, while whites and light colors make the space feel bigger)
- Paint sprayer or roller
- Painter’s tape (to protect walls and trim)
- Drop cloths (to protect the floor and furniture)
Steps:
Prep the Room:
Lay drop cloths or plastic sheets on the floor to cover any drips. Painter’s tape around edges of walls and other trim and fixtures that you don’t want painted
Clean the Ceiling:
Clean off the ceiling, removing any dust, cobwebs, or debris. The paint will not adhere if this isn’t done.
Spot clean any grease spots or stains on the ceiling with a gentle cleaner before painting.
Prime the Ceiling:
Use primer first if your ceiling is very dark or has stains. Apply it thinly with a paintbrush or sprayer, and let it dry before adding color.
Apply the paint:
If using a sprayer, keep it a steady distance from the ceiling, and apply the paint evenly across it. Work from one side to the other. For a roller, apply long, even strokes to cover large areas.
Begin in one corner and work in sections so that your coverage will be even.
Let the first coat dry before applying a second coat. Darker ceiling colors may require multiple coats.
Inspect and Touch Up:
Inspect the paint when it has dried to see if there are any missed spots or areas that require touchup.
Carefully remove the painter’s tape and clean up any paint drips from the walls or trim.
3. Drop Ceiling: Aesthetic and Practical

A drop ceiling can conceal ductwork and wiring for a smooth, clean appearance. And it is also easy to modify to add extra flavor.
Materials
- Drop ceiling grid kit
- Ceiling tiles (which come in a variety of textures and finishes)
- Saw (to cut the tiles to size if necessary)
- Suspension wires
- Drill (to attach the grid)
- Tape measure
Install the suspension system:
First measure the dimensions of the room and mark the area that the ceiling is going to hang. Install suspension wires along the joists of the ceiling, ensuring the wires are installed equidistant according to the installation instructions on the grid kit.
Attach the suspension wires to the joists of the ceiling using a drill.
Assembling the Grid:
Once the suspension wires are in place, assemble the grid frame according to the instructions. Make sure that the grid is level and secured before moving on to the next step.
Cut the ceiling tiles:
measure the size of each tile to fit into the grid sections You may have to cut tiles to fit in around the edges of the room. A saw or utility knife can be used for any trims on the tiles.
Insert the tiles into the grid:
Put the tiles into the grid system, starting from one corner of the room to the other side.
Ensure that every tile is fitted tightly and lies flat.
Finishing Touches:
Add some lighting fixtures or customized tiles for a better design touch. Check all tiles to ensure they are well fixed and lying flat
4. Beadboard Ceiling: Classic, Elegant, and Timeless
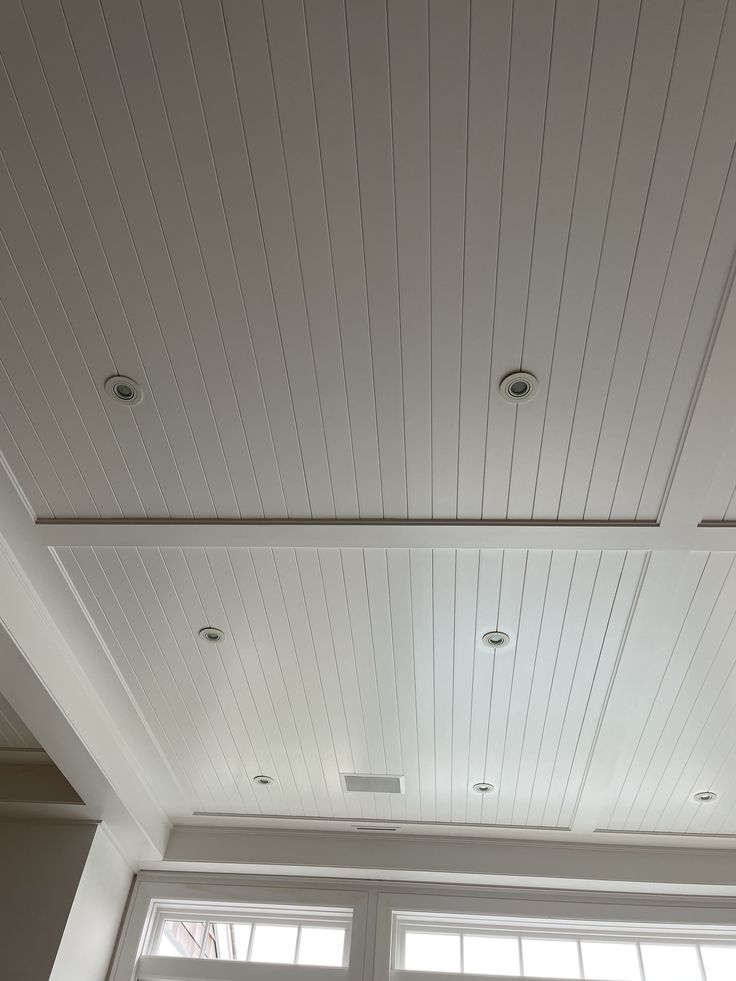
Beadboard ceilings offer a classic, timeless look that can elevate any basement. It’s a simple yet effective way to add texture and visual interest.
Materials Needed:
- Beadboard panels
- Adhesive or nails (to secure the panels)
- Measuring tape
- Saw (to cut the panels to size)
- Paint (to finish the panels)
Steps:
Measure the ceiling:
Start by measuring the length and width of the ceiling to determine how many panels you’ll need. Mark the placement of each panel using a pencil to ensure they are evenly spaced.
Cut the panels:
If necessary, use a saw to cut the beadboard panels to fit the dimensions of the ceiling. Beadboard panels come in various sizes, so it’s important to plan for any cuts needed at the edges of the room.
Apply Adhesive:
Apply a thin layer of adhesive to the back of each board panel. Instead, you can opt to use nails in order to attach the panels, which means they will be properly fixed to the ceiling.
Application of the Panels:
Begin from one corner of the room, working in your direction. Attach each panel consecutively, one after the other. You will now use your level to ensure that your panels are properly lined and straight.
Completion of the Finish
Apply a coat of paint after ensuring that all the panels have been properly installed. You can choose a light color for a bright, airy feel or a darker shade for a more dramatic look. Optionally, add crown molding to the edges for an elegant, polished finish.
Additional Tips for All Ceiling Designs:
Always work with a helper if possible, especially for lifting and installing heavy materials like wood planks or drop ceiling grid systems. Be slow when you are taking your measurements.
Everything should be well fitted this time, so there will not be much hustle when you eventually need it.
Use protective gear while making any cuts to the ceiling; goggles and a dust mask.
FAQs
What is the cheapest DIY ceiling idea for a basement?
Grab a paint can! A fresh coat on your exposed ceiling creates instant impact. I transformed my friend’s basement with charcoal paint for under $100. It hid pipes beautifully. Industrial chic without emptying your wallet. Just add painter’s tape, a roller, and your favorite weekend playlist.
What’s the best ceiling option for a low basement ceiling?
My low-ceilinged basement found its solution in a clean painted finish. Beadboard panels work wonders too. They draw eyes sideways, not down. Light colors create the illusion of height. My neighbor used white beadboard and gained “visual inches” without renovation nightmares.
How can I soundproof my basement ceiling?
I silenced my teenage drummer’s practice sessions with acoustic tiles. They’re lifesavers! Add mass-loaded vinyl between joists. Carpets upstairs absorb vibrations too. Double-drywall with acoustic sealant works magic. My home office now stays peaceful despite the drumming ambitions above.
How do I brighten a dark basement with ceiling design?
My basement went from cave to sanctuary with three simple tricks. Choose reflective white paint or light-colored panels. Install recessed LED lights around the perimeter. Add strategic uplighting in corners. The transformation is dramatic. Visitors now ask if I added windows.
Conclusion
Your basement deserves better. I’ve watched my own dark basement transform into our family’s favorite gathering spot. One ceiling upgrade changed everything. Your journey can start today with just a few tools and some imagination.
Choose what speaks to you. Maybe it’s the rustic charm of wooden planks like mine. Perhaps it’s the sleek look of a painted ceiling. Your basement has potential waiting to be unleashed. Small changes create big impacts.
Ready to grab that hammer? Or that paintbrush? Your basement ceiling is the canvas. Your style is the inspiration. The transformation awaits. Let’s make it happen!