
Hey movie lover! Transforming our basement into a DIY home theater blended creativity with our film passion without breaking the bank. From the moment we envisioned this project, it became our labor of love carefully selecting projectors and maximizing space through 3D visualization tools.
We discovered clever ways to create premium theater vibes on a budget. Whether hosting family movie nights or friend marathons, our journey proves you don’t need deep pockets for your personal cinema experience. Your unused basement has unlimited potential.
Materials and Tools Required for DIY Basement Home Theater
In creating a completely operational DIY basement home theater, having an exhaustive list of materials and tools is always beneficial. Here’s what we used in our project:
Materials
- Drywall: We will apply it for finishing off walls and a smooth overall outlook.
- Soundproof Insulation: We installed the Owens Corning Acoustic Batts to diminish the escape of sound and allow greater quality.
- Carpeting: Plush carpet made of dark color also made the place sound-friendly besides giving a cozy effect.
- Acoustic Panels: We chose pre-fabricated foam panels for easy installation.
- Blackout Curtains: It is a must to block light and make it easier to view.
- LED Lighting: Dimmable LED sconces and strip lights are included in the layered lighting setup.
- Projector Screen: The 100-inch Elite Screen model was used to achieve a professional viewing setting.
- Paint: Dark, matte paints for the ceiling and walls to minimize reflection.
- Wiring Supplies: HDMI cables, speaker wires, and power outlets connect everything flawlessly.
Tools
- Power Drill and Screwdriver: for mounting and assembling parts
- Stud Finder: locating secure spots to attach heavy items
- Paint Roller and Brushes: for the application of paint on walls and ceilings in an even manner
- Cable Conduits: for wire management and concealment
- 3D Modeling Software: We used SketchUp for the digital planning of the layout
- Measuring Tape: for precise spacing and placements
- Utility Knife: for cutting of insulation and carpeting
- Ladder: to reach up high when installing.
Transforming Basement into a DIY Home Theater
Our basement used to be just a storage space. It was dull and cluttered. We cleaned up and started visualizing the possibilities. The goal was clear: to transform it into a cozy, cinematic retreat.
After a thorough cleaning, we inspected the walls and floors meticulously, addressing any moisture issues to ensure a comfortable and dry space. For this, we used a dehumidifier and applied waterproof sealants to the walls and floors, preventing future dampness.
This step was important, for it not only protected the equipment but also ensured a long life for the home theater. We then stiffened the room with drywall and painted the ceiling black.
We chose the matte finish to avoid having light reflected off the surface and create a more ‘theatrical’ ambiance. We sealed up any cracks and gaps in walls and floors to ensure insulation and sound containment were proper.
We also incorporated ventilation by installing a quiet exhaust fan and air vents, ensuring that there was air movement without affecting the soundproofing.
Planing DIY Basement Home Theater
Every great project begins with a vision, and crafting a DIY basement home theater is no exception. Our first step was to envision how we wanted the space to feel and function.
We had a dark, intimate feel in mind, which led us to decide on a monochromatic color scheme with deep, rich colors such as navy blue and charcoal gray.
We sketched out a rough layout on paper, making it easier to envision where the projector screen, seating, and audio system would fit best. This activity has helped us align our creative ideas with practical design considerations, such as maximizing space and comfortable viewing angles.
For themes, we weighed options like vintage cinema with classic red curtains and marquee lighting versus a modern minimalist style featuring sleek furniture and clean lines.
To decide, we considered what reflected our family’s personality while browsing through design inspirations on Pinterest and theater blogs.
In the end, we merged the two styles and decided to go for modern furniture with a retro touch, such as framed vintage movie posters. This clear vision became our guide, helping us make cohesive decisions on furniture, lighting, and decor throughout the project.
Design Your Ideal DIY Basement Home Theater
It was a big step in turning our basement into a home theater, and we utilized free 3D modeling software to make the process smoother. It came out to be useful when we could accurately envision the layout of the room with the correct dimensions before even a single work started.
Experimenting with different layouts and configurations helped us foresee some of the challenges, like traffic flow and space constraints. We even used it to decide on the placement of acoustic panels and lighting fixtures so that performance is optimal from the very start.
We could preview the color schemes, furniture placement, and even the ambiance. We could tweak everything to perfection, saving time and resources and ensuring a seamless transition from planning to execution.
Choosing Carpets and Lighting For DIY Basement Theater
Creating a space conducive to enjoying great music, we began working with flooring and lighting, as the key to setting the tone would be the flooring and lights. We finally settled for plush, dark-colored carpets.
Not only did the carpeting improve the acoustic values, but it also imparted warmth, which allowed the room to feel comfortable and welcoming. It thus prevented sound reflections and could produce clear audio.
We chose dimmable LED sconces along the walls, coupled with recessed lights that keep the room cozy yet well-lit. To give that authentic theater experience, we installed ambient LED strips behind the screen, which gives the illusion of professional cinema lighting.
In order to better create a personalized atmosphere for the cinema, we also specially customized retro Neon Signs.
Neon lights can be designed with classic cinema elements, such as popcorn buckets, retro films, or favorite movie lines. Light up the wall with soft pink, blue, or amber lights, adding retro fashion charm to the modern cinema.
Combined with the original LED wall lights, atmosphere light strip, and shading systems, customized Neon Signs become the finishing touch of the entire cinema design.
We strategically added blackout curtains to keep outside light at bay and allow for complete control over the room’s brightness during movies. Layering the lighting with warm table lamps and focused lights for the snack area allowed for flexibility.
Enhancing Sound with Basement-Friendly Soundproofing
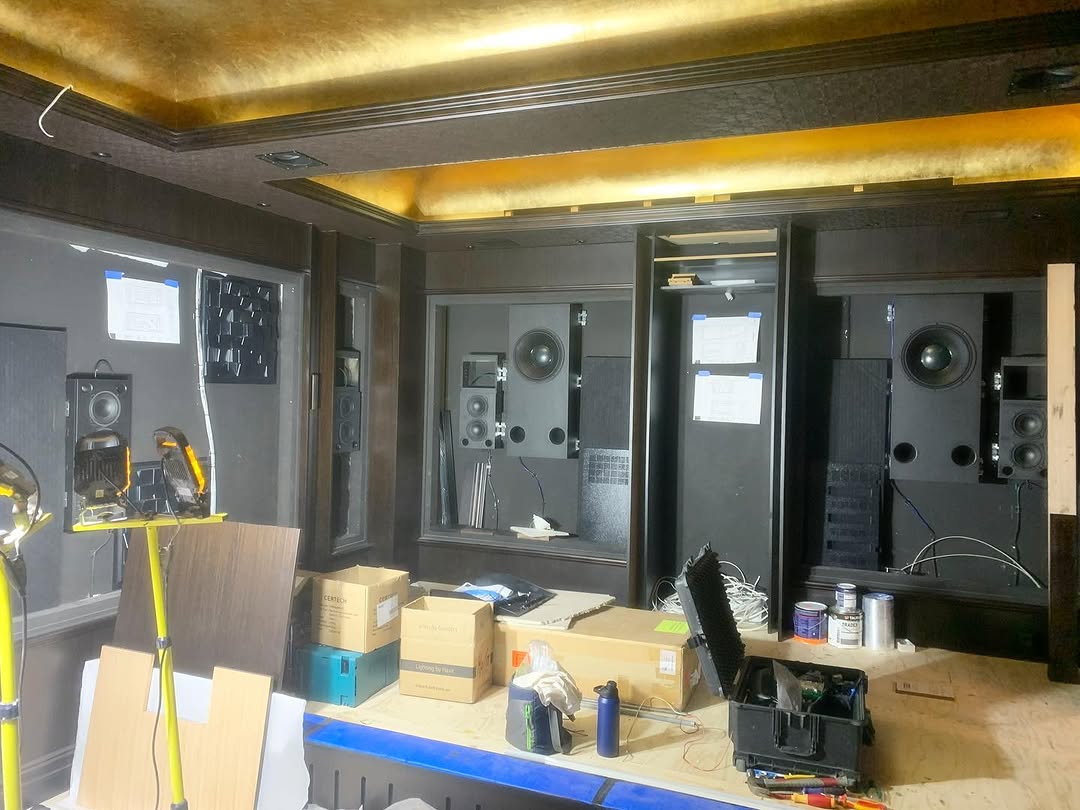
Basements are a bit tricky because sound tends to amplify unwanted noise. Therefore, it was obvious that proper soundproofing was important for having a great time in this theater.
To do that, we set up acoustic panels along the walls and added a layer of sound-dampening material to help the walls remain insulated. With these adjustments, we did away with echoes and got a crisp, clear sound.
Thick, heavy curtains not only blocked out exterior light but also absorbed sound, enhancing the acoustics of the room. A soundproof door was an important feature that would block noise coming from the rest of the house, allowing for complete immersion in the movie.
We didn’t stop there: adding bass traps in the corners and choosing a sound-dampening underlayment for the floor dramatically improved the quality of low-end sound, ensuring deep, rich audio for every viewing.
Budget-Friendly Audio-Visual Picks for Your DIY Basement Theater
In this case, I settled on a projector and a screen, which are reasonable prices online, so it was not bad after all.
For audio, I used a 5.1 surround sound system with in-wall speakers; it took up less space but could deliver impressive and immersive sounds. For costs, we made the most out of secondhand electronics and sales in a manner that enabled us to gain the highest value per cost without giving up the quality.
The media console had been incorporated to support housing our streaming box, Blu-ray player, and the other media players, in turn keeping them out of the way yet organized.
Tips for smart wiring when implementing a minimalist home theater setup
This included one of the most essential procedures during DIY basement home theater installation, which was planning the wiring. All cables were run in advance before any construction so that the cable conduits could be used, and wire hiding behind the walls resulted in neatness and being clutter-free.
It consumed time, but the payoff was well worth it. Our setup looked clean and modern. To ensure the equipment worked seamlessly, we dedicated a separate circuit for all the theater equipment.
This prevented electrical issues and ensured an uninterrupted power supply during movie nights. We also thought ahead by running extra wiring for future upgrades, such as adding additional speakers or integrating smart home features. Labeling each wire made it easier to troubleshoot later if needed.
Creating the Perfect DIY Snacks Corner for Your Home Theater

Making a perfect DIY snack corner for the home theater is a wonderful way to add fun to movie-watching. We chose a cozy corner near the seating area and dedicated that space to easy access to snacks without disrupting the space.
A vintage-style cart became our go-to storage solution, keeping everything in order and within reach. We added a popcorn machine for that real theater feel and included different seasonings like butter, cheese, and caramel for personalization.
A small fridge stocked with drinks completed the setup, so everyone had refreshments at hand. To add a little extra charm, we included LED lights around the area, giving it a warm, inviting atmosphere.
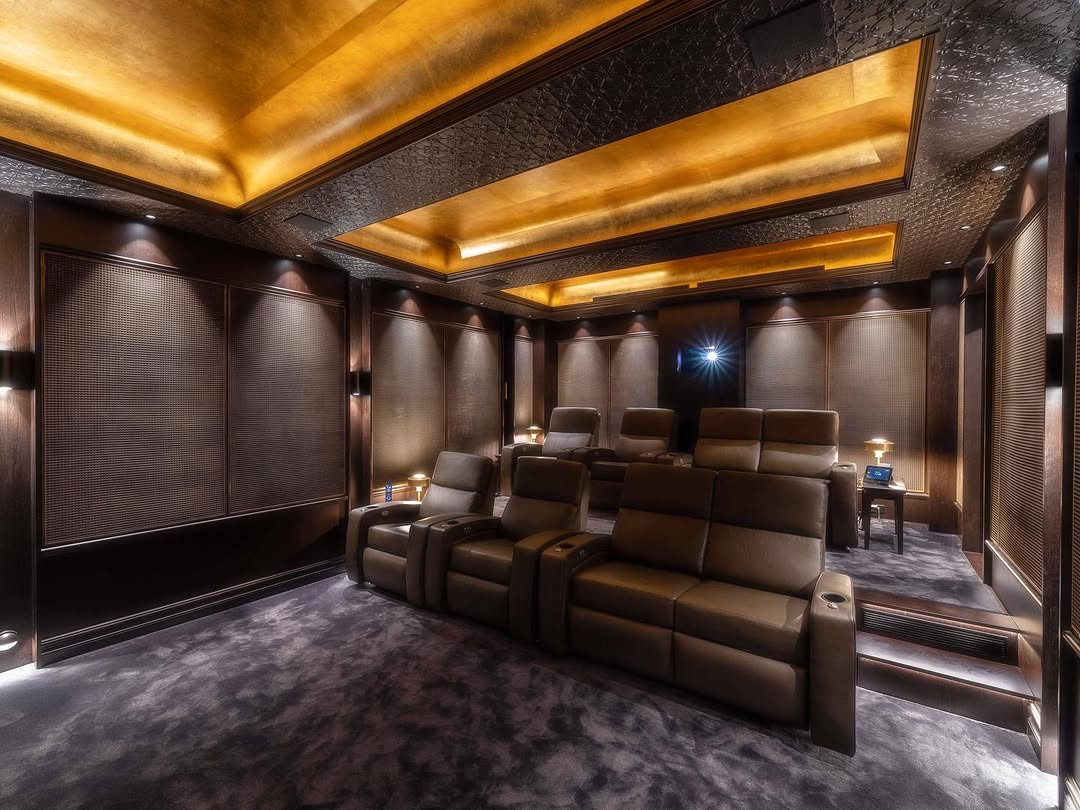
Arranging Comfortable Seating in Your Basement Home Theater
Seating had to be comfortable, not negotiable. We opted for a combination of recliners and a sectional sofa that felt cozy. It was all about the movie nights and relaxed hangouts.
We needed to ensure that everyone got a great view of the screen. Therefore, the seating arrangement and spacing became very important.
This made us add tiered platforms as if it were a stadium that maximized the seating of people; hence, we were also ensuring that there was always a clear view of the screen by the sitting audience.
Final Touches To Your DIY Theater
The final touches that brought our DIY basement home theater to life included vintage movie posters on the walls, a popcorn machine in the corner, and even a mini-fridge stocked with our favorite snacks.
LED-lit shelves showcased our favorite DVDs and collectibles, making the space both functional and personal. To complete the theater feel, we installed a marquee sign with a custom message at the entrance.
Every time we entered the room, it felt like we were stepping into a real cinema. We also integrated smart home features such as voice-controlled lighting and a universal remote to make the experience more streamlined and convenient to use in the space.
Looking back, making our DIY basement home theater was not just a renovation project but a family affair that brought us closer together. Every movie night feels special in a space we designed with care and attention to detail.
FAQs
What’s a reasonable budget for a basement home theater?
A basic DIY basement theater starts around $1,500-3,000 for essentials (projector, screen, speakers). Our mid-range setup costs $5,000 with better audio and seating. Premium setups reach $10,000+. Remember, you can start simple and upgrade gradually. We began with just a projector and basic speakers, adding components as budget allowed.
How do I manage basement moisture issues?
Dehumidifiers are your best friends! We installed a quality unit that maintains 40-50% humidity. Seal concrete walls with waterproofing paint. Use moisture barriers under flooring. Consider raised platforms for seating areas. Regular inspections prevent future problems. Our basement stayed perfectly dry through all seasons with these precautions.
What’s the best screen size for my space?
Measure your viewing distance! The ideal screen size typically equals your viewing distance divided by 1.5. For our 12-foot deep room, we chose an 8-foot screen. Consider ceiling height too. Test your projection size before permanent installation. Your basement dimensions should dictate your screen, not the other way around.
How can I improve basement acoustics?
Acoustic panels transformed our sound quality! Install them at reflection points. Carpet or area rugs reduce echo. Bass traps in corners control low frequencies. Ceiling treatments prevent sound bouncing. Heavy curtains help too. Our DIY acoustic panels cost a fraction of commercial options while delivering amazing results.
Do I need special permits for a basement theater?
Check local building codes first! We needed electrical permits for additional circuits. Some areas require egress updates for basement renovations. Theater rooms may have occupancy regulations. Our permit process took just three weeks and saved headaches later. Always consult professionals for electrical and structural work.
Conclusion
Creating our DIY basement theater wasn’t just about saving money, it became a cherished family project that taught us new skills. The joy on our kids’ faces during our first movie night made every challenge worthwhile.
Your basement holds unlimited potential. Start small if needed. Embrace imperfections. Each upgrade brings fresh excitement to your space. Consider your theater a living project that evolves with your tastes and technology.
Remember that personal touches matter most. Our vintage popcorn machine and collection of blankets create memories no commercial theater can match. Your basement cinema will become more than just a room; it’ll transform into your family’s favorite gathering spot.
Ready to grab those tools and start your transformation? The red carpet awaits!