When I started collecting rainwater, I didn’t realize how much it would transform my garden and household tasks. Not only does it help conserve water, but it also provides a free, natural source for watering plants, cleaning, and even filling the kiddie pool in summer.
However, simply having a rain barrel isn’t enough. Proper elevation is key for better water pressure and easy access, which is where a sturdy rain barrel stand comes in.
Building one is easier than you might think, requiring just a few materials and basic tools. In this guide, I’ll share the steps, tips, and lessons learned from making my own, so you can create a stand that fits your space perfectly. Let’s get started!
Materials and Tools Required for DIY Rain Barrel Stand
Materials
- Treated Lumber (2×4 or 2×6 boards): Pressure-treated wood is key for durability.
- Cement blocks or concrete pavers: to create a level and stable base.
- Wood screws (3-inch): For assembling the frame securely.
- Wood Glue: Optional, but I used it to add extra strength.
- Outdoor Wood Stain or Sealant: To protect the wood from rain and sun.
Tools
- Saw (circular or hand saw)
- Drill and screwdriver
- Measuring Tape
- Level
- Impact Driver (for driving screws)
- Step-by-Step Instructions
Planning and Measurements

The first step I took was to measure the barrel’s dimensions. Then chose a 55-gallon rain barrel, a pretty standard size, and measured the diameter and height.
For the stand, we decided on a height of about 2 feet—perfect for a watering can to fit underneath and for easy gravity flow. I sketched out a rectangular design with four vertical posts and horizontal supports for stability.
Pro Tip: we always measure twice before cutting! This saves time and prevents mistakes in the long run.
Building the Base
The next task was to create a solid base. I started by laying out four cement blocks in a 2×2 pattern, ensuring they were level with a spirit level.
This stable base would prevent any wobbling or tipping of the barrel once it was in place. Cement blocks are especially helpful since I live in a windy area, providing added support.
Personal Tip: If you prefer a more compact look, you could swap out cement blocks for concrete pavers, which offer the same stability but with a sleeker design.
Constructing the Frame
With the base ready, I moved on to building the frame. I cut four pieces of treated 2×4 lumber to a height of 2 feet and two horizontal pieces to match the barrel’s length (about 3 feet).
After pre-drilling holes to avoid splitting the wood, I attached the posts to the horizontal pieces using wood screws. This frame would act as the support structure for the barrel, keeping it elevated and secure.
Personal Reflection: As I was constructing the frame, I soon came to understand how important this structure’s stability would be. A good frame will prevent the barrel from shifting or rocking when it is filled with water.
Securing the Barrel
Once the frame was constructed, I placed the rain barrel on top to check for proper alignment. After ensuring it was centered, I added two additional horizontal supports across the top, right under the lip of the barrel.
These supports keep the barrel in place, preventing it from sliding off.
Tip: Make sure the barrel is centered before securing it. Small adjustments here can make a huge difference in ensuring stability.
Finishing Touches
For this stand, I sanded down all the edges to give a smooth, polished finish free from rough spots or splinters, then applied some wood stain so that it was protected from rain and sunlight.
We opted for a dark color stain, suitable for my garden’s style of look, providing a rustic touch to the overall appearance. On dry stain, I mounted the barrel on the stand and admired what I had achieved.
Personal Tip: To add a bit of flair, we planted flowers around the base of the stand, giving it a decorative touch. It’s a simple, low-cost way to make the stand blend in with your garden.
Common Mistakes to Avoid
From my own experience, I learned a few things the hard way:
- Underestimating the Weight: A full barrel can weigh over 400 pounds, so make sure your stand can support that weight without wobbling.
- Using Untreated Wood: Be sure to use pressure-treated lumber to avoid rot, especially since the stand will be exposed to rain and sunlight.
- Misjudging the Height: It’s important to make sure the stand provides enough clearance for easy access to the spigot and for your hose or watering can.
- Maintenance and Upkeep
I have made it a habit since I built my rain barrel stand to check on the stability every few months, especially after the storms.
Additionally, we apply the wood stain or sealant annually to ensure that the wood is protected from weathering. This simple maintenance ensures that the stand stays sturdy and functional for years.
More DIY Rain Barrel Stand Ideas
1. Cinder Block Stand
For a simple yet sturdy rain barrel stand, cinder blocks are an excellent choice. Start by selecting a flat and level surface to prevent tipping.
Arrange two rows of three cinder blocks each, ensuring they are evenly spaced for maximum stability. If you need additional height, stack another layer of blocks on top.
To create a more polished look, you can place a wooden plank across the top or even paint the blocks to match your outdoor space. This setup is incredibly durable and requires minimal effort while providing a solid base for your rain barrel.
2. Wooden Pallet Stand
If you have access to wooden pallets, you can transform them into a functional rain barrel stand with just a few tools. Begin by dismantling a pallet and cutting the slats to your desired dimensions.
Assemble a sturdy square or rectangular frame using screws and a drill, ensuring the structure is strong enough to hold a full barrel. For added reinforcement, place additional slats across the top to evenly distribute the weight.
This method is not only cost-effective but also allows you to repurpose old wood, making it an eco-friendly option.
3. Concrete Paver Stand
For a heavy-duty and long-lasting rain barrel stand, concrete pavers offer excellent support. Start by leveling the ground where you plan to place the stand, then spread a layer of gravel to aid in drainage and prevent sinking.
Stack the pavers in a stable, flat arrangement, ensuring they form a solid and even surface for the barrel to rest on. This approach works well for those who want a maintenance-free solution that blends seamlessly into a backyard or garden setting.
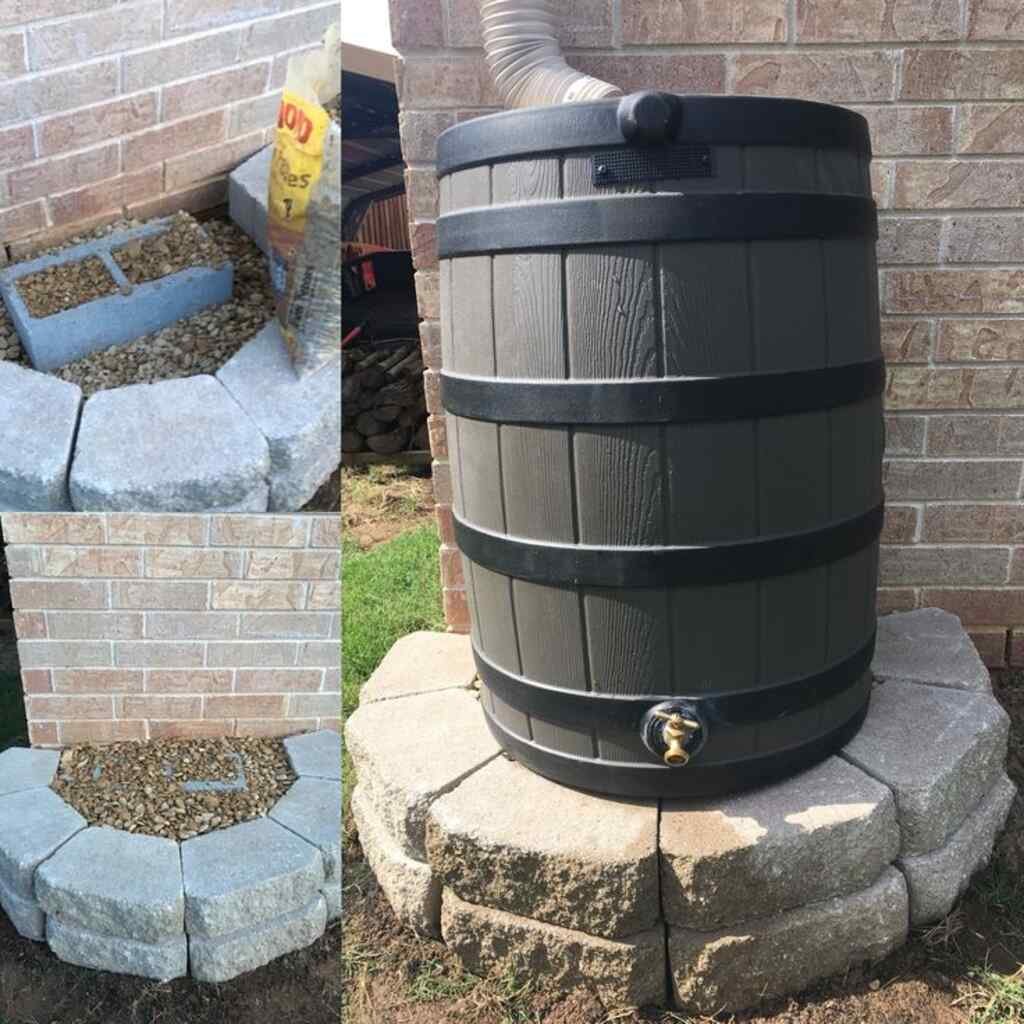
4. Recycled Brick Stand
Using reclaimed bricks is a great way to build a sturdy and visually appealing stand while reducing waste. Begin by stacking bricks in a square or circular pattern, checking for levelness as you go.
For extra durability, you can use mortar to secure them together, though a dry-stacked formation can work just as well if properly aligned. This method not only provides a rustic charm to your rain collection system but also allows you to customize the height to fit your needs.
5. Pressure-Treated Lumber Stand
For those who prefer a DIY project that blends seamlessly with wooden decks or garden structures, a stand made from pressure-treated lumber is a great option.
Cut four 4×4 posts to the desired height and connect them using 2×4 beams, forming a sturdy square or rectangular frame. Secure everything with heavy-duty screws and reinforce the top with cross-bracing for extra support.
This wooden stand provides a reliable and aesthetically pleasing solution while allowing for customization in design and finish.
6. Metal Barrel Rack
Repurposing an old metal drum rack or shelving unit can provide a quick and efficient rain barrel stand without requiring much modification.
Ensure the metal frame is strong enough to support the full weight of a barrel, and consider reinforcing it with extra brackets if needed. A fresh coat of rust-resistant paint can help extend its lifespan and improve its appearance.
This method is ideal for those looking for a durable, industrial-style stand that can withstand outdoor conditions.
7. Stacked Log Stand
If you prefer a more rustic approach, using stacked logs can create a charming and functional rain barrel stand. Cut thick wooden rounds or logs to a uniform height and arrange them in a stable formation.
For additional security, you can fasten them together with long screws or even notch them slightly to interlock. This method works well for natural landscapes and offers a unique, organic look while still providing the necessary elevation for proper water flow.
Conclusion
These seven DIY rain barrel ideas—the wooden barrel stand, the integrated gutter system with built-in stand, and the vertical rain barrel setup—all offer unique advantages.
Whether you’re looking for a rustic look, a more efficient way to use your gutter system, or a space-saving solution, each of these ideas is practical and functional.
After trying out these different setups, I can confidently say that building your own rain barrel stand not only saves you money but also gives you a rewarding project that benefits the environment. Happy building, and may your rain barrel system provide you with all the water you need!


