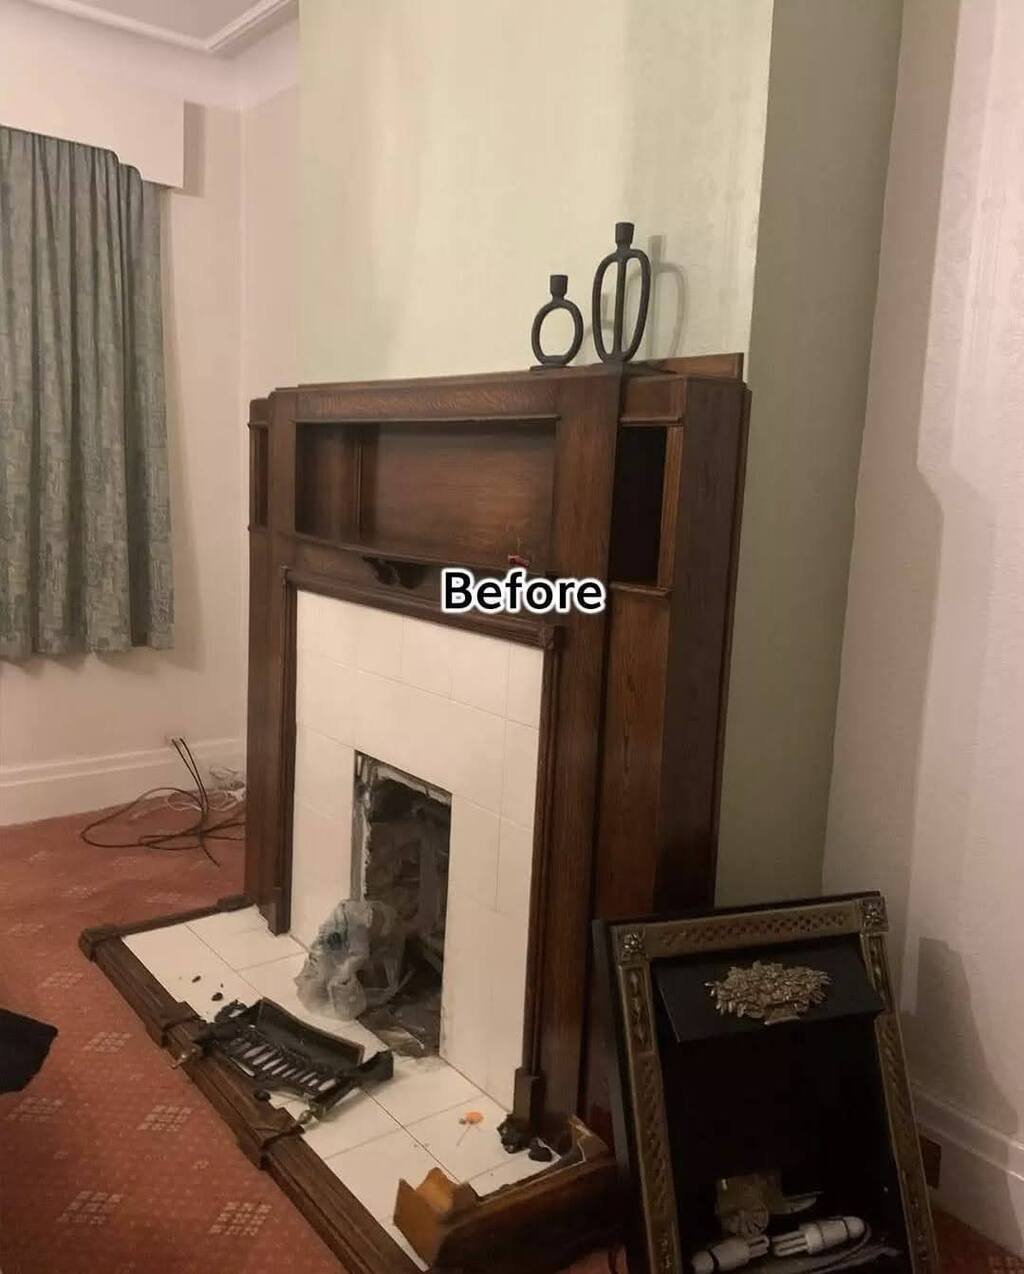
Our fireplace was once the most uninspiring corner of our living room—a tired, outdated design that felt more like an eyesore than a centerpiece. Every time I glanced at it, I felt a twinge of frustration.
One evening, after watching yet another home makeover show, I decided it was time for a change. But, with a tight budget, the challenge was to create something stylish, functional, and personal without breaking the bank.
That’s when the idea of an inexpensive DIY fireplace makeover took shape. Little did we know, this weekend project would completely transform not just the fireplace but the entire ambiance of our home.
The best part? We didn’t need to be professional contractors to achieve this!
With some careful planning, budget-friendly materials, and a touch of creativity, we turned our dull fireplace into a cozy and stunning focal point. Here’s how we did it step by step, so you can do the same.
Planning the DIY Fireplace Makeover
We started by deciding what look we wanted. Scrolling through Pinterest boards, flipping through magazines, and looking at different styles, I think rustic-modern was exactly the mix we wanted.
This would give it a warm and timeless feel, with clean lines and natural textures. We set a budget of $200 and had to be creative with what we already had at home, so we created a detailed plan and made an inventory of what we already had.
For example, we repurposed wood scraps for accents and reused tools that had been part of other projects. Researching inexpensive materials and sketching a basic design helped us see the transformation before lifting a single tool.
Planning not only ensured our inexpensive DIY fireplace makeover stayed within budget but also kept us focused on our vision, avoiding unnecessary detours.
Gathering Tools and Materials
Once the plan was set, we created a shopping list for all the necessary tools and materials. Here’s what we used:
Tools
- Sandpaper (medium and fine grit)
- Paintbrushes and foam rollers
- Painter’s tape
- Screwdriver
- Utility knife
- Measuring tape
- Level
Materials
- High-heat-resistant paint for the firebox
- Peel-and-stick tiles for the surround
- Wooden stain for mantel
- Reclaimed wooden planks for accents
- Adhesive and caulk
- Optional decor such as candles, mirrors, and vases
We gathered most of our materials at local hardware stores, thrift shops, and online sales. For example, we bagged peel-and-stick tiles on clearance, which saved us a nice portion of our budget.
Step-by-Step Fireplace Overhaul
Step 1: Preparing the Fireplace
Preparation is the foundation of any successful project. We began by thoroughly cleaning the fireplace.
Using a mild cleaner and a damp cloth, we removed all the accumulated soot and dust. This step ensured that the new materials would adhere properly.
Next, we sanded the mantel and surround to smooth out imperfections and create a better surface for painting or staining. To protect surrounding walls and floors, we carefully applied painter’s tape.
This simple step prevented accidental paint drips and saved us a lot of cleanup time.
Step 2: Updating the Fireplace Surround
Our fireplace surround was outdated and dull. Instead of removing the old tiles, which would have been expensive and time-consuming, we opted for peel-and-stick tiles.
These tiles are not only affordable but also easy to install. We started by measuring the area and cutting the tiles to fit perfectly.
Using a utility knife, we carefully trimmed the edges for a seamless look. After peeling off the backing, we adhered the tiles directly onto the old surface, pressing firmly to ensure they stuck evenly.
The transformation was immediate—the faux-marble finish added a touch of sophistication.
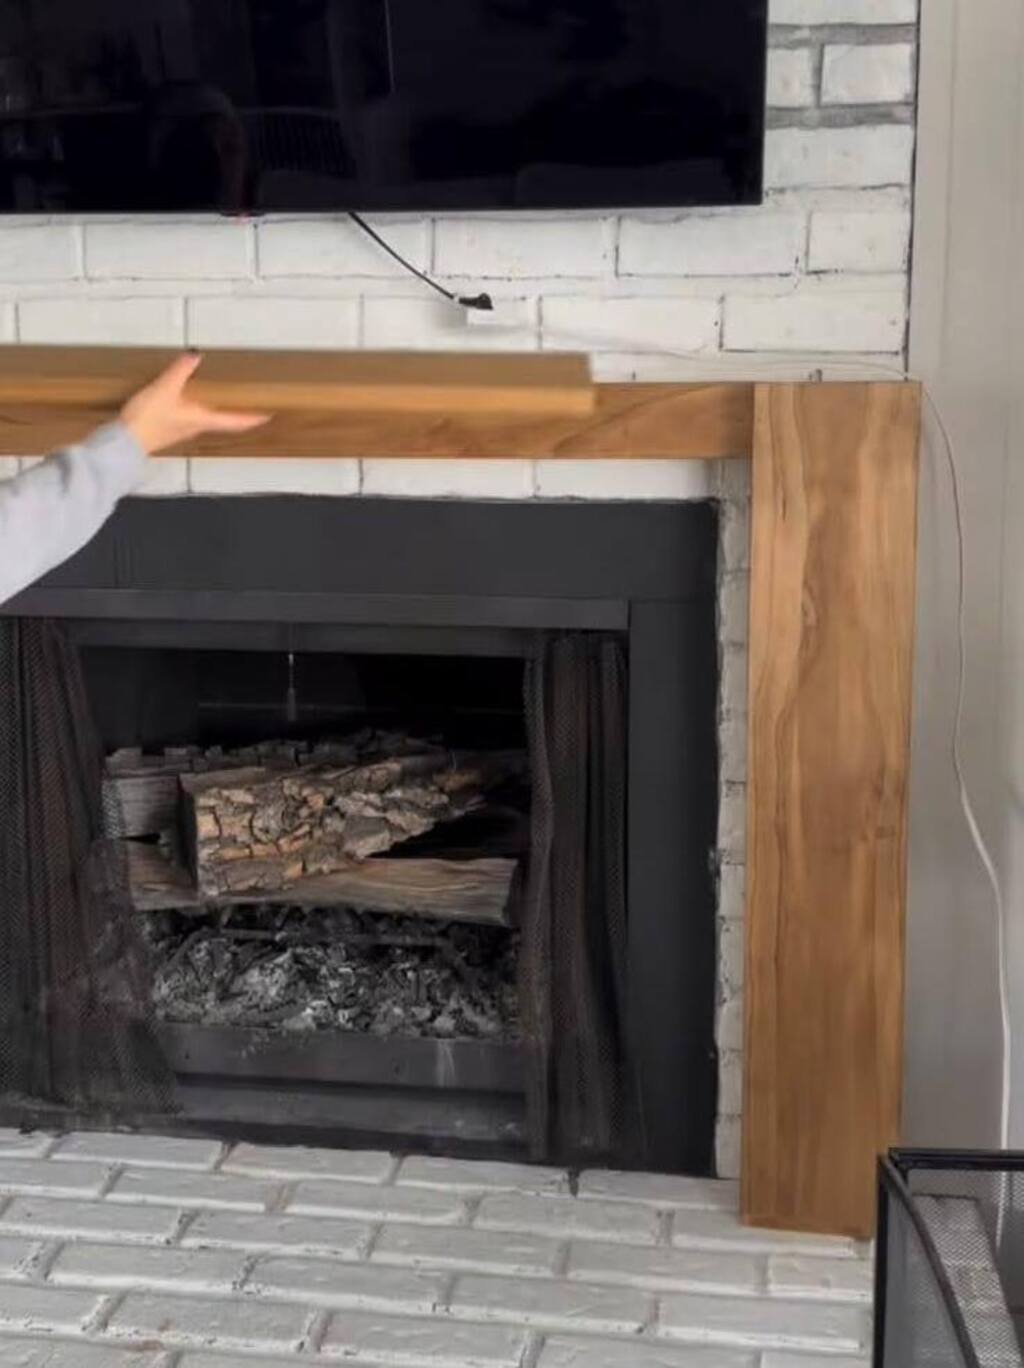
Step 3: Refreshing the Mantel
The mantel was another area that needed attention. We removed it from the wall and sanded it down to eliminate the old finish.
After cleaning off the dust, we applied two coats of wood stain in a rich walnut shade. Each coat was allowed to dry completely before applying the next.
Once the stain dried, we reinstalled the mantel securely. The deep, warm tones of the wood beautifully complemented the bright tiles, adding a striking contrast that elevated the entire design.
Step 4: Painting the Firebox
The firebox interior was faded and unattractive, so we gave it a fresh coat of high-heat-resistant black paint. This type of paint is specifically designed to withstand high temperatures, making it perfect for fireplaces.
Using a small paintbrush, we carefully applied the paint in thin, even layers, allowing each layer to dry before adding the next.
The matte black finish gave the firebox a sleek, polished look that completed the makeover.
Step 5: Adding Decorative Touches
With the main elements done, we turned our attention to decor. Above the mantel, we hung a large mirror that reflected light and made the room feel more spacious.
On the mantel itself, we arranged a mix of candles, vases, and a small potted plant. These simple, budget-friendly additions added warmth and character to our inexpensive DIY fireplace makeover.
Incorporating Energy Efficiency
While the fireplace’s aesthetic transformation was our main focus, we also took the opportunity to enhance its energy efficiency.
A functional fireplace can significantly reduce heating costs, especially during the colder months, by efficiently distributing warmth.
We installed a heat-resistant fireplace insert to improve heat output and minimize energy loss through the chimney. These inserts are budget-friendly and easy to find at local hardware stores.
Additionally, we used a draft stopper to seal any gaps when the fireplace wasn’t in use, preventing cold air from seeping into the room. If you want an extra layer of insulation, consider adding fire-resistant insulation panels behind the surround.
This small upgrade can make a big difference in maintaining a comfortable temperature in your living space.
By combining style with functionality, this DIY makeover not only improved our home’s ambiance but also made it cozier and more energy-efficient.
Creative Tips for Budget-Friendly Upgrades
- Repurposed materials: We used leftover wood to create a faux beam effect under the mantle. It added depth without increasing costs.
- Add texture: A sponge and white paint can create a faux-brick effect for the surround. This DIY trick is simple yet impactful.
- Shop thrift stores: We found a vintage fireplace screen for just $10, giving the setup an elegant touch.
Challenges Faced and How We Solved Them
Like any DIY project, we encountered some challenges. The old tiles weren’t completely even, which made sticking the new tiles tricky.
To address this, we applied a layer of adhesive beneath the peel-and-stick tiles for extra hold. Sanding the mantle also took longer than anticipated due to an uneven surface.
While it required patience, the smooth finish was worth the effort. Aligning the tiles perfectly was another challenge, but using a level and measuring each piece twice ensured a professional look.
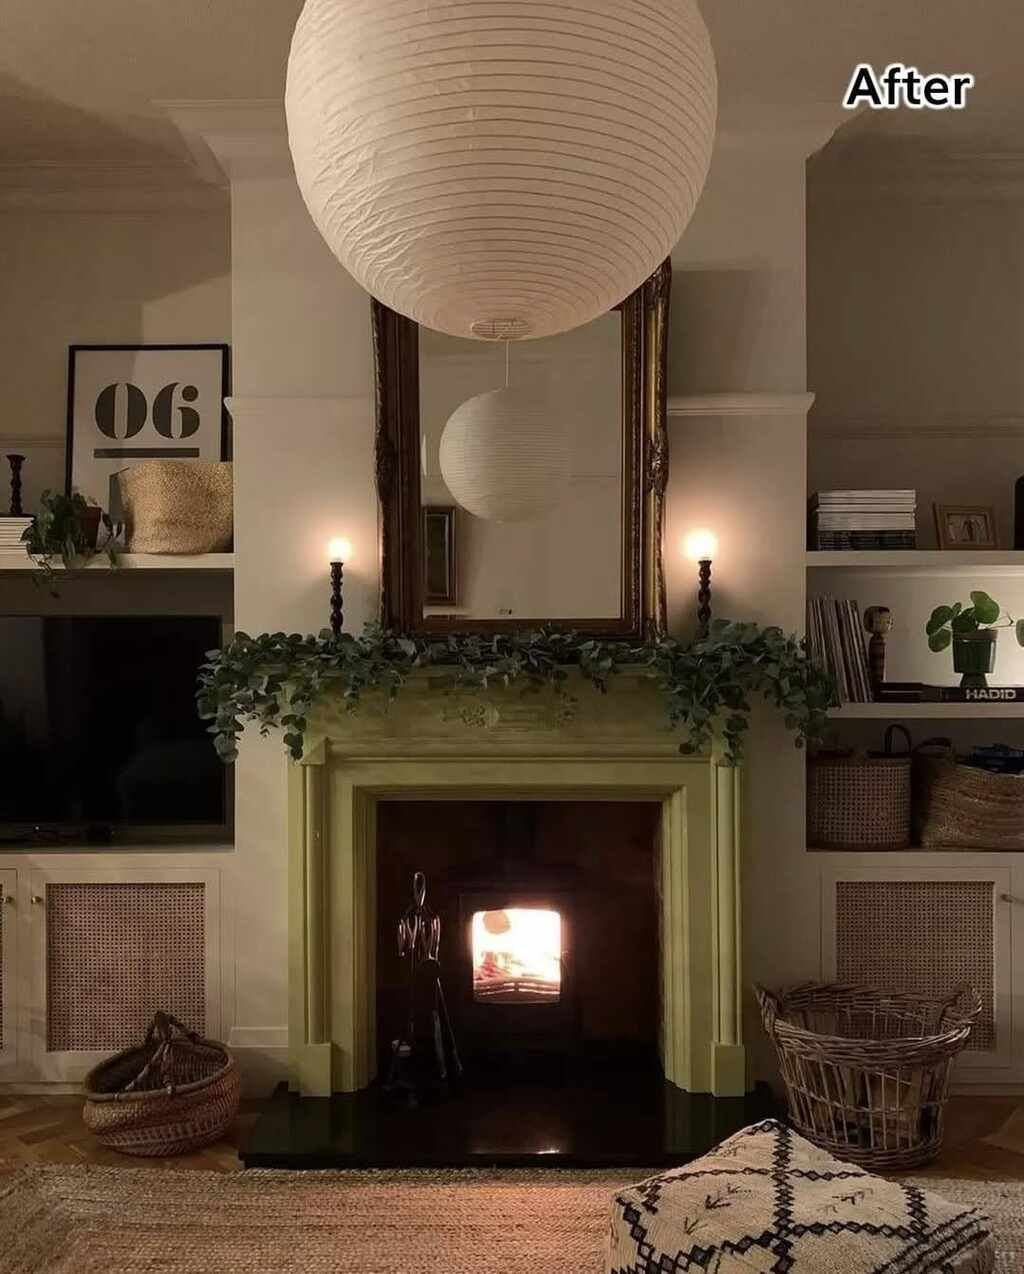
The Final Reveal
When we stepped back to admire our work, we were amazed at the transformation. The fireplace, once an overlooked feature, is now the centerpiece of our living room. The sleek tiles, rich wood tones, and polished firebox created a cohesive, inviting design.
Friends and family couldn’t stop complimenting our work. Several even asked for tips to try their own inexpensive DIY fireplace makeover! The best part was knowing we had achieved all this on a modest budget, proving that great design doesn’t have to come at a high cost.
Budget Breakdown:
- Peel-and-stick tiles: $60
- Wood stain: $15
- High-heat-resistant paint: $20
- Sandpaper and caulk: $25
- Decorative accents: $30
- Total: $150
Conclusion
This inexpensive DIY fireplace makeover was a labor of love that brought immense satisfaction and pride. It reminded us of the joy and fulfillment that come from creating something with our own hands.
Beyond just aesthetics, this project became a personal journey of resourcefulness and creativity. Every time we gather around the fireplace, we’re reminded of the effort and care that went into making it a warm, inviting space for our family and friends.
If you’re thinking about tackling a similar project, start with a clear plan, gather affordable materials, and embrace the process with patience and determination.
The end result will not only be a unique reflection of your style but also a testament to what you can achieve with a little effort and creativity. Trust me, it’s worth every moment.
FAQs
Q1. Do I use regular paint for my fireplace or high-heat-resistant paint?
No. Regular paint is not for fireplaces because it peels or discolors when exposed to extreme temperatures. High-heat-resistant paint is manufactured for these conditions. Its manufacturing ensures durability and safety.
Q2: How long does an inexpensive DIY makeover for a fireplace take?
It depends on the scope of the project. Ours took about two days, including prep and drying time. For larger makeovers, you might need a full weekend. Breaking tasks into manageable steps can also make the process less overwhelming.
Q3: Are peel-and-stick tiles durable for a fireplace surround?
Yes, as long as they are heat-resistant and applied to a clean, even surface. Adding adhesive can enhance their durability. These tiles are an excellent choice for affordability and style, providing a sophisticated look without the hassle of traditional tile installation.
Q4: What’s the best way to choose a color scheme for a fireplace makeover?
Consider the overall style and color palette of your room. Neutral colors are versatile and blend seamlessly, while bold tones can make a statement. Pair warm and cool tones for a balanced look. You can also use accent colors in the decor to tie the design together, making the fireplace stand out as a harmonious focal point.


