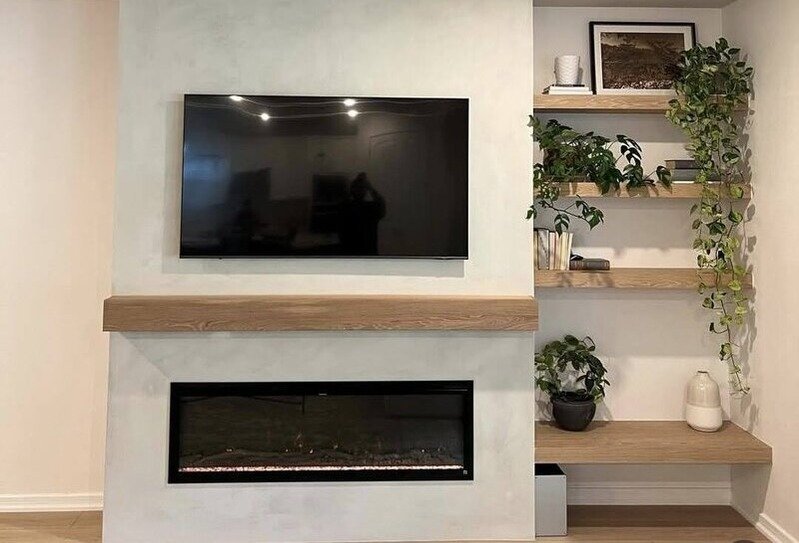
I just can’t wait to show you my latest DIY projecta beautiful fireplace surround that has completely transformed my living room into the cozy, inviting space I have always dreamed of. It was not just a focal point but something to warm and functionally add to my home.
Whether it is curling up with a book on cool evenings, hosting movie nights with friends, or just enjoying the comforting glow of the fireplace after a long day, it has already become the best favorite spot in the house.
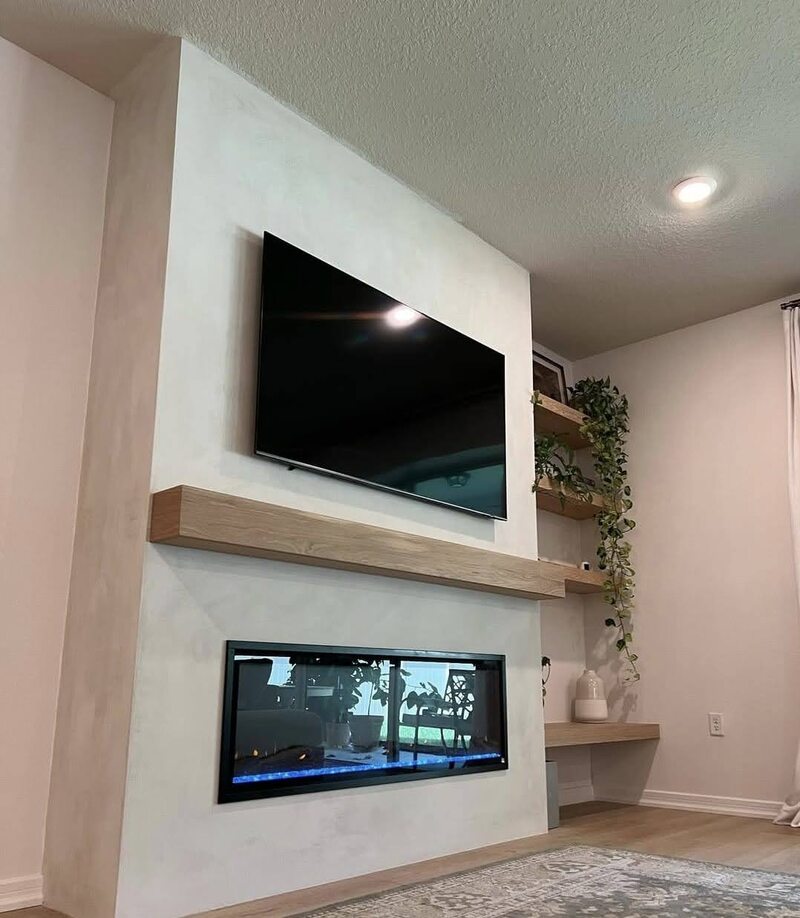
The best part? It’s not just about looksit’s practical too! From the sleek mantel perfect for seasonal dcor to the built-in TV mount that saves space, every element was carefully thought out.
I even managed to pull this off with a mix of creativity, patience, and a whole lot of learning along the way. Ready to see how I turned a bare wall into the heart of my living room? Let’s dive in!
Must-have tools and materials for a DIY fireplace
Before you can begin construction on your DIY electric fireplace, it’s important that you have the right materials and tools. Here are all of them:
Tools
- Miter saw-for cutting wood in accurate angles
- Power drill and screwdriver-in assembling the frame and setting the parts together
- Stud finder- this helps locate where the wall studs are so as to hold the frame on them
- Level and square- this ensures alignment and levelness.
- Utility knife for cutting drywall sheets with precision.
- Sandpaper to smoothen the edges and surfaces.
- Putty knife
- Safety gear gloves, goggles, and a dust mask for protection.
Materials
- 2×4 lumber
- Plywood
- Drywall sheets
- Screws
- Spackle
- Primer and paint
- Drawer slides
- Heavy-duty brackets
- Electric fireplace insert
- Wood stain or finish
Planning the Best DIY Electric Fireplace Setup
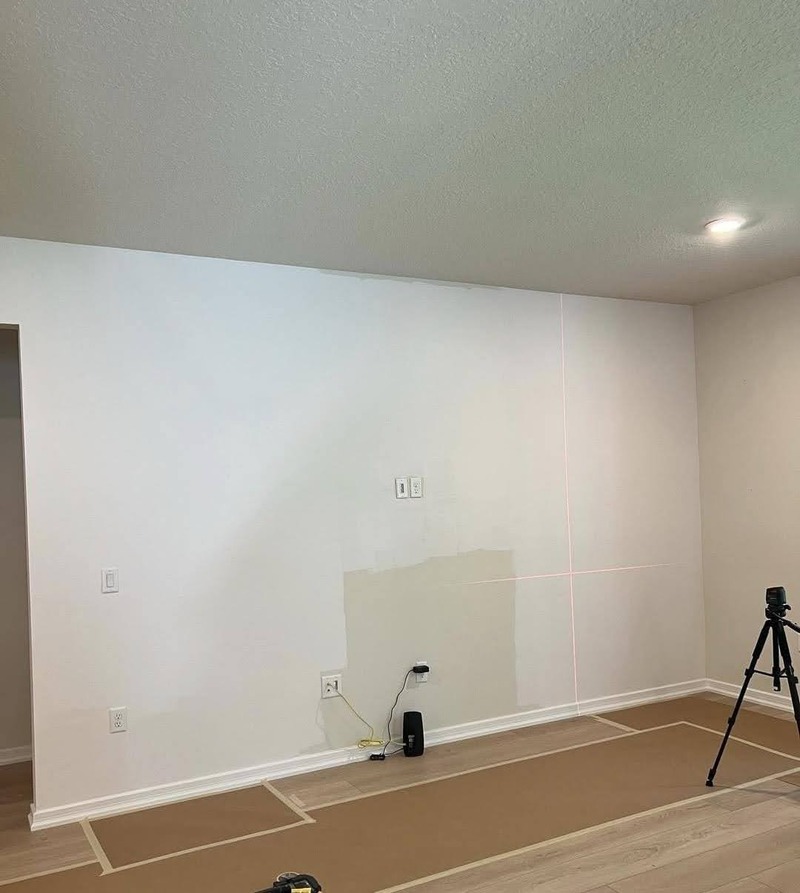
Planning is the foundation for any successful DIY project and, therefore, my electric fireplace. First, I ensured that the location was in an ideal place in the living room, close to an electric outlet.
I measured out the dimensions of the wall carefully, taking into consideration the size of the insert and the overall frame size. I chose a more modern, minimalist design, including a built-in mantel and shelves for added functionality.
A detailed sketch enabled me to visualize the look and helped me in determining the materials to be chosen. I chose light wood accents and a neutral drywall finish to complement the decor of the room.
Having a blueprint helped me to have a smooth workflow and minimize mistakes during construction.
Cutting and Preparing Lumber for the DIY Electric Fireplace Frame
Cutting lumber for a DIY fireplace frame requires precision. I started by measuring and marking each piece of 2x4s and plywood based on the dimensions in my plan.
I used the miter saw to make accurate cuts, fitting the pieces exactly into my design. For clarity and not to miss, I labeled every piece with what it belonged in.
All edges were sawed for a few minutes, avoiding splinters, and the finished pieces were assembled easily. Before cutting, double-checking all measurements prevented waste and unnecessary cuts.
This was the first crucial step that helped in preparing the lumber, so it was all ready for its assembly without any extra adjustments when installing.
Step-by-Step Assembly of the DIY Fireplace Frame
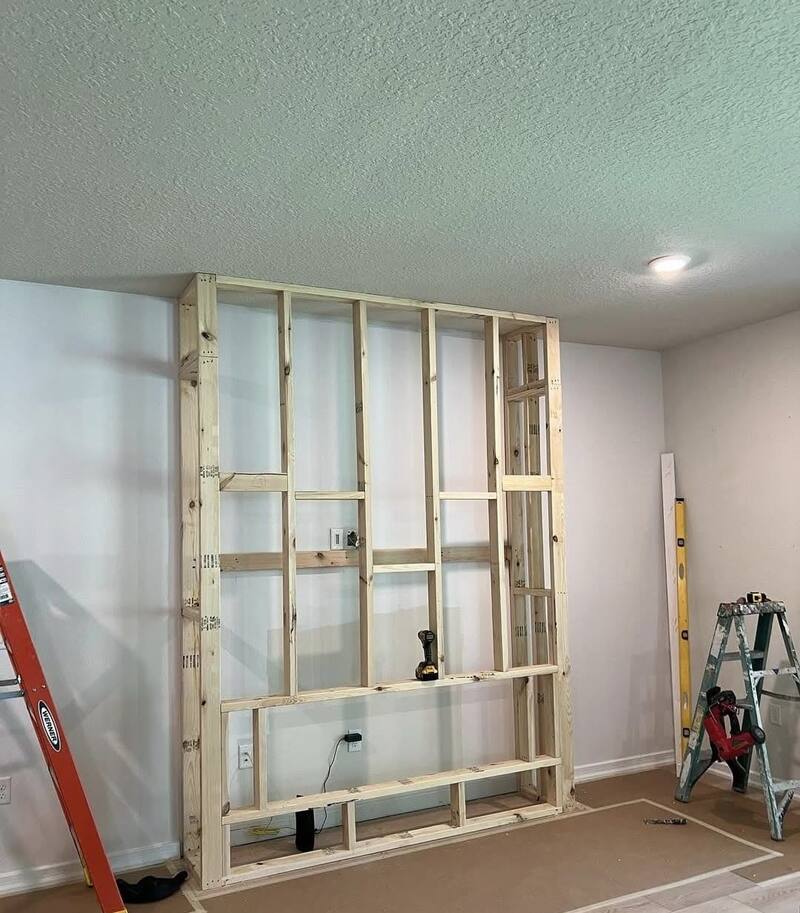
I begin building the frame by developing a solid base that helps hold the entire structure firmly. Using screws and the power drill, I mounted the base using 2x4s to assure it is level and square.
I then built the vertical supports, where I aligned them perfectly with the base and secured them further using a few screws. For more stability and for the actual definition of the sections containing the fireplace insert and shelves, horizontal cross beams were installed.
I did this a lot using my level and square to achieve perfect alignment in the building of the frame. A lot of patience and dedication were required here since it is going to be the backbone of the whole fireplace. Once done, the frame was solid and ready for the next step.
Mounting the DIY Electric Fireplace Frame Safely
Mounting the frame to the wall is a very important step to ensure stability and safety. Using a stud finder, I located the wall studs and marked them for reference.
I anchored the frame to the studs using long screws, ensuring it was firmly attached. This step stabilized the structure, also making it ready to take the load of mantel and drywall.
Repeated checks were done in terms of alignment while putting up, with changes if needed. A strong, motionless frame will keep everything steady and hold on for all the steps remaining in this project.
How to Build a Hidden Drawer for a DIY Electric Fireplace Mantel
Incorporating a hidden drawer into the mantel added both functionality and style to the DIY fireplace. I used plywood to construct the drawer, ensuring it fit seamlessly within the mantel’s design.
Drawer slides were installed on the inner frame, allowing for smooth and effortless operation. The drawer was tested multiple times to ensure it opened and closed without any issues.
This feature provided a discreet storage space for remotes, chargers, and small items to keep the living room free of clutter. The hidden drawer perfectly blended into the overall design, thus providing a practical element of the fireplace without compromising its aesthetic value.
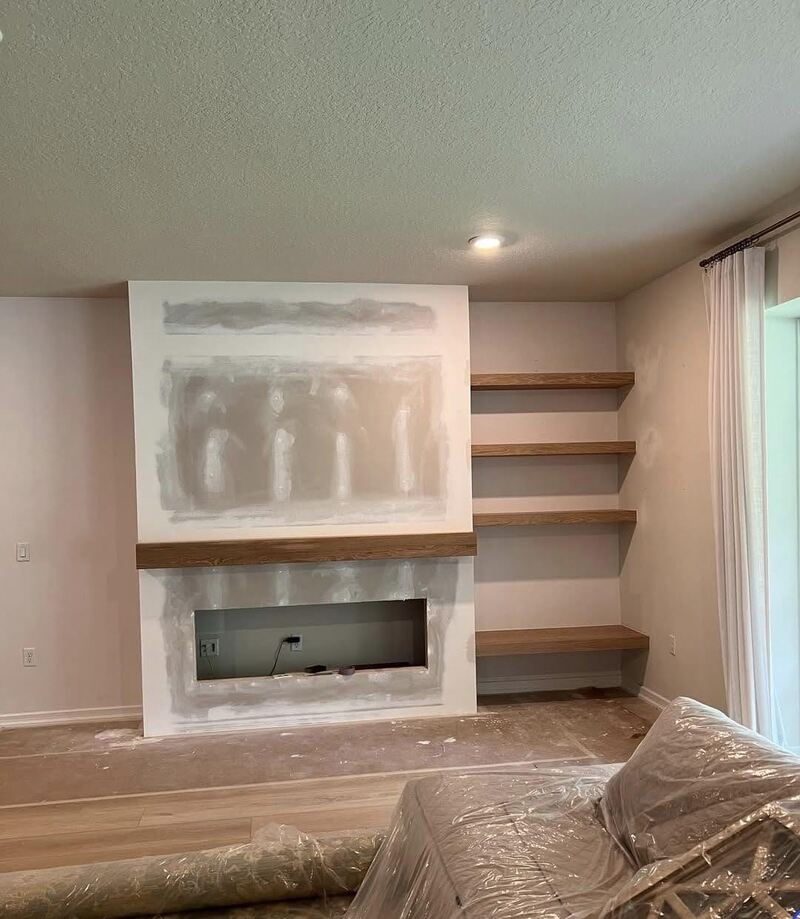
Adding Drywall to the DIY Fireplace Structure
Covering the frame with drywall provided a clean and polished appearance for the fireplace. I measured and cut drywall sheets to fit the structure precisely. A utility knife was used for accurate cuts.
Each panel was then secured to the frame using drywall screws, giving a snug fit. Careful cuts were made in the openings for the electric fireplace insert and any electrical outlets.
This step needed patience and precision to obtain a professional finish. The drywall created a smooth surface that can be primed and painted, thus transforming the frame into a well-coordinated and aesthetically beautiful structure.
Making the DIY Fireplace Flawless Using Spackle and Sanding
Spackling and sanding is the secret to achieving a flawless finish on the drywall. I applied spackle to all seams, screw holes, and corners using a putty knife to spread it evenly.
I let the spackle dry and then sanded the surface with fine-grit sandpaper to give it a smooth, even texture. The process was repeated until the imperfections were all eliminated.
Corner bead strips added to the edges gave a sharp, clean line to the fireplace. This ensures that it will look professionally built and ready for any final touches.
Priming and Painting the DIY Electric Fireplace
The next step would be to prime the drywall in preparation for painting. I used a top-grade primer to ensure full coverage and seal the surface.
After the primer was dry, I painted the fireplace in a soft neutral color that matched my decor in the living room. For large areas, a roller was used, but a brush was used on edges and corners.
Multiple thin coats of paint gave a very durable and flawless finish. The painting brought the design to life, making the DIY fireplace a stunning focal point in the room.
Attaching the Mantel and Hidden Drawer to the DIY Fireplace
The mantel was attached to the frame using heavy-duty brackets and screws, ensuring it was secure and level. I installed the hidden drawer and fitted it smoothly into place due to the pre-fitted drawer slides.
I stained the mantel so that it would have the grain of the wood show and thus warm and characterize the design. This step finished the upper portion of the fireplace with the union of practicality and elegance.
The mantel and drawer became a great stand-alone feature for enhancing the aesthetic and functionality of the DIY electric fireplace.
Final Steps: Installing and Testing Your DIY Electric Fireplace
The final step involved installing the electric fireplace insert into the prepared opening. I carefully followed the manufacturer’s instructions, ensuring that all electrical connections were safe and secure.
Once it was plugged in, I tested the fireplace, adjusting the flame and heat settings to achieve the desired ambiance. The realistic flames added warmth and charm to the living room, completing the project.
A TV mounted above the fireplace created a cozy entertainment nook, making the DIY electric fireplace the perfect centerpiece for my home.
FAQs About DIY Electric Fireplace Projects
What Are the Benefits of a DIY Fireplace?
For me, the best part of building a DIY fireplace was the ability to design it exactly how I wanted. I didn’t have to compromise on style or settle for a generic store-bought version.
Plus, it was much more affordable than hiring someone to do it, which really helped with my budget.
How Long Does It Take to Build a DIY Electric Fireplace?
When I got started, I didn’t really know how long it was going to take, but for me, it took just about two weekends. Planning, gathering materials, and building it step by step were all part of it.
The time frame really varies with the complexity of design and your experience with do-it-yourself projects.
What Do I Need to Keep in Mind Before Starting?
Before I got started, I made sure that I had all the necessary tools, enough materials, and a clear plan for the design. Measuring everything correctly was key because even a small mistake could throw things off.
Safety was also my top priority, especially when it came to handling the electrical components. My advice? Don’t rushdouble-checking your work saves so much time in the long run!
Can I Customize the Design Further?
Absolutely! That was the most favorite part of this project. I added some shelves on the sides for built-in storage and even added some LED lights to make it cozy and modern-looking. You can be simple, or you can get really elaborate with paint, tiles, or even decorative trim to totally transform the look.


