
Have you ever imagined having a piers and beam foundation for your project as if professionally done without much of going to the professionals? A great DIY, this is it.
Essentially, it implies creating the vertical piers and a horizontal beam such that to create a supportive base as a foundation so that an elevated structure with a substantial base is in place; this is suitable in rough terrain areas due to an increased risk from water attacks and in moist environments, generally.
It’s not only functional but also a journey of learning and craftsmanship. With a DIY pier and beam foundation design, you’ll be able to save money, get hands-on experience, and create something tailored specifically to your needs.
From building a small shed or a tiny house to an addition to your home, this guide will take you through every step. Let’s get started!
Benefits of Building a Pier and Beam Foundation Yourself
When you do a DIY pier and beam foundation design, you open up many more benefits than just saving on cost. First, you are free to customize the design to your specific requirements.
For example, you can adapt the structure to accommodate uneven terrain or create additional crawl space for storage or utilities. The most important advantage is the experience gained while learning.
This enables you to gain good construction skills in your foundation that can be applied to further projects. You are able to source materials that have a low environmental impact for your foundation, making your foundation more eco-friendly.
Lastly, you have a solid base for your structure and a good sense of accomplishment with a DIY pier and beam foundation design.
Step-by-Step Guide to DIY Pier and Beam Foundation Design
Plan Your Layout: Begin by producing a detailed blueprint of your foundation. Measure the dimensions of your structure and determine the exact placement of the piers.
Observe the load-bearing requirement and ensure that the piers are placed at suitable distances to bear the loads effectively.
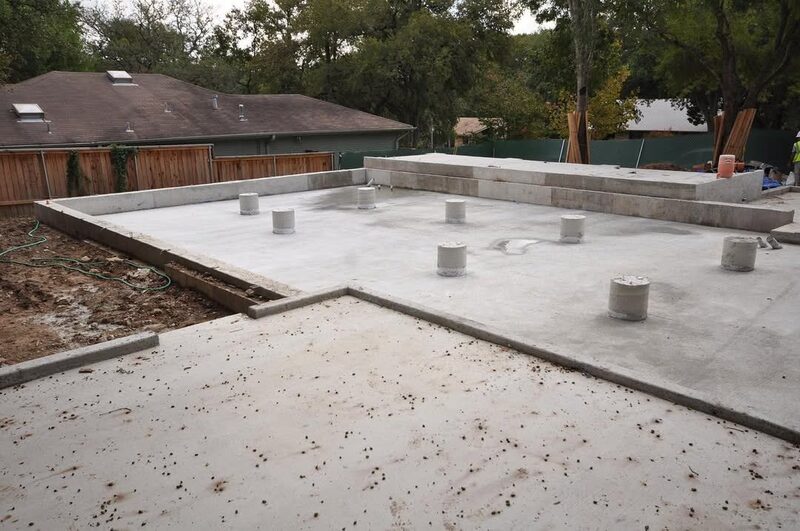
Excavate and Prepare: Use a post hole digger to make uniform holes for the piers. The depth of those holes should be determined based on local building codes as well as the nature of the soil on your site. For stability’s sake, make sure each hole’s bottom is level.
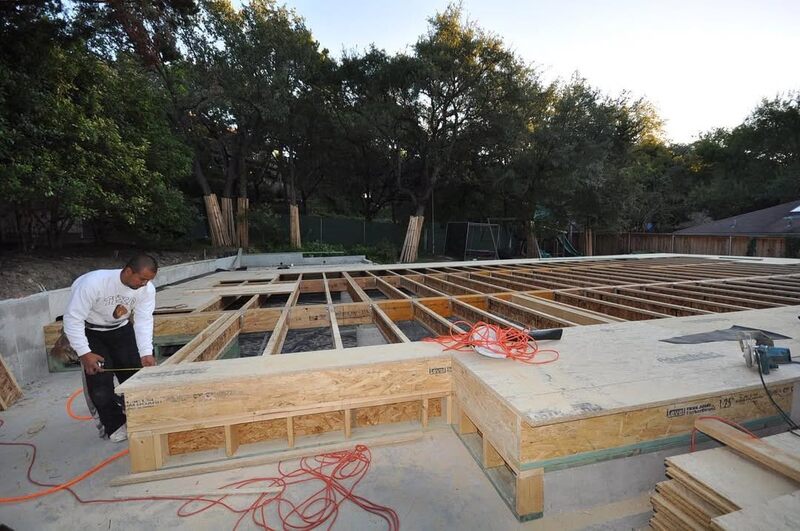
Install Piers: Pour in precast concrete or treated wooden piers into the holes. Add a layer of gravel at the bottom for drainage and pack the soil around each pier tightly to hold them in place.
Install beams: Securely fasten horizontal beams to the piers using galvanized brackets or bolts. Double-check the alignment and use a laser level to ensure the beams are perfectly horizontal.
Inspect and Finalize: Walk around the foundation, testing for stability and alignment. Make any necessary adjustments before proceeding with your construction project.
Best Materials for a DIY Pier and Beam Foundation Design
For piers, concrete precast or pressure-treating wood is recommended for durability and resistance to moisture.
Concrete piers ensure durability, while treated wood offers flexibility and is much easier to handle. For the beams, pressure-treated lumber should be used to prevent rot and insect damage.
Ensure that the wood is of the appropriate grade to support the load of your structure. Galvanized bolts, brackets, and fasteners are important to secure connections and prevent corrosion over time.
In addition, gravel or crushed stone should be used at the base of the piers to enhance drainage and minimize the chances of water-related issues.
High-quality materials may increase the upfront cost slightly, but they guarantee the durability and stability of your foundation.
How to Plan Your DIY Pier and Beam Foundation Design Project

Effective planning is the foundation of a successful DIY pier and beam foundation design. First, assess the type of soil and terrain at your site.
Conduct a soil test to determine the load-bearing capacity of the soil and make necessary adjustments to your design. Next, make a detailed blueprint including dimensions, pier placements, and material requirements.
Look into the local building codes so that your design complies with all the requirements. Budgeting should be realistic in terms of materials, tools, and unexpected expenses.
Establish a timeline for each phase of the project to keep yourself on track. Incorporate flexibility into your plan to accommodate unexpected challenges.
Top Tools Needed for a DIY Pier and Beam Foundation Design
The right tools can make or break your DIY pier and beam foundation design project. Here’s a list of essentials:
- Laser Level: Ensures precise alignment of piers and beams.
- Post Hole Digger: Helps create uniform holes for the piers.
- Circular Saw: Cuts beams to desired length with precision.
- Hammer Drill: Helps attach brackets and bolts onto the piers and beams.
- Measuring Tape: Maintains accuracy in measuring.
- Shovel: Aids in digging and filling holes.
- Wrench Set: Tightens bolts and brackets securely.
Site Preparation Tips for DIY Pier and Beam Foundation Design
It is vital that proper site preparation will help in the DIY pier and beam foundation design. Remove all the debris and clear out vegetation and anything else that would interfere with your construction process.
Get the ground leveled as flat as possible for stability purposes. Conduct a soil test to determine its composition and load-bearing capacity.
If the soil is too loose or unstable, consider compacting it or using additional support materials like gravel. Mark the exact locations for your pier holes and double-check the measurements against your blueprint.
Common Mistakes to Avoid in DIY Pier and Beam Foundation Design
Building a pier and beam is rewarding but requires attention to detail, and one of the common errors that are made is regarding pier placement. Misaligned piers can compromise the structure’s stability, so take time to ensure that using a laser level is absolutely precise.
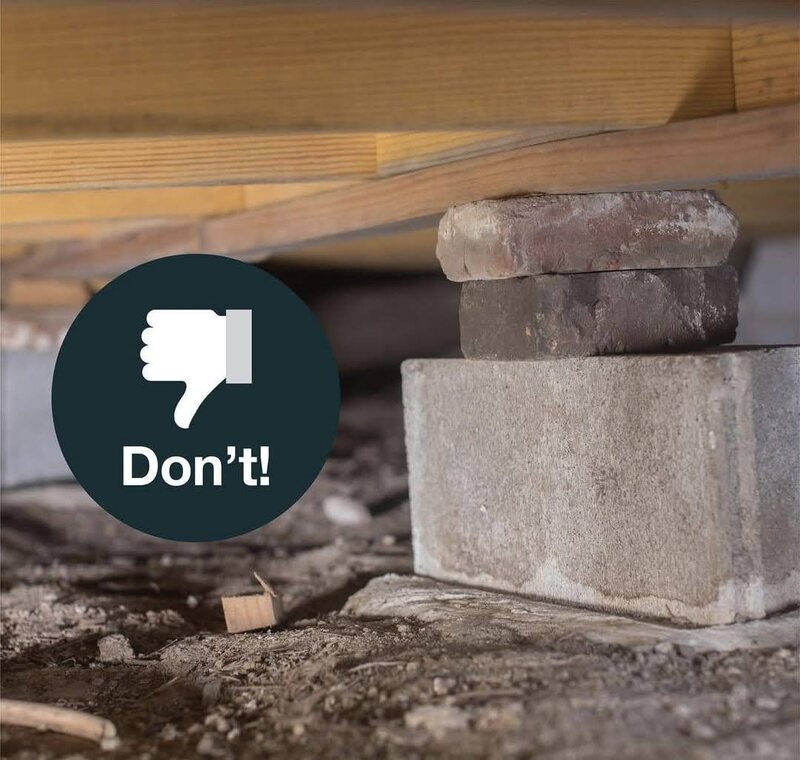
Also, always avoid using substandard material. Low-quality wood or concrete might save costs when building but can lead to premature failure, which will cost the person more in the end.
Invest in durable wood and concrete, pressure-treated materials to last longer. A more common mistake is to ignore soil preparation.
It may lead the foundation to shift over a period of time, leading to structural problems. Always conduct soil tests and then compact the ground before any installation.
Another pitfall is neglecting regular checks during the construction process. Periodic checks will let you identify and correct small problems before they become larger problems.
If these are avoided, there will surely be a result of strong, stable, and long-lasting DIY pier and beam foundation design.
How to Make Your DIY Pier and Beam Foundation Design Stable
Stability is the backbone of any successful foundation. For your DIY pier and beam foundation design to last, start by using quality, pressure-treated materials.
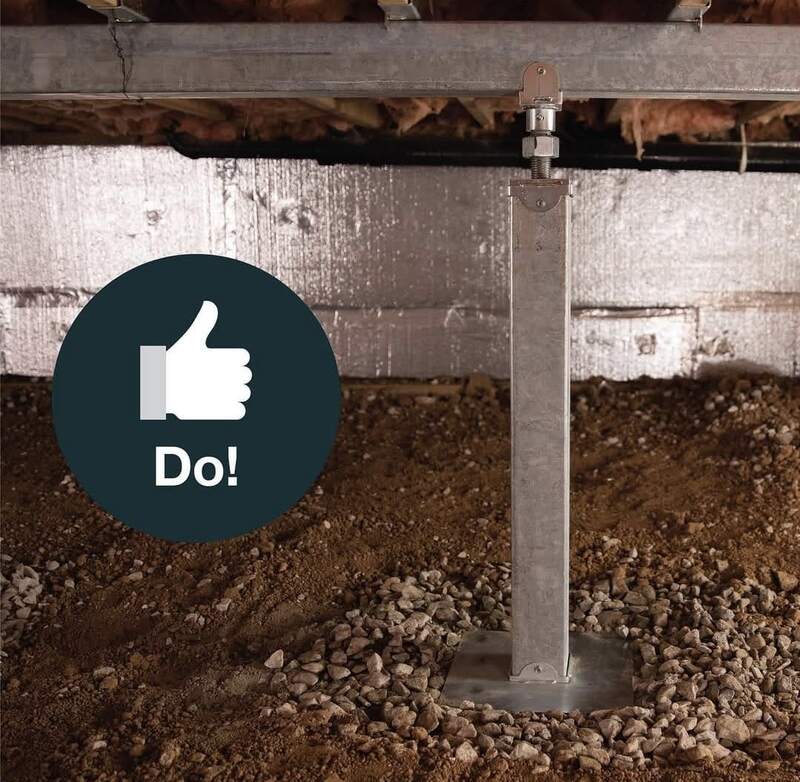
Secure piers firmly into the ground with compacted soil or concrete bases for added stability to prevent shifting from soil movement or weather changes. Ensure that the beams are reinforced with metal brackets and bolts to hold in place on the piers.
Regularly inspect during construction and after completion for any potential weaknesses or misalignments. Testing at every step allows you to make adjustments as needed.
Cost-Effective DIY Pier and Beam Foundation Design Tips
You don’t have to break the bank to build a foundation. Here are some cost-effective DIY pier and beam foundation design tips. First, source materials locally.
This will save on transportation costs and help the local economy. Reusing leftover materials from previous projects can also cut expenses while minimizing waste.
You may want to take a less complex design or one that requires fewer materials. Tools can be very expensive, so borrow, rent, or share these tools instead of buying a set.
If you’re buying tools, opt for multi-purpose ones that would be reused in the following projects. Planning your budget is crucial, and strictly sticking to it will show you that it’s very possible to have a highly quality foundation without breaking your bank.
Maintaining and Monitoring Your Self-Created Pier and Beam Foundation
Sustaining your self-crafted pier and beam design is the most important feature to the structure’s continued existence. Always inspect frequently for wear and tear damage, like cracks in piers or rot in the beams.
Secure any loosened bolts or brackets in place, and replace harmed parts quickly before they go further to waste. Perform an annual level check to ensure the foundation remains stable.
Use a laser level to identify any shifts or unevenness and make necessary adjustments. Addressing small issues early on can prevent costly repairs in the future.
Proper maintenance not only prolongs the life of your foundation but also ensures the safety and stability of the structure it supports. With consistent care, your DIY pier and beam foundation design will stand strong for years to come.
Conclusion
A DIY pier and beam foundation design project is not about making a structure but rather making the base of it strong and safe enough while learning some very useful things.
Proper planning, using the right materials, and avoiding common mistakes in creating a pier and beam will make a durable foundation customized to your needs.
With proper maintenance and regular inspections, your pier and beam foundation will stand the test of time, offering stability and functionality for decades to come.
Whether you’re constructing a cozy tiny home, a practical shed, or an addition to your property, this guide equips you with the knowledge to succeed. Dive into your project with confidence and transform your vision into reality!
DIY Pier and Beam Foundation Design: Frequently Asked Questions
Is It Possible to Have a Pier and Beam Foundation in Sloping Land?
Yes, it is possible to create a pier and beam foundation on sloping land because this kind of design actually allows for the creation of a leveled base using different heights for the piers.
See to it that the piers are adequately anchored to the ground, then double-check their alignment by making use of a laser level to achieve stability.
How Long Will a Pier and Beam Foundation Last?
When done with good materials and maintained well, a pier and beam foundation can be as long as 50 years or more. Inspections and timely repairs do extend its lifespan much further.
Do I Need to Hire a Professional for Doing a Diy Pier and Beam Foundation Design?
While you can complete this project independently, consulting a professional during the planning phase ensures your design adheres to local building codes and best practices. Their expertise can help you avoid costly mistakes and ensure long-term stability.
What Materials Work Best for a Pier and Beam Foundation?
Pressure-treated wood and pre-cast concrete are great options for piers and beams. These materials are resistant to moisture, rot, and insects, making them durable and long-lasting.
Can I Use the Old Materials for My Foundation?
Yes, reusing materials can help save costs, but only if they are in excellent condition. Do not use broken or untreated wood because this will affect the stability of the structure.


