
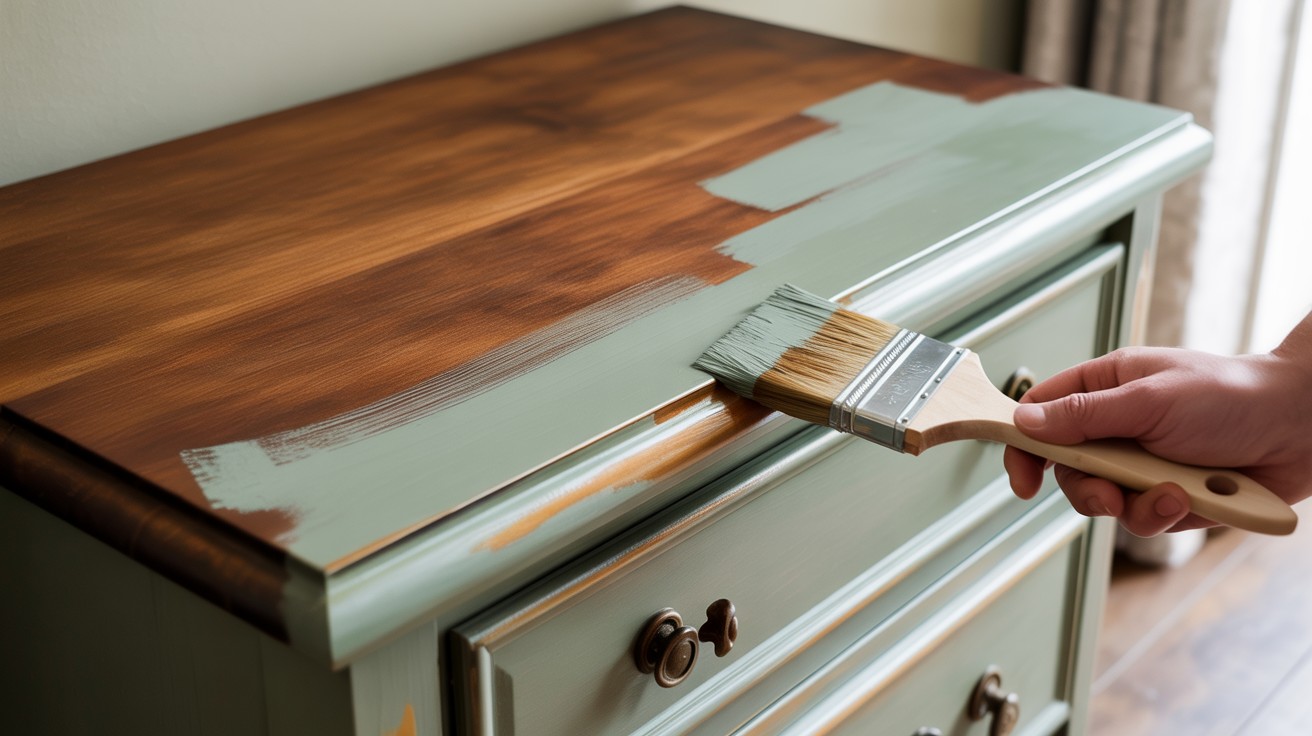
Repainting furniture, cabinets, and home décor items has become increasingly popular among DIY enthusiasts looking to refresh their spaces without breaking the bank.
However, many people find themselves facing a common challenge: how to paint over existing polyurethane finishes.
This protective coating, while excellent for durability and protection, creates a smooth, non-porous surface that typically repels paint.
The good news is that you absolutely can paint over polyurethane successfully, but only with proper preparation and the right techniques.
Understanding the correct steps and materials needed will save you time, money, and frustration while ensuring your painted project looks professional and lasts for years to come.
Understanding Polyurethane Surfaces
What Is Polyurethane?
Polyurethane is a durable, protective coating commonly applied to wood surfaces to provide long-lasting protection against wear, moisture, and daily use.
This clear or tinted finish creates a hard, glossy barrier that preserves the natural beauty of wood while extending its lifespan.
You’ll typically find polyurethane finishes on furniture pieces like dining tables and dressers, kitchen and bathroom cabinets, interior trim and moldings, and hardwood floors throughout homes.
Why It’s Tricky to Paint Over
The challenge with painting over polyurethane lies in its inherent properties. This finish creates a smooth, plastic-like surface that naturally resists adhesion from most paints and primers.
The glossy, non-porous nature of cured polyurethane prevents paint from properly bonding to the surface underneath.
Without adequate preparation, paint applied directly over polyurethane will inevitably peel, flake, or chip off within a short period, leaving you with an unsightly and unprofessional-looking result that requires complete removal and reapplication.
Do You Always Need to Sand First?
The Myth of “No Prep” Chalk Paint
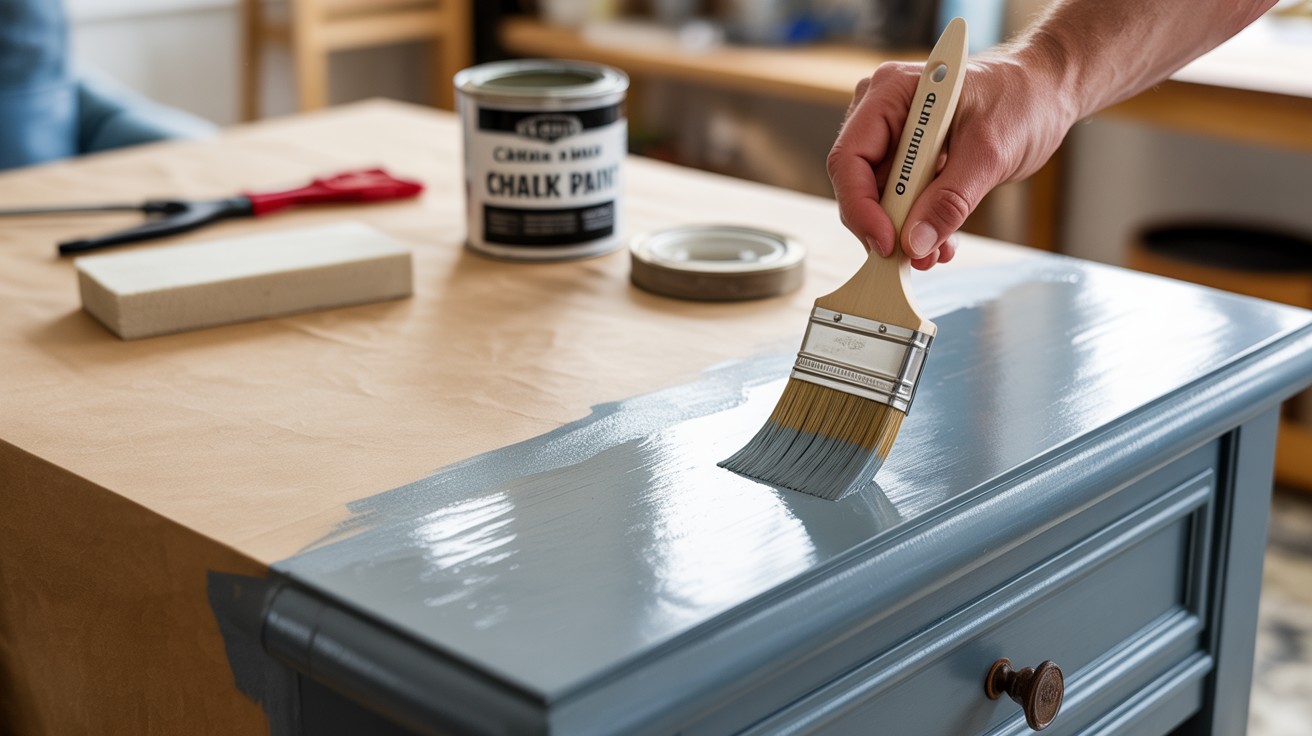
Many chalk-type paints market themselves as requiring minimal preparation, claiming they can adhere directly to almost any surface without sanding or priming.
While these specialty paints do have better adhesion properties than traditional latex or oil-based paints, the promise of zero preparation can be misleading when dealing with polyurethane finishes.
Even with chalk paint’s improved bonding capabilities, creating a secure base remains essential for long-term durability and professional results.
The unique formulation of chalk paint allows it to grip surfaces better than conventional paints, but this doesn’t eliminate the need for proper surface preparation entirely.
Risks of Painting Directly Over Slick Surfaces
Applying any paint, including chalk paint, directly over glossy polyurethane surfaces carries significant risks.
The paint may appear to adhere initially, but poor bonding will eventually cause peeling, chipping, or complete paint failure, especially in high-use areas.
Temperature changes, humidity fluctuations, and normal wear can cause improperly adhered paint to separate from the underlying polyurethane.
This results in wasted time, materials, and effort, ultimately requiring complete paint removal and proper surface preparation before repainting.
Assess the Condition: Good, Bad, or Ugly?
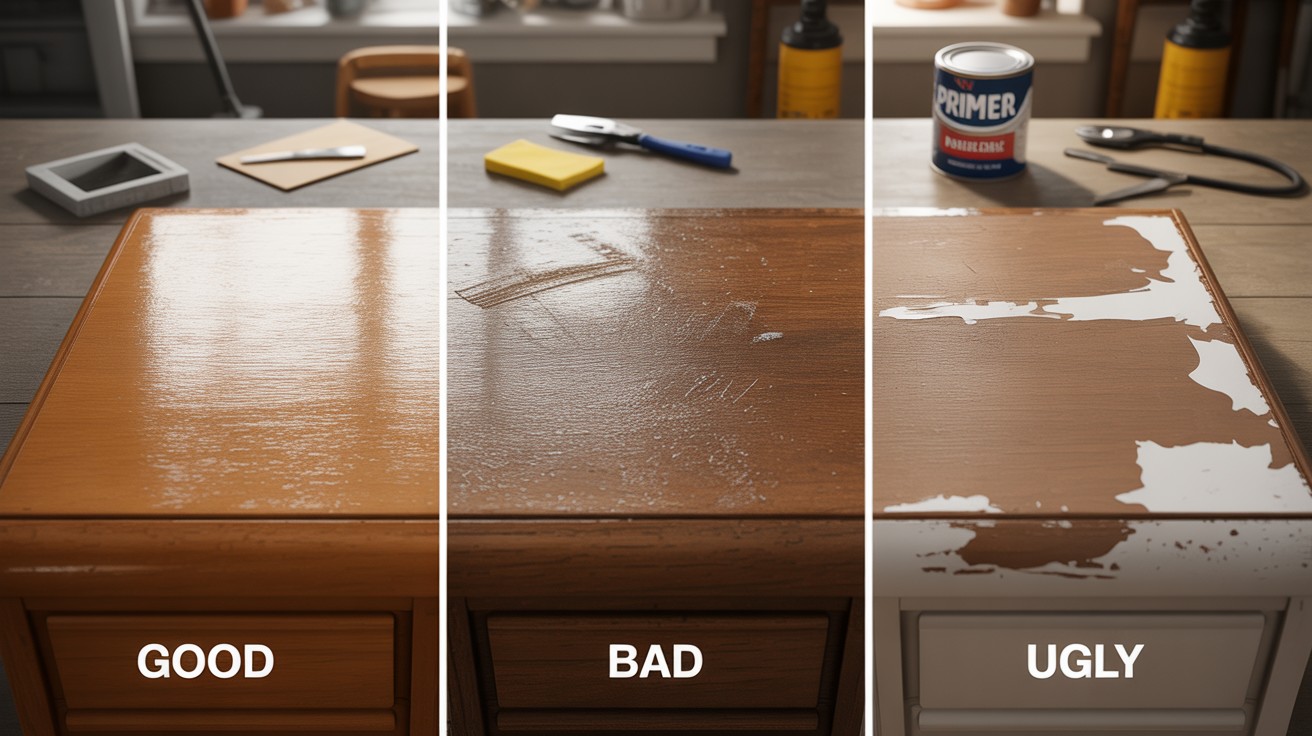
The Good: Clean, Glossy but Intact Finishes
Items that have been stored indoors with minimal damage represent the easiest scenario for repainting. These pieces typically have clean, glossy surfaces that remain structurally sound despite their age.
Steps to prep:
- Clean thoroughly with a 50/50 vinegar and water solution to remove dirt, grease, and buildup
- Rinse completely with clean water and allow to dry fully
- Perform light scuff sanding to create texture for paint adhesion
- Wipe clean with a tack cloth to remove all dust particles before painting
The Bad: Light Damage or Scratches
Pieces stored in garages, basements, or high-traffic areas often show signs of wear but remain structurally sound. These items require more intensive preparation to achieve professional results.
Steps to prep:
- Fill any deep scratches or gouges with appropriate wood filler
- Sand the entire surface using 100-120 grit sandpaper for proper adhesion
- Clean thoroughly to remove all sanding dust and debris
- Apply a high-quality primer before painting to ensure proper coverage and adhesion
The Ugly: Peeling or Flaking Finishes
When lacquer, shellac, or polyurethane finishes are actively failing, complete removal becomes necessary. These heavily damaged pieces require the most work but can be restored beautifully.
Steps to fix:
- Strip the old finish using soy-based strippers that are safer and more effective
- Scrape away loosened material and scrub detailed areas thoroughly
- Sand the entire surface smooth and repair any underlying wood damage
- Clean completely and apply appropriate primer before repainting for lasting results
Best Products and Supplies to Use

What You’ll Need
Having the right tools and materials makes all the difference between a successful paint job and a frustrating experience. Here’s your complete shopping list for painting over polyurethane surfaces.
Essential sandpaper includes both 100 and 120 grit options for different preparation stages, or you can opt for liquid sandpaper as an alternative for intricate details and hard-to-reach areas.
Wood filler becomes necessary for repairing scratches, dents, or gouges before painting.
A simple vinegar and water mixture serves as an effective, non-toxic cleaning solution that removes buildup without leaving residue.
For paint selection, chalk-type or high-adhesion paints work best over prepared polyurethane surfaces due to their superior bonding properties.
Quality primer may be required depending on your chosen paint type and the condition of your surface.
For severely damaged pieces, paint stripper becomes essential – choose soy-based options for safer application and easier cleanup.
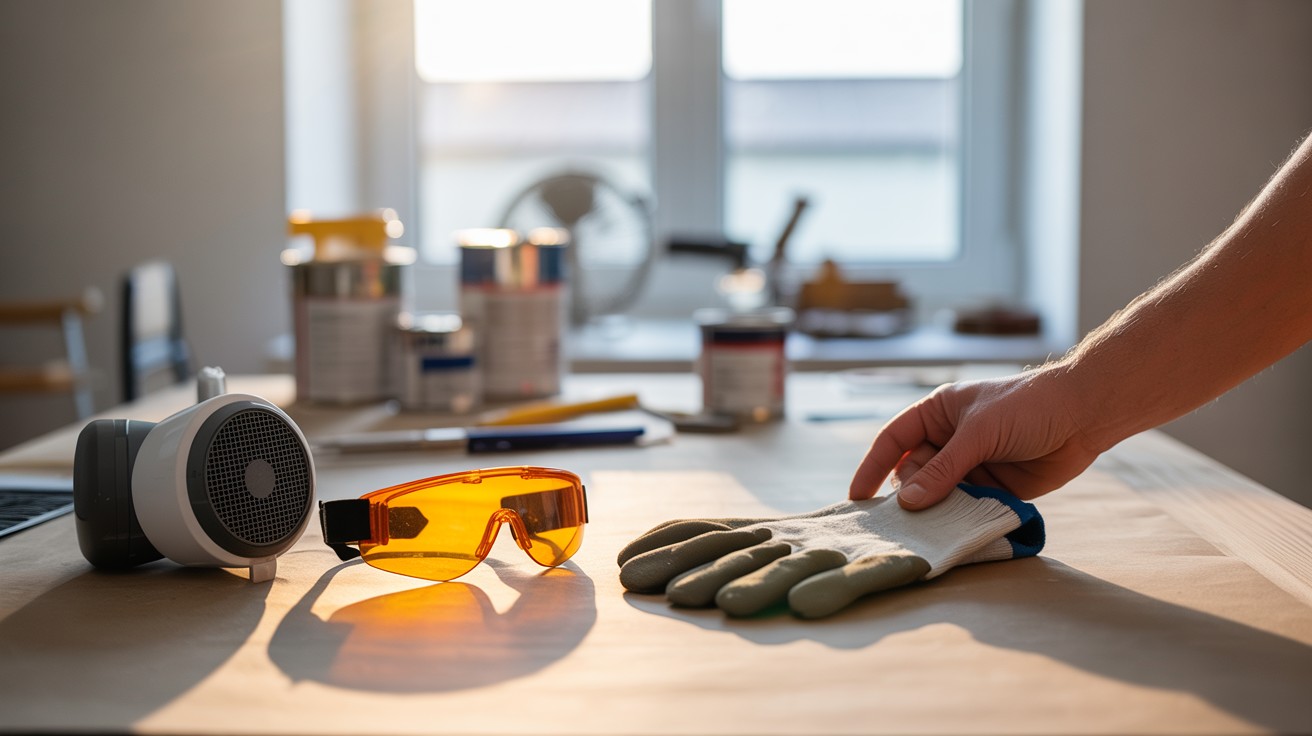
Don’t forget your application and safety supplies: high-quality brushes appropriate for your paint type, protective gloves to keep chemicals off your skin, and a safety mask to prevent inhaling dust or fumes during preparation and painting.
Proper ventilation and drop cloths will help create a safe, clean workspace for your project.
Safety Tips Before You Start
Before beginning any painting project over polyurethane, prioritizing safety protects both your health and ensures successful results.
Always work in a well-ventilated area, opening windows and using fans to circulate fresh air, especially when using chemical strippers, primers, or paints that produce fumes.
Indoor spaces without adequate airflow can cause dizziness, headaches, or respiratory irritation.
Essential protective equipment includes safety glasses to shield your eyes from dust and chemical splashes, protective gloves to prevent skin contact with harsh chemicals and solvents, and a proper dust mask or respirator to avoid inhaling particles during sanding or chemical vapors during stripping and painting.
Most importantly, always read and follow product labels and manufacturer instructions completely.
Each product has specific application requirements, drying times, and safety precautions that must be observed for both optimal results and personal safety.
Taking shortcuts with safety measures can lead to injury, poor project outcomes, or damage to your workspace.
Conclusion: Is It Worth It?
The answer is a resounding yes — you absolutely can paint over polyurethane surfaces successfully when you commit to proper preparation.
The key lies in understanding that shortcuts rarely produce lasting results, and the right approach depends entirely on assessing the current condition of your piece.
Choose your preparation method based on what you’re working with: light scuffing for intact finishes, moderate sanding for damaged surfaces, or complete stripping for failing coatings.
Each approach requires different time investments and materials, but all can produce professional-quality results when executed correctly.
Investing the time upfront to prepare surfaces properly will save you significant frustration later. Rushing through preparation or skipping essential steps often leads to paint failure, requiring you to start over completely.
Taking the methodical approach ensures your refreshed furniture, cabinets, or trim will look beautiful and last for years to come, making your DIY investment truly worthwhile.
Frequently Asked Questions
Can you paint directly over polyurethane without any preparation?
No, painting directly over polyurethane without preparation will result in poor adhesion and paint failure. Even chalk paints that claim minimal prep requirements still need some surface preparation for lasting results.
What type of paint works best over polyurethane surfaces?
Chalk-type paints and high-adhesion paints work best over properly prepared polyurethane surfaces. These specialty formulations bond better than traditional latex or oil-based paints to previously finished surfaces.
Do I always need to sand before painting over polyurethane?
Light sanding or scuffing is typically necessary to create texture for paint adhesion. For heavily damaged surfaces, more aggressive sanding or complete finish removal may be required.
How do I know if my polyurethane surface is ready for paint?
Clean, intact finishes need light scuffing, while damaged surfaces require filling and sanding. Peeling or flaking finishes must be completely stripped before repainting for proper results.
What safety precautions should I take when painting over polyurethane?
Always work in well-ventilated areas and wear protective equipment including gloves, safety glasses, and masks. Follow all manufacturer instructions on products to ensure safe application and optimal results.