
Want to build a swing fire pit but don’t know where to start? You’re in the right place.
I’ve spent years building outdoor structures for families just like yours. My plans work. They’re tested, safe, and budget-friendly.
In this guide, you’ll get:
- Two complete swing fire pit plans with step-by-step instructions
- Exact materials lists and cost breakdowns
- Pro tips that save time and money
- Safety guidelines that keep your family protected
Plan #1 costs $300-600 and fits smaller yards. Plan #2 handles bigger crowds for $500-900.
Both plans use simple tools you probably own. No advanced carpentry skills needed.
Here’s my promise: Follow these plans exactly, and you’ll have a beautiful swing fire pit that becomes your family’s favorite gathering spot.
Let’s build something amazing together.
Why Build a Swing Fire Pit?
Regular fire pits are nice. But swing fire pits? They’re game-changers.
Here’s why you need one:
Comfort meets function. No more uncomfortable chairs that hurt your back after an hour. Space-saving design. Swings take up less ground space than bulky patio furniture. All-weather entertainment. Rain or shine, your swing provides shelter and fun.
Instant conversation starter. Neighbors will ask where you got it. You’ll proudly say “I built it myself.” Boosts property value. Unique outdoor features make your home stand out.
The gentle rocking motion is oddly therapeutic too. It’s like meditation with marshmallows.
Tools & Materials You’ll Need

Before we dive into the plans, let’s gather your supplies.
Essential Tools:
- Circular saw or miter saw
- Drill with bits
- Level
- Measuring tape
- Socket wrench set
- Post hole digger
- Shovel
Safety Gear:
- Safety glasses
- Work gloves
- Dust mask
Materials for Both Plans:
- Pressure-treated lumber
- Galvanized bolts and screws
- Metal swing hardware
- Fire bricks or steel fire ring
- Gravel for drainage
- Sand for leveling
Don’t have all the tools? No problem. Most hardware stores rent them by the day.
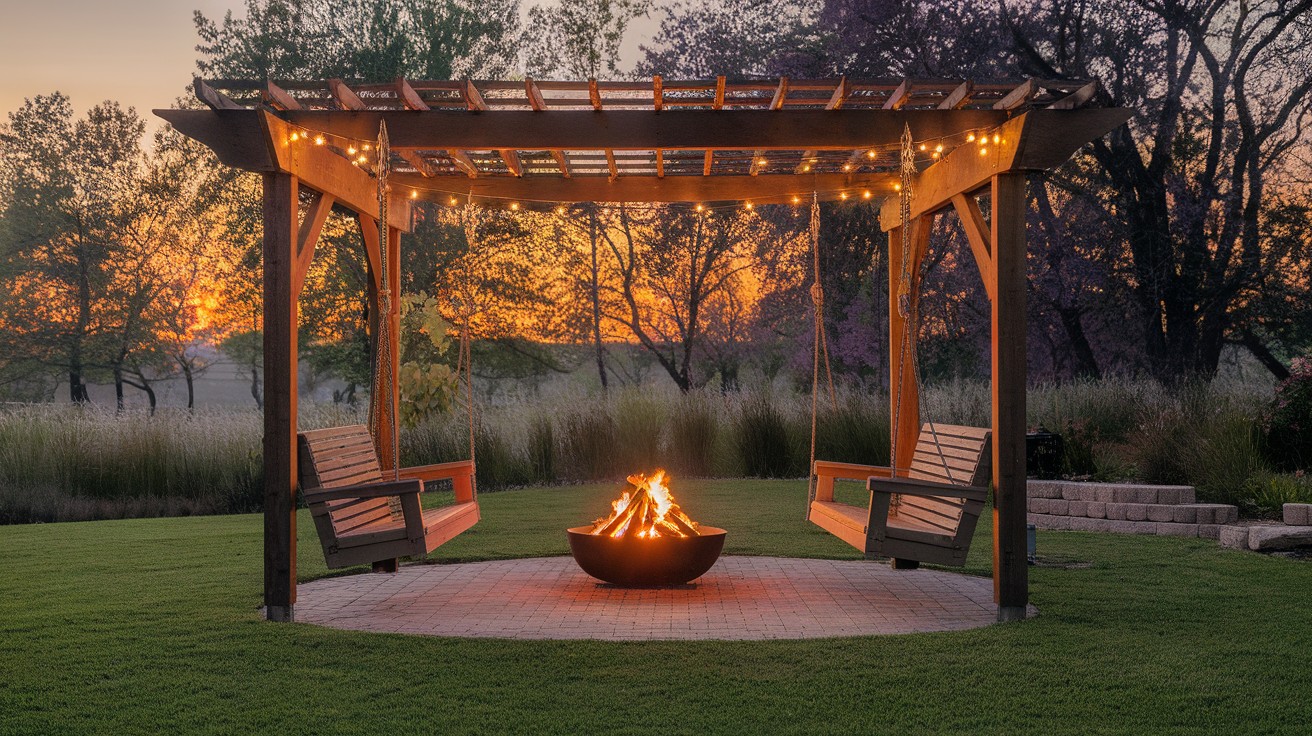
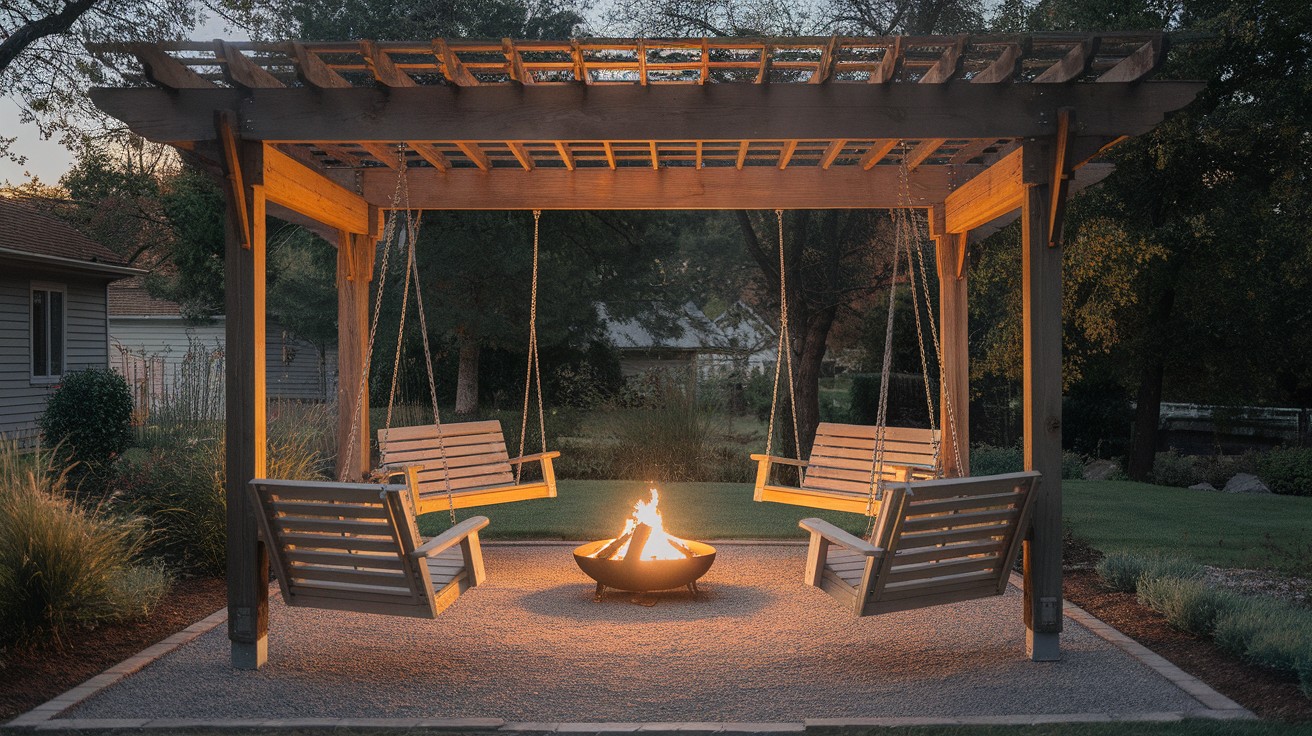
Swing Fire Pit Plan #1: Classic 4-Swing Pergola Style
Overview:
- Estimated Budget: $300–$600
- Skill Level: Intermediate DIY
- Time to Build: 1 weekend
This design gives you a cozy pergola with four swings surrounding a central fire pit.
Perfect for: Small families or intimate gatherings of 6-8 people.
Step-by-Step Guide:
Step 1: Plan Your Layout
Mark a 12×12 foot square in your yard. This gives you plenty of swing space plus safety clearance.
The fire pit goes dead center. Swings hang from the pergola corners.
Step 2: Dig Post Holes
Dig four holes at each corner. Make them 2 feet deep and 8 inches wide.
Pro tip: Call 811 before you dig. Underground utilities are no joke.
Step 3: Set the Posts
Use 4×4 pressure-treated posts, 10 feet long. Place each post in its hole. Add gravel for drainage. Use concrete mix for stability.
Keep them plumb! A crooked pergola ruins everything.
Step 4: Install Top Frame
Cut 2×8 boards for your top frame. These connect all four posts.
Use galvanized carriage bolts. Pre-drill to prevent splitting.
Step 5: Add Cross Beams
Install 2×6 cross beams every 2 feet. These give your pergola structure and style.
Use joist hangers for a clean, professional look.
Step 6: Build the Fire Pit
Dig a circular pit 3 feet across and 6 inches deep in the center.
Line with fire bricks or install a steel fire ring. Add drainage gravel underneath.
Safety first: Keep the pit at least 4 feet from any swing.
Step 7: Hang Your Swings
Install heavy-duty swing hangers rated for 400+ pounds each.
Use chain or rope rated for outdoor use. I prefer galvanized chains, it lasts forever.
Test each swing with extra weight before your first party.
Step 8: Finishing Touches
Sand all rough edges. Apply outdoor wood stain or sealant.
Add string lights for ambiance. Install a gravel border around the fire pit.
Swing Fire Pit Plan #2: Circular 6-Swing Arbor with Stone Pit
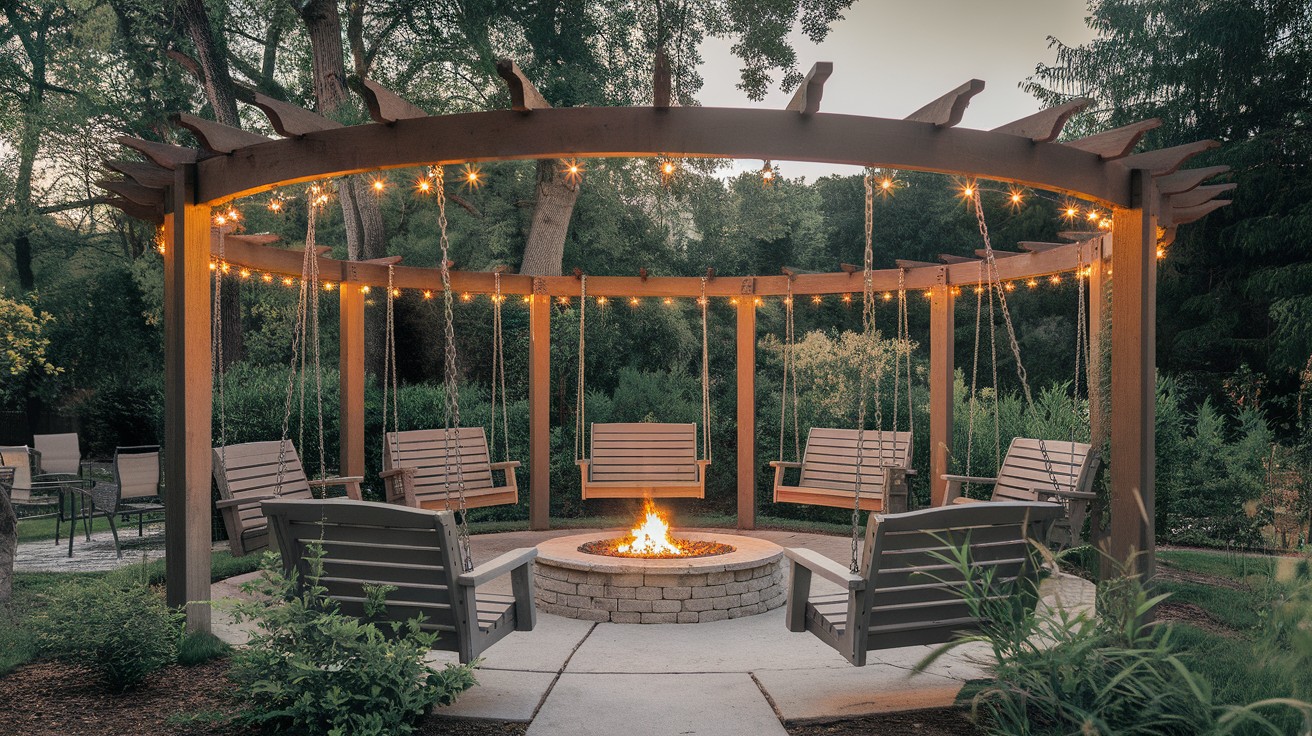
Overview:
- Estimated Budget: $500–$900
- Skill Level: Advanced DIY or team build
- Time to Build: 2 weekends
This showstopper features six swings arranged in a perfect circle around a stone fire pit.
Perfect for: Large families or those who love entertaining big groups.
Step-by-Step Guide:
Step 1: Design Your Circle
Mark a 16-foot diameter circle. The fire pit sits in the center. You’ll place six posts evenly around the outer edge. That’s one post every 60 degrees.
Math refresher: 360 degrees ÷ 6 posts = 60 degrees between each post.
Step 2: Calculate Post Positions
Use a compass or string method to mark exact post locations.
Here’s a simple trick: Use a 16-foot rope. Tie one end to a stake in the center. Walk the circle, marking posts every 8.5 feet along the circumference.
Step 3: Dig and Set Posts
Dig six holes, 2.5 feet deep and 10 inches wide.
Use 6×6 posts, 12 feet long. These need to handle more weight and wind load.
Step 4: Create the Circular Top Frame
This is the tricky part. You need to cut curved or angled pieces to connect your posts in a circle.
Option 1: Use flexible metal strapping as your top frame.
Option 2: Cut 2×10 boards at 30-degree angles to create six straight sections.
Step 5: Install Overhead Beams
Add decorative beams from each post to the center. These carry swing loads and look amazing.
Use 2×8 lumber. Cut them to meet at a center hub or decorative element.
Step 6: Build Your Stone Fire Pit
This pit needs to be special. Go big or go home. Dig a 4-foot diameter circle, 8 inches deep. Install a steel ring liner.
Build up the sides with natural stone or fire bricks. Use high-temperature mortar.
Step 7: Install Six Swing Points
Each swing needs a heavy-duty mounting point directly above. Use through-bolts with large washers. Rate each point for 500+ pounds.
Space them perfectly. Measure twice, drill once.
Step 8: Hang and Test Swings
Install all six swings with matching hardware. Use adjustable chains so you can level everything perfectly.
Test each swing individually. Then test with multiple people.
Step 9: Professional Finishing
This build deserves professional touches:
- Weather-resistant stain in a rich color
- Decorative stone pathway to the pit
- Landscape lighting under the arbor
- Fire-resistant mulch around the base
Tips for Customizing Your Swing Fire Pit
Make it yours. These plans are starting points, not rules.
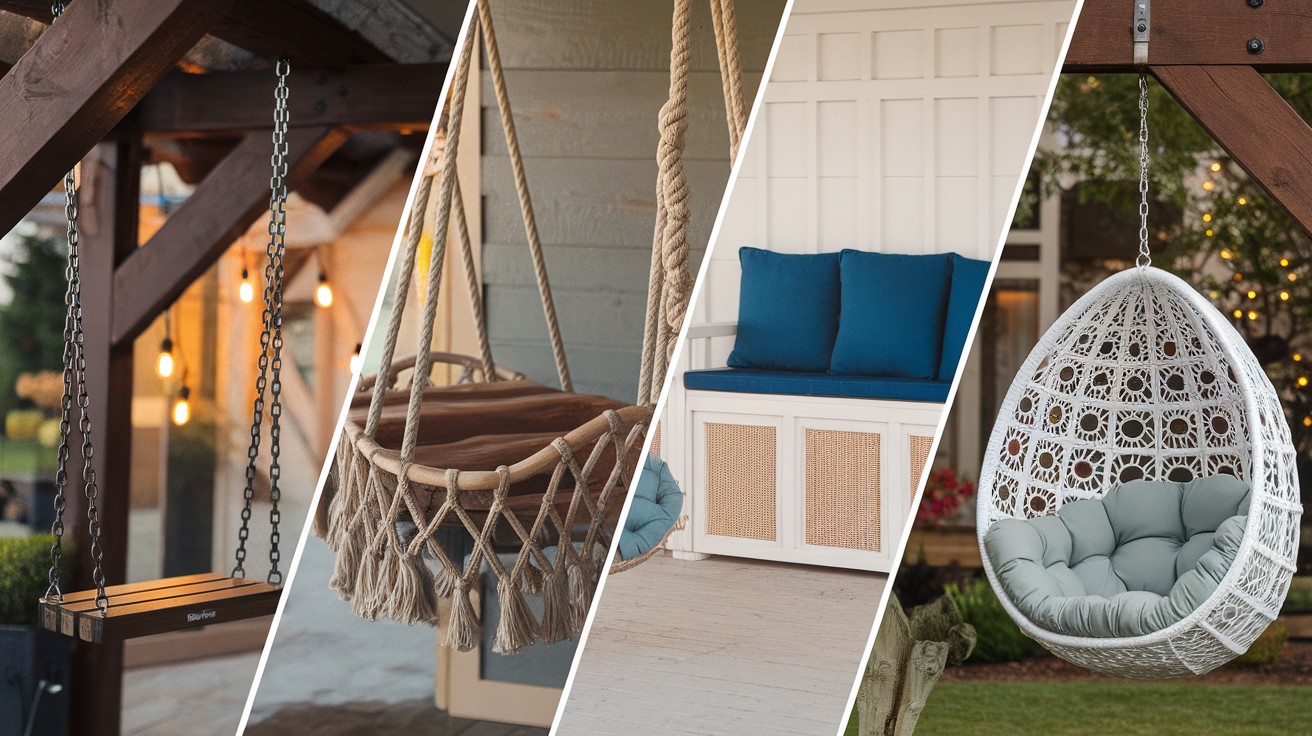
Choose your swing style carefully. Traditional chain swings offer durability and easy maintenance. Rope swings create a rustic camping feel that kids love. Cushioned porch swings provide maximum comfort but need weather protection during storms. Hanging egg chairs bring a modern touch that impresses guests.
Fire pit fuel makes a huge difference. Gas systems offer convenience with instant on-off control and no cleanup. Wood burning gives you authentic crackling sounds and that classic campfire smell. Propane provides controlled flames that are perfect for windy areas. Bio-ethanol burns clean with no smoke, making it ideal for covered spaces.
Weather protection extends your season. Adding a retractable canopy lets you use the space during light rain. Installing windscreens between posts blocks cold breezes and creates intimacy. Consider building a partial roof over seating areas for year-round comfort without blocking the open sky feeling.
Lighting sets the perfect mood. Solar string lights require no wiring and automatically turn on at dusk. LED strip lights mounted under the frame create dramatic lighting effects. Tiki torches placed around the perimeter add tropical ambiance and extra warmth. Additional fire bowls scattered nearby multiply the magical flickering light.
Comfort upgrades make all the difference. Weather-resistant cushions turn basic swings into luxury seating. Swing-mounted cup holders keep drinks secure during gentle rocking. Built-in storage benches hide blankets and supplies while providing extra seating. Outdoor blanket storage keeps cozy throws dry and ready for chilly nights.
Safety Reminders
Fire safety is non-negotiable. Keep a fire extinguisher nearby. Have a garden hose ready. Never leave fires unattended.
Swing safety matters too.
Inspect hardware monthly. Replace worn chains immediately. Set weight limits and stick to them.
Local codes vary. Check with your city about fire pit regulations and building permits.
Conclusion
You now have everything needed to build your dream swing fire pit. Plan #1 creates cozy family moments for $300-600. Plan #2 handles big gatherings for $500-900.
Both use simple tools and clear instructions. No guesswork involved.
Here’s what happens next:
- Pick the plan that fits your space and budget
- Gather materials this week
- Start building this weekend
- Enjoy your new backyard centerpiece for years
Don’t overthink it. These plans work for beginners and experts alike. The hardest part? Choosing which plan to build first.
Your family deserves this upgrade. Stop dreaming and start building. Six months from now, you’ll be swaying by warm flames, grateful you took action today.
Build it. Use it. Love it.
Frequently Asked Questions
How far should swings be from the fire pit?
Keep swings at least 4 feet away from any fire pit edge. This prevents accidents and gives everyone safe exit space.
Can I use regular outdoor swings for this project?
Yes, but make sure they’re rated for 400+ pounds each. Heavy-duty porch swings work best and last longer than lightweight options.
What’s the biggest mistake people make building these?
Skipping the foundation work. Wobbly posts ruin everything. Take time to dig proper holes and use concrete for stability.
Do these fire pits work in winter?
Absolutely! Fire pits actually work better in cold weather. Just remove fabric cushions and store them inside during harsh conditions.
How do I maintain my swing fire pit long-term?
Inspect swing hardware monthly and apply wood stain yearly. Replace any rusty bolts immediately and keep the fire pit clean of debris.